AI Agents, Prompts, Guardrails and Conversational AI in Amazon Connect Customer
The contact center is rapidly evolving from scripted automation into intelligent orchestration powered by Generative AI.
What was once called Amazon Connect has evolved into a much broader AI-enabled customer engagement platform now positioned as Amazon Connect Customer — introducing a new generation of:
- Conversational AI
- AI Agents
- Prompt Engineering
- Guardrails
- Workflow Orchestration
- AI-driven self service
For many organizations, this represents a fundamental shift in how customer service systems are designed, implemented, and managed.
The Shift from “AI for Answers” to “AI for Action”
Traditional self-service systems focused primarily on information retrieval.
The customer asked a question.
The system searched a knowledge base.
An answer was returned.
This is what we call:
AI for Answers
Examples include:
- Store hours
- Billing questions
- Password reset instructions
- Product information
- FAQ automation
While valuable, these systems are largely informational.
The next evolution is dramatically more powerful.
AI for Action
Modern AI Agents can now:
- Collect information from the caller
- Understand intent and operational urgency
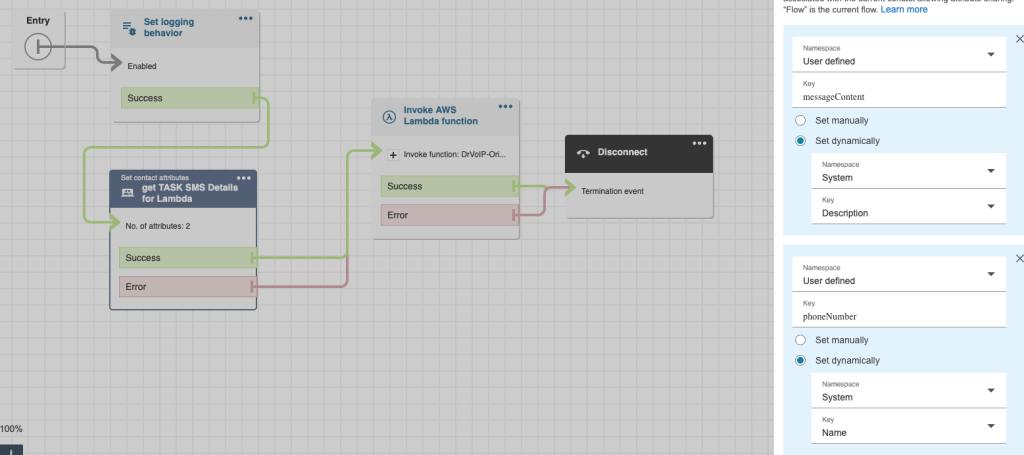
- Execute workflows
- Trigger automations
- Integrate with enterprise systems
- Escalate intelligently
- Create tickets
- Send SMS alerts
- Schedule callbacks
- Update CRM systems
- Orchestrate after-hours support
The AI is no longer simply answering questions.
It is taking action on behalf of the customer.
That changes everything.
Conversational AI Is No Longer Just a Chatbot
The newest Amazon Connect capabilities introduce AI Agents that can behave more like operational assistants than traditional IVR systems.
These systems combine:
- Natural language understanding
- Retrieval Augmented Generation (RAG)
- Prompt Engineering
- AI Guardrails
- Workflow orchestration
- Tool usage
- Business logic integration
- Real-time decision making
This creates customer interactions that feel dramatically more natural and effective.
Instead of:
“Press 1 for Support.”
Customers can simply say:
“I’m having an outage and need after-hours support.”
The AI Agent can:
- Determine urgency
- Collect required information
- Notify an on-call engineer
- Create a support ticket
- Escalate appropriately
- Confirm actions back to the customer
All automatically.
Why Prompt Engineering and Guardrails Matter
This is where many organizations underestimate the complexity of enterprise AI deployment.
An AI Agent is only as effective as:
- Its prompts
- Its instructions
- Its tool configuration
- Its security boundaries
- Its operational guardrails
Prompt Engineering defines:
- Agent identity
- Personality and tone
- Allowed behavior
- Escalation boundaries
- Workflow procedures
- Compliance restrictions
- Response formatting
- Operational goals
Guardrails define:
- What the AI may or may not do
- Security boundaries
- Compliance protections
- Risk controls
- Escalation triggers
- Human handoff conditions
Without proper prompt architecture and guardrail design, AI systems can quickly become unreliable, inconsistent, or operationally risky.
Why This Requires Specialized Expertise
Many organizations assume AI deployment is simply an extension of existing IT or contact center operations.
In reality, enterprise Generative AI implementation requires expertise in:
- Conversational AI design
- Large Language Models (LLMs)
- Prompt Engineering
- AI orchestration
- Retrieval systems
- AWS cloud architecture
- Amazon Connect workflows
- Knowledge management
- Security and governance
- Integration engineering
This is a new technical discipline.
Organizations deploying AI Agents successfully are increasingly relying on Certified Generative AI Developers with real-world implementation experience.
How DrVoIP Helps
At DrVoIP, we specialize in helping organizations implement practical enterprise AI solutions using AWS technologies including Amazon Connect.
Our focus includes:
- AI for Answers
- AI for Action
- Conversational AI Agents
- Prompt Engineering
- Guardrail architecture
- Contact center automation
- Amazon Connect integrations
- Knowledge-base driven support
- After-hours AI orchestration
- Human escalation workflows
We help organizations move beyond basic chatbots toward intelligent operational AI systems that improve customer experience while reducing operational overhead.
The Future of Customer Engagement
The contact center is becoming an AI orchestration platform.
The winners will not simply deploy AI.
They will deploy AI safely, intelligently, and operationally.
That requires the right architecture, the right strategy, and the right implementation expertise.
The future is not just smarter conversations.
It is smarter outcomes.
To learn more about implementing AI for Answers and AI for Action in your organization, visit: