How can an Agent Originate an SMS message in Amazon Connect ! – Part 2 Routing the Return Message

SMS Return Message Routing

In part 1 of this blog we looked at three options that enable an Agent to make originate an SMS message:

  • Option 1 – User a TASK Template
  • Option 2 – Create an HTML Form
  • Option 3 – Create an Email to SMS solution

As it relates to being able to route a return message back to the Agent that created the message, there are some real problems with Option 1 and Option 2.

Option 1 Task Template launches Contact Flow

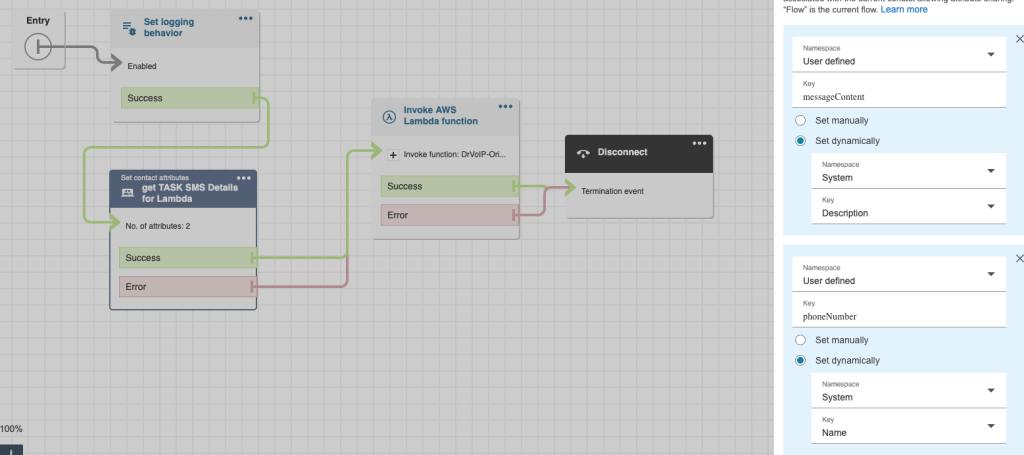
The TASK solution gets the Origination SMS job done and works just fine.  The Contact Flow the TASK points to contains an invoke Lambda that sends the messageContent and phoneNumber on to Pinpoint SMS.  There is no real way however, to capture the Agent that initialized the Task.   We tried writing the phoneNumber and TaskID along with a timestamp to a dynamoDB table, then invoking another lambda to look up the phoneNumber it in an inbound contact flow, but it was just ugly.  How many lambda’s does it take to route a message?  You need someway to ID the Agent so you can “set working queue” by agent and get the incoming return message routed accordingly.   Given that custom fields (as of this blog) can not be passed as a contact attribute, there was not way to add the Agent ID to the Task Template.
Another major challenge is that the CHAT API used by SMS (and chat for that matter) does not support Contact Attributes.   Let us assume you want to ask the customer to enter the order number so you can look up the status.  They might provide that number, but there is no way to extract that data and assign it to a Contact Attribute for further processing later in the contact flow.

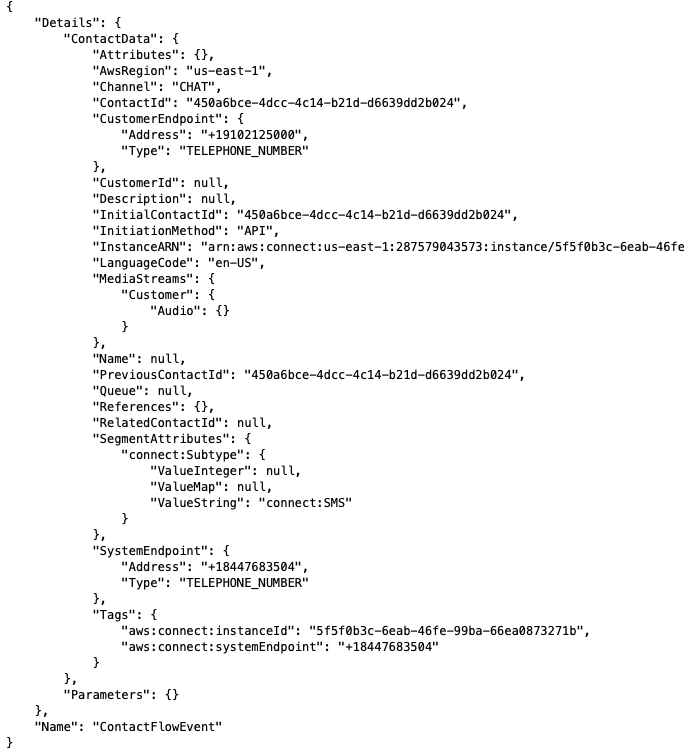
We learned that you can extract the incoming EVENT when it hits the Contact Flow attached to the Pinpoint SMS number in your instance.   In fact we regularly do that just to make sure that documentation that describes the EVENT is correct.  In this example we want to grab the incoming phone number so we can look it up in the scratch pad dynamoDB table created for this purpose.

Invoke this simple python Lambda as the first block in your contact flow and you will get the details you need to extract the senders phone number.
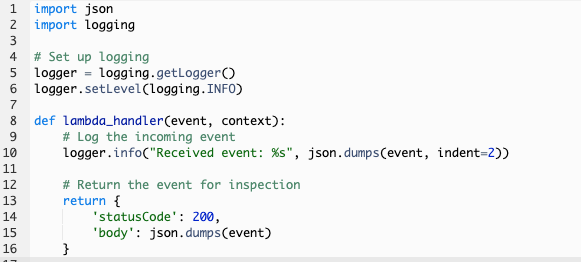
PrintEvent Lambda

Note in details that this SMS came in as a CHAT channel, though he Segment Attribute is channel:SMS.   We can get the customer endpoint and use that to set a Contact Attribute, but not much else of use here! The ContactId and the InitialContactId are the same.
Enter Option 2 (Static s# website to launch HTML form)

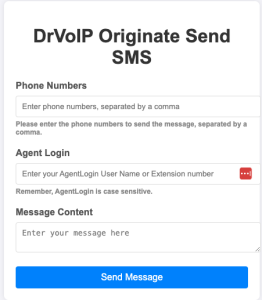
The benefit of popping an HTML form is that you can prompt the Agent to enter something to identify themselves.  This would enable you to write the phoneNumber, AgentId and timestamp to a dynamoDB table for later processing.  On the inbound handler we could grab the phoneNumber, look it up in the database and grab whatever it was that you were using for an AgentID.   This might be the AgentLogIn or User Name or even an “extensionNumber”.  There would be yet another dynamoDB table that mapped AgentId to the Agents Name or ARN, either of which can be used to “Set Working Queue by Agent”.

Enter option 3 Email to SMS

In this option we want to use email to launch the SMS handler using the configuration provided in Part 1.   The thinking here was to use SNS rather to trigger a Lambda rather than Invoking  Lambda from inside a contact flow triggered by the Chat API.  Do not connect the SMS phone number direct;y to the Instance.  We created two SMS handlers: one inbound Lambda to handle either an SMS that did not ordinate by an Agent.  it could also handle a return message originated by an Agent.

Email Outbound

Using the email client we were able to launch an outbound lambda that would be able to parse the message and write the From (i.e. Agent ID), Subject (i.e. target recipient phone number)and a times stamp  to a dynamoDB table.  No need to log the message content, we would pass all the variables off to the Pinpoint SMS number.

SMS Inbound

The inbound SMS triggered the lambda which would use the phone number to index the dynamoDB table and bring back the AgentId.  It might be necessary to use the AgentId to look up the Agent Name or ARN, but the result was much cleaner and seemed to work just fine!   With the AgentId we were  If there was no matching number in the database then the message was treated as a new incoming SMS and routed to the default workgroup set in the contact flow.

TTL

We needed a ‘garbage collector’ that could go into Dynamodb and clean out any entries that had a time stamp that exceeded whatever we set as the Time To Live (TTL) value.

How can an Agent Originate an SMS message in Amazon Connect !

Pinpoint SMS

For some time now, you have been able to channel SMS messages through the Amazon Connect CHAT API, using Pinpoint services.  Typically, you would create a new project, enable SMS and then use SNS to trigger a lambda function to handle your SMS conversation.  Most recently, AWS has created Pinpoint SMS, a dashboard that enables you to directly integrate SMS services into your Amazon Connect instance, appearing like any other phone number.   This enables you to capture an SMS event directly to a contact flow eliminating the need to use SNS.

How to Originate an SMS in Amazon Connect?

Getting an inbound SMS message into the call center and routed to the next available agent in a specific queue has been a feature for some time.  As high lighed above, it is now even less complex as we can eliminate the use of SNS, enabling a contact flow to trigger the  lambda function that would handle the SMS session.   The real trick, however,  is how can an Agent originate an SMS message?   If an agent could originate an outbound SMS message, how would the return message be routed back to the agent who originally sent it?

Origination Options?

In this blog we will consider three different strategies that enable an Amazon Connect Agent the ability to ORIGINATE an outbound SMS message.  As noted above, responding to an inbound text message is well documented but originating an SMS message is a real challenge!  (Figuring out how to route the return message to the Agent that originated the message, is yet another challenge! )

  • Option 1 – User a TASK Template
  • Option 2 – Create an HTML Form
  • Option 3 – Create an Email to SMS solution

Each option is successively more complex to configure, each requiring additional AWS services including Lambda and ultimately DynamoDB tables.    Lets take these options one at a time and hopefully learn something as we attempt these different solutions and learn how to configure them.

Can an Agent Launch a Contact flow?

In order for an Agent to originate an SMS message, we needed to find away for an Agent to launch a Contact flow.   The contact flow can string together the steps we need to generate an outbound SMS.  We can turn on logging, trigger a lambda function, pass in the target phone number and message content and hand the message off to Pinpoint SMS for processing.   How can a agent launch a contact flow?  First we considered using a quick connect in which we could modify one of the default handlers to form the contact flow steps we required.  Unfortunately, with the exception of the External quick connect which had no call flow associated with it, the others required the Agent to have an active call before they could trigger the quick connect.  Drat! Foiled again!

Option 1 – Enter the TASK template!

We discovered that TASK templates might be a solution!  Creating a TASK template we found that we could add custom fields!  Yeah! So lets add a field for a phone number and one for message content! Also we might want to know which agent originated the message so we could route the return message back to that agent.   This started to feel like a real solution and but hen reality set in.  The good news was that you could assign the TASK to a contact flow!  This was very powerful, enabling the Agent to enter the phone and message and then send the TASK to the contact flow where we could invoke Lambda to handle the rest.   That is when the bad news surfaced!  There is no way to pass a custom field as a parameter that you could take advantage of in a “Set Contact Attribute” step.  Ah Snap!

Digging through the documentation we did find that there are only three variables (at the time of this bog) that can be passed as contact attributes.  These are the TASKid, the Name of the Task and the Description of the TASK.  So to solve our problem, we had to play with words such that NAME would now = phoneNumber and Description would now =the  messageContent.   This worked remarkably well and has become our current solution for enabling Agents to originate an outbound SMS message.

Click for Video on the DrVoIP channel!

The advantage of this solution is that you do not need to write any code other than the Lambda handler that your contact flow will invoke to send the outbound SMS through Pinpoint.  The entire solution uses existing Amazon Connect resources: Tasks, Contact Flows and the CHAT API behind the scenes.  The downside is the user interface is not intuitive and agents need to remember which field it the real phoneNumber and messageContent field.  It is not a workable solution if you are concerned about routing a return message to the Agent that originated the message.  If those are not concerns, then this is an effective and easy solution to implement.

Option 2 – Use an HTML form

Given the challenges of launching a contact flow, it might be easier to create a pop up HTML form.  When the Agent wants to originate an SMS message, the click a link that presents an HTML form.  The form has a field for the phone number of the recipient,  the message content.  The form also has a field for the Agent ID, which we will discuss further in part 2.    To enable this configuration we need to string together several AWS services:

  • Pinpoint SMS, which we assume you already have setup and handling inbound SMS to your call center instance!
  • We need to build a static website to host our HTML form.   The website will be built in an S3 bucket, in the same region and account as the Amazon Connect instance.
  • The HTML form needs to POST the form contents to an API Gateway.
  • Lastly, the Gateway needs to launch a lambda function to process the  request and provide a hand off to Pinpoint 2 way SMS.

Option 3 – Create an Email to SMS solution

This is the most sophisticated of the three options, but is also the most powerful.  It also is the best solution for enabling a return message to be routed to the Agent that originated the message.   The configuration will require configuring a number of AWS services:

  • You will need access to your DNS records, or you will need to create a new domain in Route53, the AWS DNS service.
  • We will be creating a subdomain.  As our domain is DrVoIP.com our new subdomain will be SMS.DrVoIP.Com.
  • This subdomain will add a MX record in the appropriate DNS.   The MX record will point to an SMTP service, in this case using AWS Simple Email Services (SES).
  • SES will have an email receiving rule that will route any incoming email to this subdomain, to an SNS topic.
  • The SNS topic will trigger a Lambda function.
  • We need a Lambda function that will process the event and parse the recipient phone number, message content and the FROM field of the incoming email.  We will discuss the FROM field part 2 of this blog.

How to get the return message back to the originating Agent?

The next challenge was getting the return SMS message routed back to the Agent who originated the message to begin with.  As noted above, the CHAT stream does not provide a way of extracting attributes.   For example, lets assume your chat conversation asks the visitor (keyboard or SMS) what is the order number they are enquiring about?   You would like to extract that number from the conversation, assign it to a contact attribute so you could automate the retrieval of that information. Snap, in general, that is the limitation of using the CHAT API.

Routing a return SMS message to the Agent that originated the message, is a subject we will explore in Part 2 of this blog on Amazon Connect SMS channel management!


Amazon Connect Video Update:

Transforming Customer Service with Visual Interaction

In April 2022, we introduced our first blog and demo showcasing the integration of video into call centers using Amazon Connect. Since then, the potential applications for video in customer service have continued to expand across various industry segments where “high touch” customer contact is crucial. Initially, we focused on applications that added video as a chat option, connecting website visitors to customer service representatives in contact centers. However, the practicality of video solutions has significantly increased with the advent of mobile smartphones as customer endpoints.

Enhancing Customer Service with Visual Interaction

Amazon Connect Video!Imagine an insurance adjuster dramatically increasing the number of claims they can process. Instead of visiting each claim site, a video conference enables the agent to visually inspect damages remotely, streamlining the claims process. Similarly, many technical support issues could be resolved in a single call with video support. For instance, an agent can ask, “Can you show me exactly which port you plugged that cable into?” This visual interaction can lead to quicker and more accurate resolutions.

Telemedicine: Revolutionizing Healthcare

Telemedicine is another powerful application of video integration in contact centers. Healthcare providers can offer virtual consultations, allowing patients to receive medical advice and care from the comfort of their homes. Video consultations enable doctors to visually assess patients, discuss symptoms in real-time, and even guide them through minor procedures or exercises. This not only improves patient convenience but also expands access to healthcare services, particularly for those in remote or underserved areas.

Real-Time Product Demonstrations

In retail, video can elevate the customer experience by enabling real-time product demonstrations. Customers can connect with a representative who can showcase products, answer questions, and provide personalized recommendations. This interactive approach can enhance customer satisfaction and drive sales, as customers gain a better understanding of products before making a purchase.

Virtual Property Tours

The real estate industry can also benefit from video integration. Real estate agents can conduct virtual property tours, allowing potential buyers or renters to explore homes and apartments without physically visiting the location. This not only saves time for both agents and clients but also broadens the reach of property listings to a global audience.

Personalized Financial Advice

Financial institutions can leverage video to offer personalized financial advice. Clients can have face-to-face meetings with financial advisors to discuss investments, savings plans, and other financial matters. This personal touch can build trust and strengthen client relationships, ultimately enhancing customer loyalty.

Education and Training

In the education sector, video can facilitate remote learning and training sessions. Instructors can conduct live classes, workshops, and one-on-one tutoring sessions, ensuring students receive the support they need regardless of their location. This can be particularly valuable for professional development and corporate training programs.

There is a YouTube Demo click Pic!

Conclusion

Consumers have increasingly adopted video conferencing, especially since the release of camera-embedded phones. By integrating video into your contact center, you can enhance the clarity and effectiveness of customer interactions. Whether it’s resolving technical issues, processing insurance claims, offering telemedicine services, conducting virtual tours, providing financial advice, or delivering education and training, video can transform customer service experiences.

Embrace the power of video with Amazon Connect and take your customer service to the next level.

Configuring Amazon Connect Voice Mail

Configuring Amazon Connect Voice Mail

For several years we have been deploying a modified version of the Amazon Connect Voice Mail solution as published by the AWS team to GitHub!   When Amazon Connect first hit the market in 2017, it was without a voice mail solution.  Actually it was without lots of features that most call center folks would expect!  However, as time unfolds in its petty pace, new features are regularly being added.  Today, Amazon Connect continues to lead the way in call center technology.   The voice mail solution, has changed over the last few years, and though in January of 2024, AWS archived the application and no longer supports it, the solution is still quite useable with a few tweaks.   AWS indicates they are rewriting the solution, but they have not published a target release date.

Dial Agent Direct Option

We have modified the solution in a variety of ways.  For example, many folks want a caller to be able to dial an extension number to reach an agent directly.   We created contact flows to do just that and we rely heavily on the published solution.   You can dial an extension, if the Agent is not available, you can leave a message or transfer off to another agent or customer service queue.  Messages can be transcribed and sent via email or as an SMS message.    Given that you can not “transfer to flow” from within a customer queue hold flow, we build the voice processing option into the hold flow.  In this way you can offer your customers waiting for an agent to become available options that include leave a voice mail.   The voice mail, taken in a customer service queue, can be routed like a phone call to the next available agent as a task.

The voice messaging framework opens up a range of new functionality for the Amazon Connect instance!   Let us know if we can help, just email drvop@drvoip.com and we will get you pointed in the right direction.  There is a YouTube video on this configuration:


Membership notification system using AWS Pinpoint SMS!

The Challenge!

We had a voice notification system setup to alert member of our “club” about meetings and special events.  It consisted of a Dynamodb table that listed the phone numbers of the club membership; several lambda functions to access and update the database and an Amazon Connect instance to drive the telephone network requirements.   It worked well and got the job done.   Administrators would call up the application, enter a security authorization code, reset the database, record a new greeting and have a message delivered to every member within minutes.  The only complaint was having to maintain the membership database.  Members came and went and someone had to keep the database updated!

The Solution

Text had an interesting advantage!  Members would be able to add or delete themselves from the database themselves.  You would add yourself to the notification list by texting the work JOIN to the published notification number.  If you wanted to leave the list, simply send the word STOP to the same number and you would be removed.     This seem like a perfect solution, creating a self healing application that  would free if not eliminate the need for administrators.

AWS Pinpoint SMS to the rescue

Some of the components we used in the voice notification system were still required.  The dynamodb table and lambda were still critical components.  We did not need to use Amazon Connect for the telephone interface as AWS Pinpoint had an SMS interface.  We also needed to add SNS so that an incoming SMS message would trigger the lambda function to parse the message.     Pinpoint at the time we implemented the first version of the product did not have a facility for testing the application.   SMS spam has become such an issue, that you are now required to register your “campaign” and have the carrier approve it before you can send your fist text message.  There is now a newer version of Pinpoint SMS that has a test facility, but you are still required to obtain approval for your planned usage of the SMS functionality by carrier.   The process is frustrating and may take more than 30 days to complete, so be forewarned!

Bells and Whistle Options

Members would send the word JOIN to be added to the notification list, but who could send messages to the list?  The goal was to eliminate dependence on an administrator to send SMS messages that might originate from different parts of the organization.   To accomplish this, we created a SEND option!  We defined an environmental parameter that was the “secret password” and if this word was the first word in the incoming text message, Lambda would strip it off and forward the rest of that incoming message to the membership list.  (How kool is that)?   In our next version, we added the ability to customize the JOIN message to include firstName and lastName.


Amazon Connect Emergency Notification System

Emergency Notification?

There are a number of use cases for an application that can process a list of contacts to be notified by voice message of an impending event.  The event may be an emergency or  a notification of a community activity of interest to the list subscribers.   Even an appointment reminder falls into this category, so it is not necessary to have an actual ’emergency’ to have a requirement to mass notify a subscriber or customer group.

Basic Functional Spec

We had need of a “campaign dialer” like a solution and we found that all the parts we needed were available in AWS and Amazon Connect.   We hammered out a basic functional statement that had the following features:

  • The application requires the admin to authenticate;
  • A facility exists to record a new message to be played by the dialer;
  • The Dialer had to be able to simultaneously dial a large number of list members by contact group code;
  • The called individuals could enter a response code  to enable a transfer or follow up action (press 1 to transfer to an agent, Press 2 to reschedule,  etc.)
  • All contacts would be coded as notified even if they hung up, to eliminate redials.
  • A facility exists to reset the database in preparation of a new campaign.

The resulting solution contained the following modules:

  • Dialer Setup Module: (Authorization to use the notification system; Menu to reset database,  record new outbound voice message and initiate outbound campaign
  • DynamoDB table to contain the subscriber or customer list with associated fields to support the application (subscriber name, zip code, result code, etc.)
  • Lambda functions to read/write subscriber database and record audio to prompt file
  • Administrator notification of campaign dialer status through SNS

The solution is coded with four contact flows that enable group alerts to be sent simultaneously.  The AWS services used include Amazon Connect, DynamoDB, Lambda, Kinesis and optionally SNS. Depending on your contact center soft limits, the dialer will contact a minimum of 50 subscribers per phone call.  The following video details the configuration and the entire application is available in the DrVoIP.com store including the lambda functions and sample DB configurations.


“Do it yourself” kit for deploying an advanced Amazon Connect Instance!

Dynamic Call Centers?

We can dynamically reconfigure our contact flows, the experience a caller has when calling our contact center.   To do this, we us DNIS (i.e. dialed number information services) essentially using the number the caller dialed, to index a configuration database and return all of the options we need to route an care for the call.   Rather than “cut and paste” contact flows, modified for each queue, why not just use one contact flow that can be reconfigured on the fly?  DNIS is a system attribute in Amazon Connect, it can be passed to the contact flows as such and used to route the caller.   In this solution we provide everything you need to quickly implement a very advanced, flexible and scaleable voice only contact center.

We provide a complete “Do It Yourself” Amazon Connect Contact Center

Core features of this solution include the ability to reconfigure greetings, menus and options based on the DNIS, the number the caller dialed ot reach your call center.   Other features include the option to Directly Dial an Agent, or to have IVR option menus.   Queue hold options include “call back”, leave a voice message for follow up that is queue specific.   Contact flows check staffing, hours of operation and  include after hours call handlers.

What is in the DIY Kit?

In addition to several video tutorials to help the non-engineering professional build out the contact center, we provide all the contact flows ready for you to import!  We provide the lambda functions used to index the configuration database and the dynamodb table descriptions. Each contact flow is heavily commented to enable easy modifications of options and prompts.  Tech Tip videos for installing the voice mail system;  custom agent dashboard and  instructions on how to configure other AWS services that the contact center requires.  Finally, we throw in an hour of technical support to answer your questions!   You will find the package in the DrVoIP.com store!


Agent Step-by-Step Guide

Amazon Connect Agent Scripts?

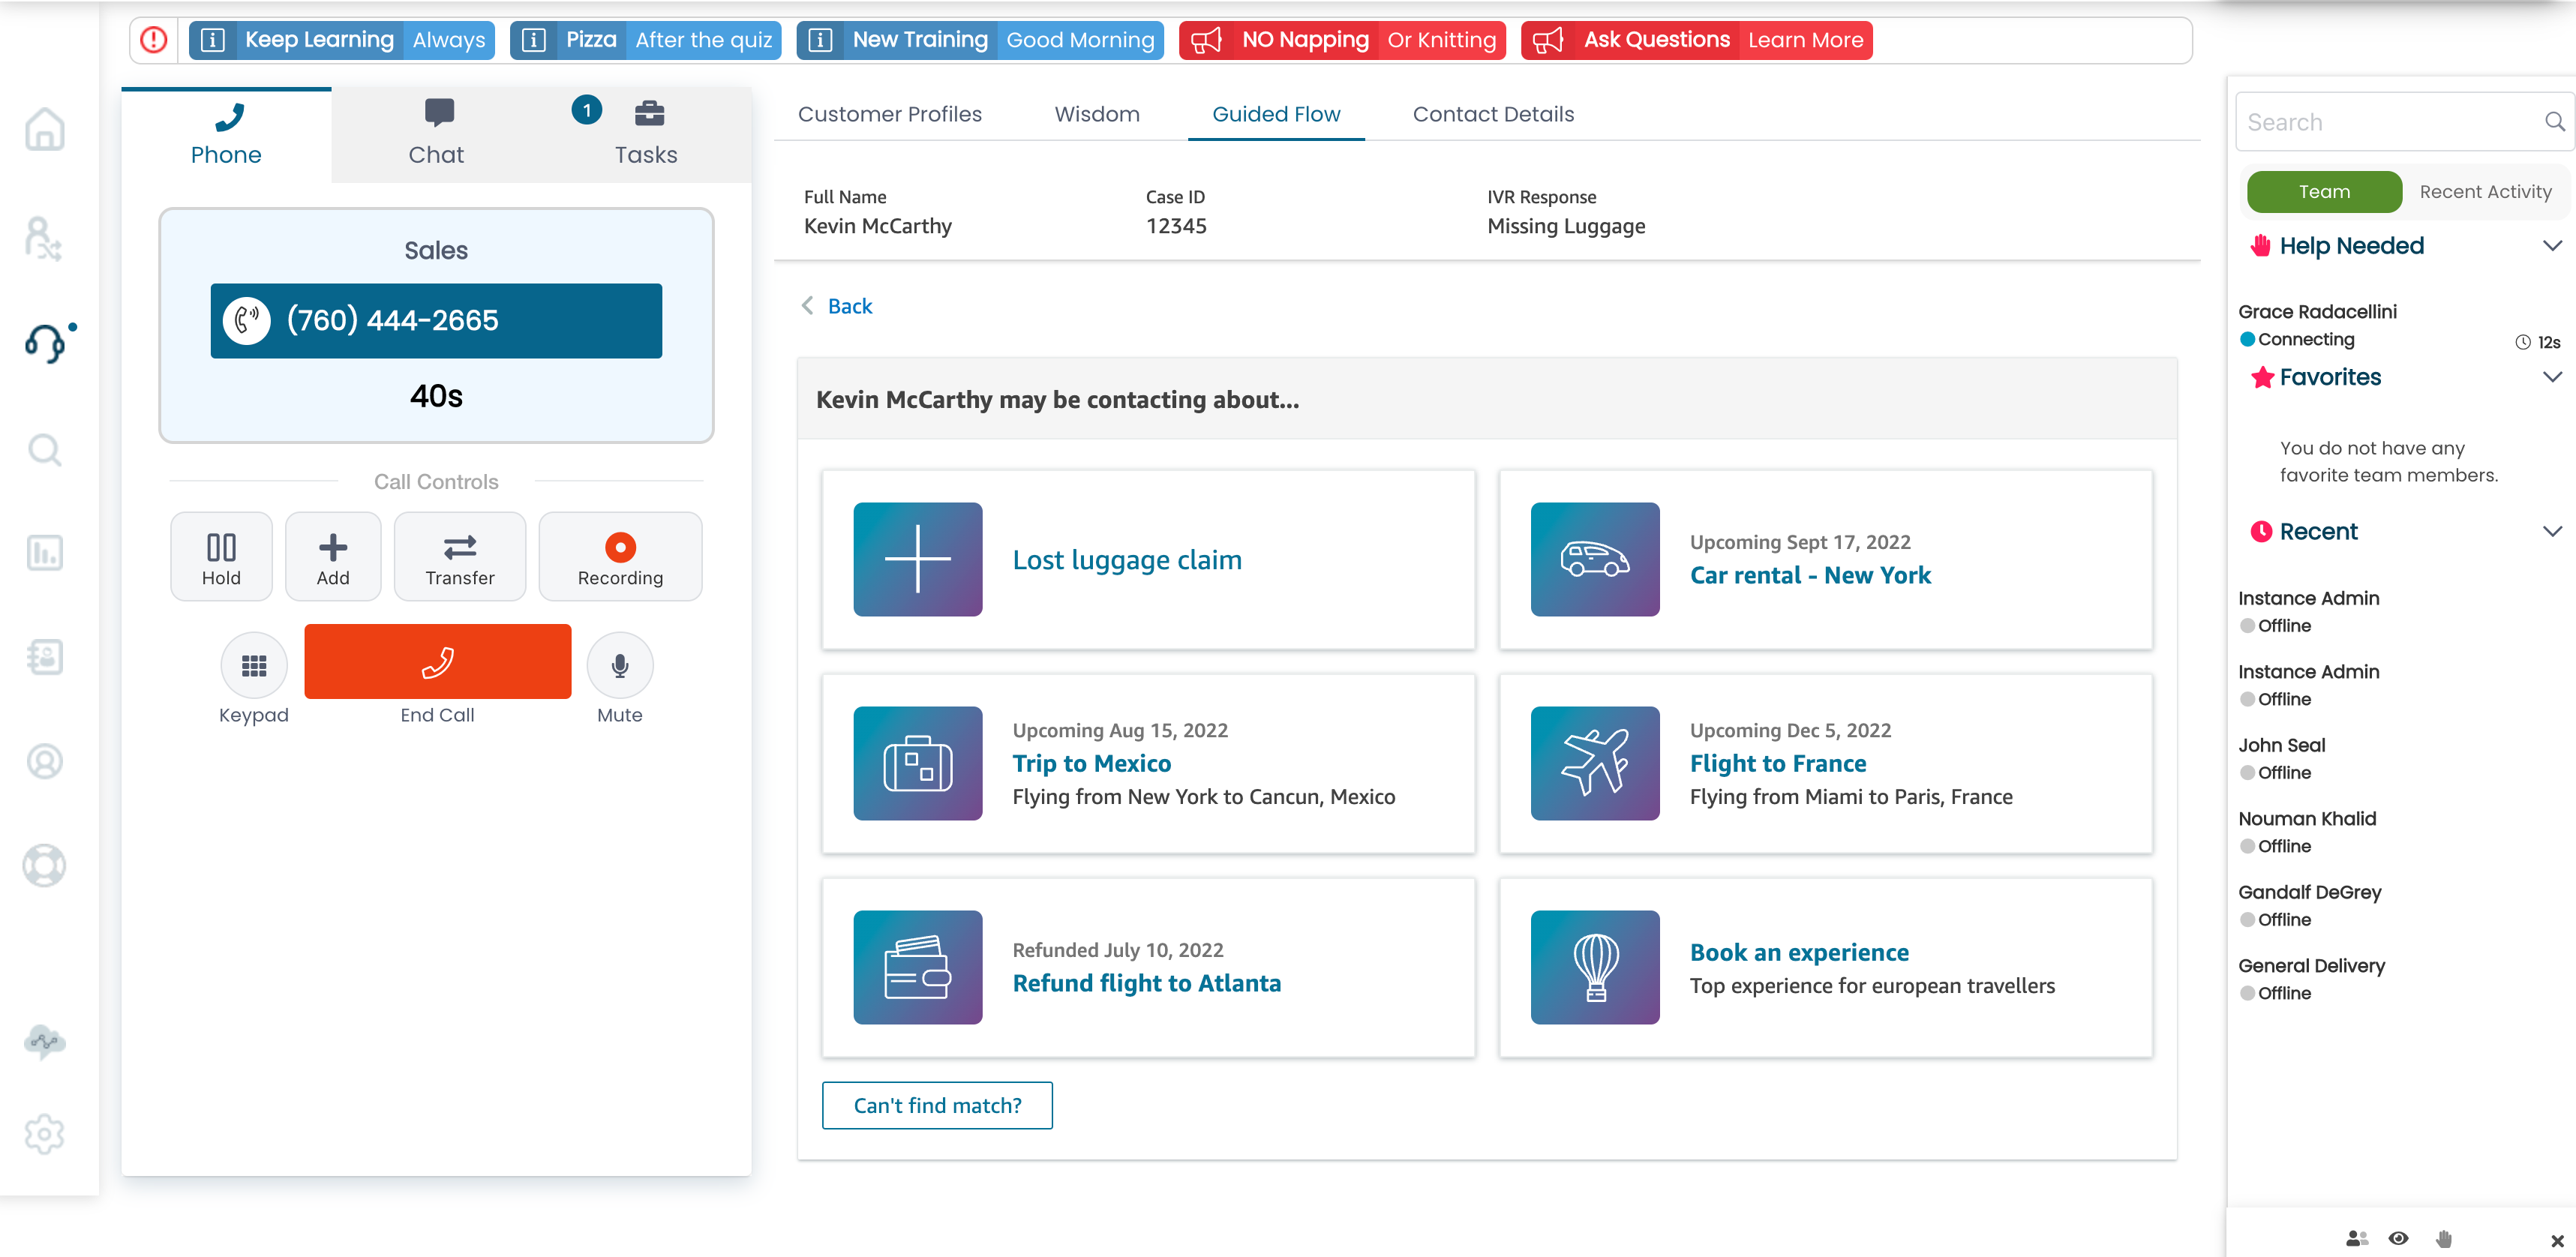
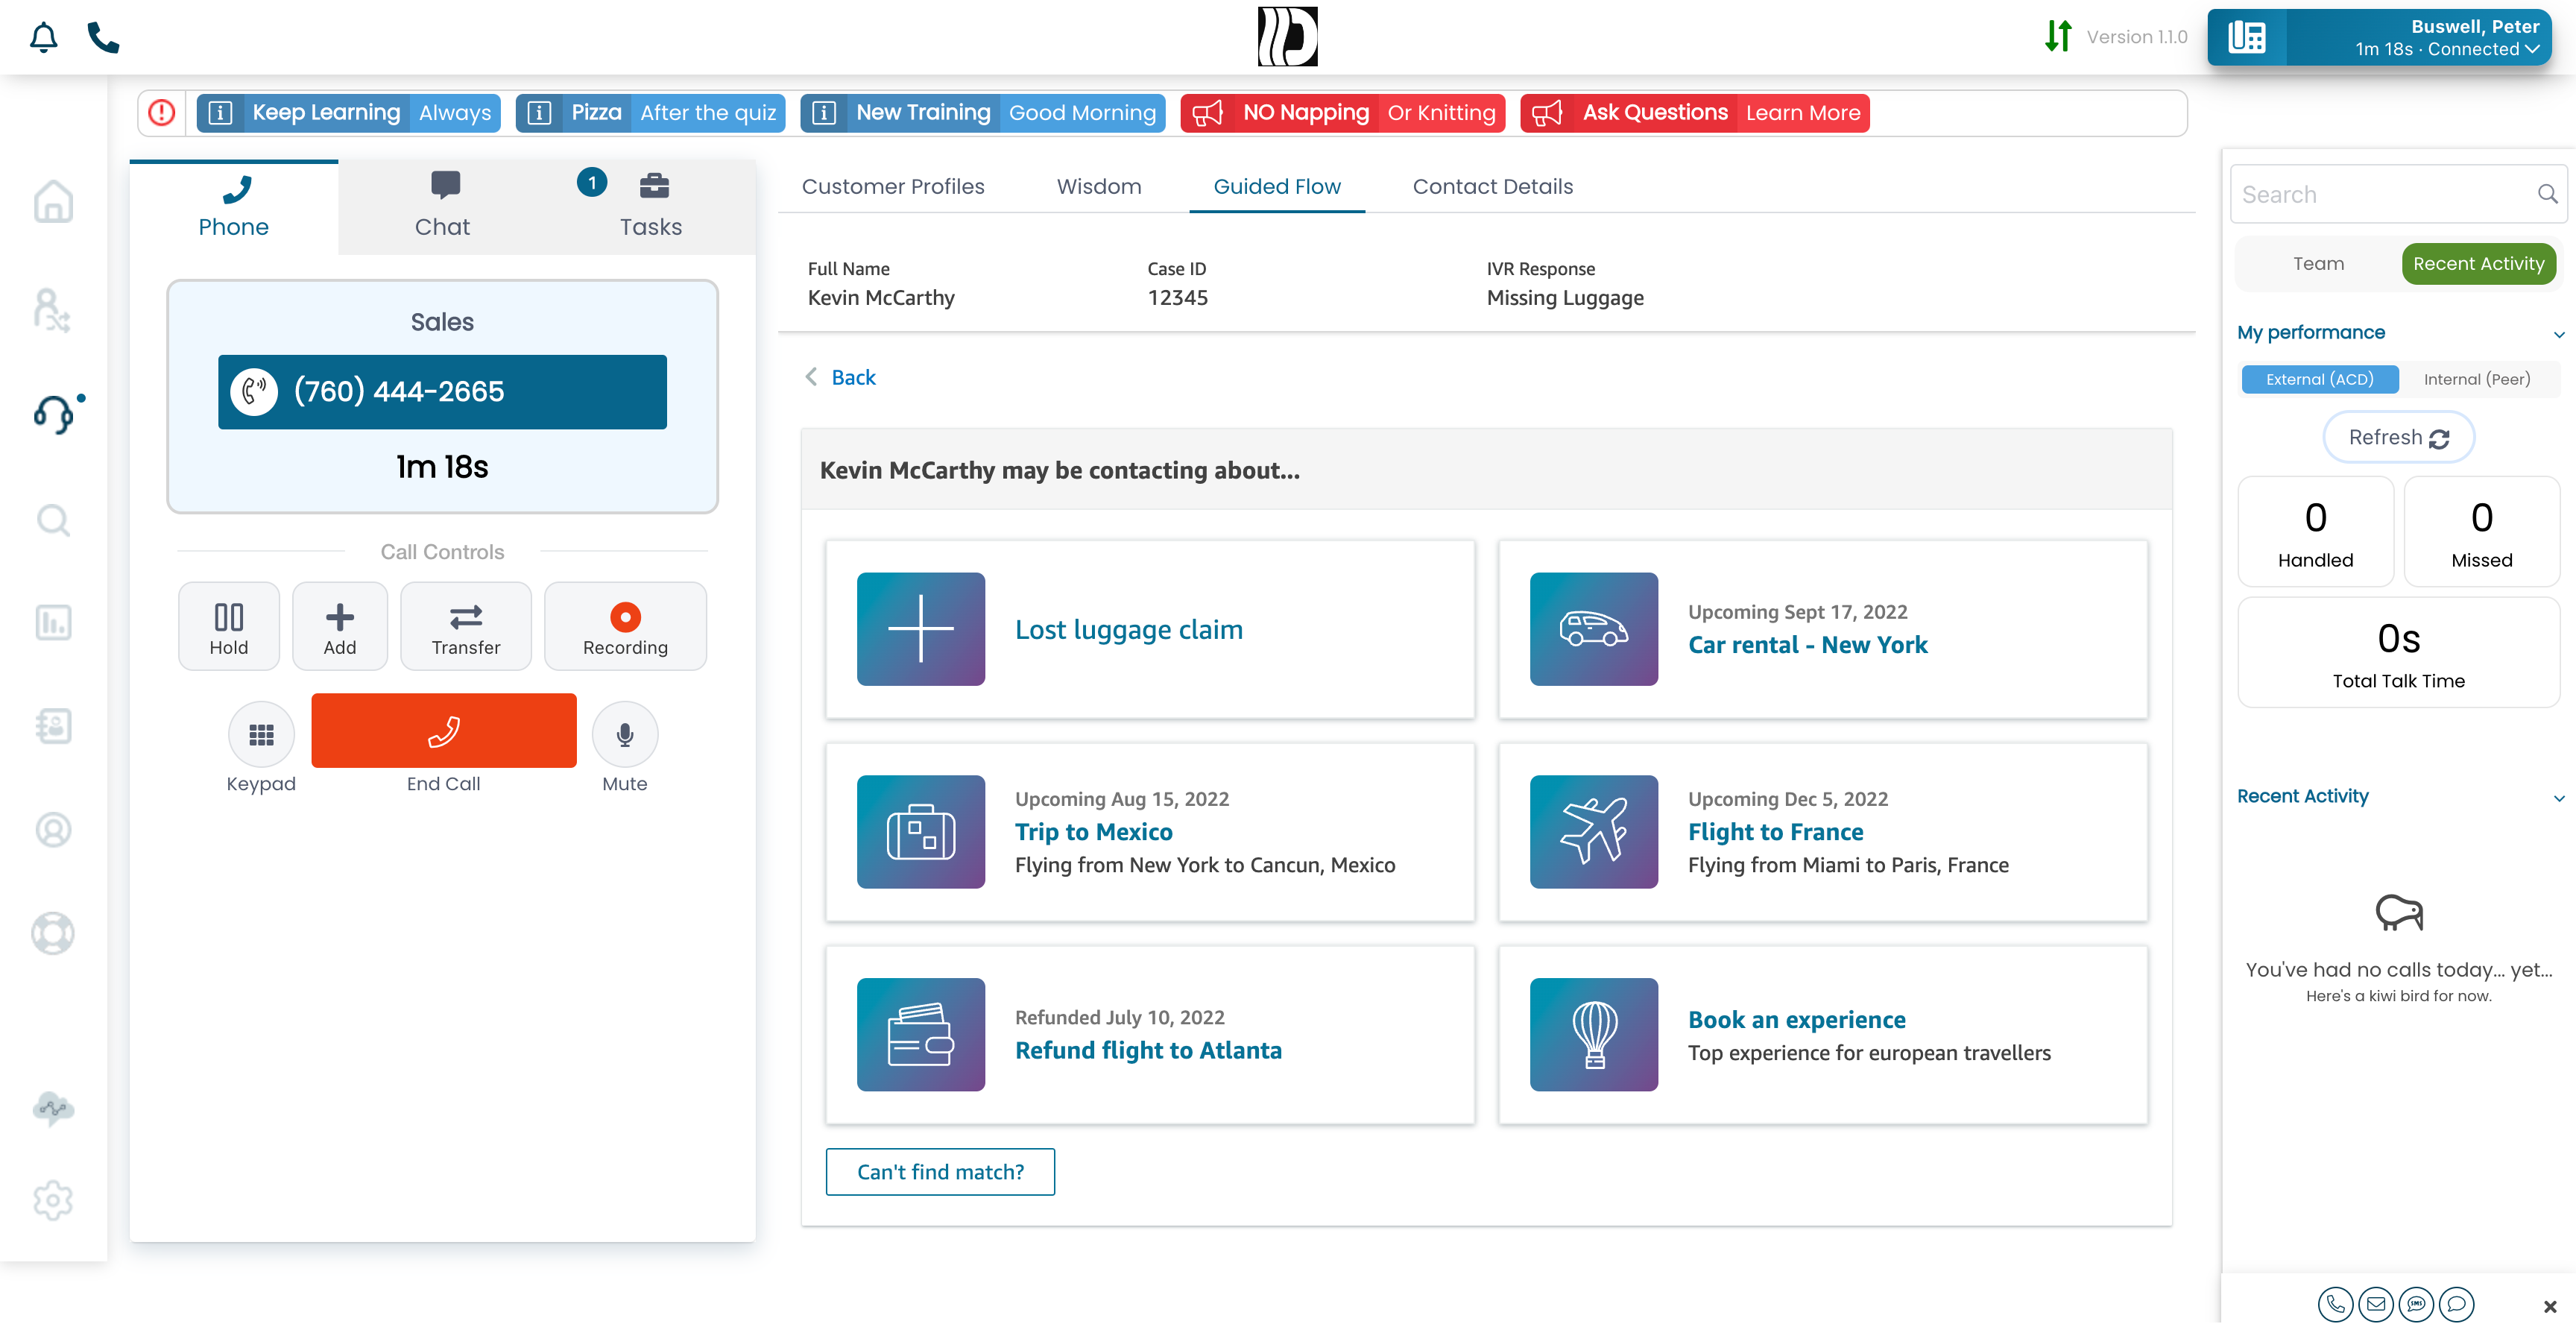
We have been very impressed with Amazon Connect’s growing move into an embedded CRM.  Customer Profiles and Cases are powerful capabilities that are now integrated in the “pay only for what you use” cloud based contact center.  Recently, Amazon has added “step-by-step” Agent guides!  This powerful new functionality brings “one call” customer problem resolution from concept to reality.    It offers a unified experience for contact center agents to access the tools they need to address customer calls effectively.  Each phone call can generate  a screen pop of information resources.   These information or action resources can be tailored  for each queue.  This sample screen shot illustrates what might be presented to an Agent in an Airline who might handle reservations and claims for lost luggage!

Step-by-Step Agent Guides

Using the existing contact flow designer, you can configure “cards” (picture above”) that prompt the agent through how best to handle a customer request.  You can create detailed views, forms and confirmations that kick off back end actions!  No longer is it necessary to open a separate  browser tab to update your CRM, this can all be handled by the back end functions lunched from the guides.

Give us a call to setup a demo or to discuss how this amazing new set of productivity solutions can assist in achieving your contact center vision! – DrVoIP@DrVoIP.

Can you Delete an Amazon Connect Contact Flow?

Out of the Box?

AWS has configured the contact center to work out of the box.  Add a phone number, define at least one agent and using the default contact flows, you can be taking phone calls in minutes.   The contact center features will be minimal, but they work without having to have a engineer do everything.  A reasonably intelligent business process professional should be able to configure a working contact center.  The price you pay for this however, is that you are not able to delete contact flows within the Amazon Connect dashboard.

Why Default Contact Flows?

If you look at the “out of the box” contact flows you will note several contact flows that are Default configurations.   These default contact flows are used unless you specify the use of another contact flow of your own creation,  For example you will see a “Default Outbound” which is used for every outbound phone call made by the contact center.  This  contact flow announces to the called party that the call is being recorded before it transfers the call to an agent.  If you do not want that behavior you need to replace this Default Outbound contact flow with one of your own creations.

You can not delete it!  Why? Basically to keep you from doing something that would crash your call center!  The default contact flows enable rapid deployment of a minimal contact center.   Folks who do not know what they are doing could easily delete something that the system otherwise makes use of, causing a problem that is a direct result of inexperience and ignorance.

Accumulating Contact Flows

After working with the product for a bit, you realize that you can not just delete a contact flow.  You can rename it and reuse it with changes but you can not delete it from within the Amazon Connect dashboard.   At some point, these trashed contact flows accumulate and make navigating your configuration more challenging then most of us want to deal with.  So what is to be done with these unwanted contact flows?

You Can Delete them?

As you gain more experience with the Contact Center you will learn that using the command line tools, you can in fact, delete a contact flow. ( If you do not know what the Cli interface is, or how to make use of it, you most likely should not be trying to delete contact flows)!

Download and install the AWS Command Line Interface (Cli).   This advanced tools can be installed on a Windows, Mac or Linux machine and is used to provide access to advanced configuration options that require some level of software engineering experience.  You will configure your Cli with your account, secret access keys, region and optional profiles. Using this tool you can delete a contact flow, for example.

The following format is used through the Cli to delete a contact flow:

aws connect delete-contact-flow –instance-id YOUR-INSTANCE-ID –contact-flow-id YOUR-CONTACTFLOW-ID

The following video clip show you this in action!

Again, don’t fool with the Cli if you are not comfortable as this is a powerful tool and with it comes great responsibility!

(Call us if you need help! – DrVoiP@DrVoiP.com)


WTF is a DNIS Map?

Route by DNIS?

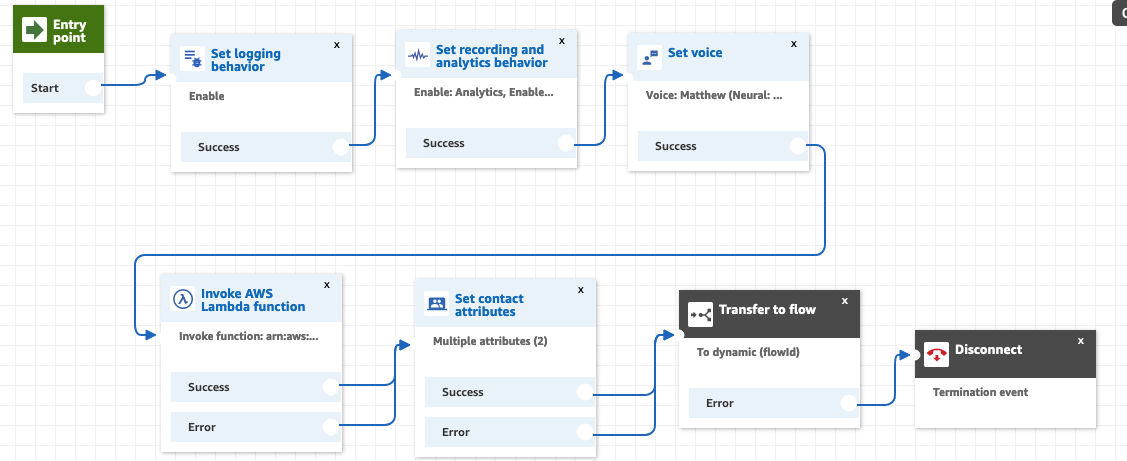
A common call center request is to provide a custom greetings or route a call to a Customer Service Queue (aka CSQ) based on the number the caller dialed.   DNIS or “dialed number information service” is usually the solution to this request.   Typically you create a database table in which the index is the DNIS.  In this way we can pull back all the information we need to greet and route the caller.  The solution consists of mapping a DNIS number to a contact flow that has a lambda function that looks up the greeting and routing details in the database referenced the function.DNIS MAP

Assign the incoming DNIS number, actually all incoming numbers should hit this contact flow, and we do the usual setup.  Turn on logging which is very useful during testing and you can turn it off later to save a few pennies.  Set up recording, preferred voice and then invoke the lambda function that will retrieve the desired greeting and routing information.  It is a good practice to set the contact attributes so that you can easily reference the returned variables in subsequent contact flows and to make them available for the CTR records and potential screen pops.

Contact Attributes

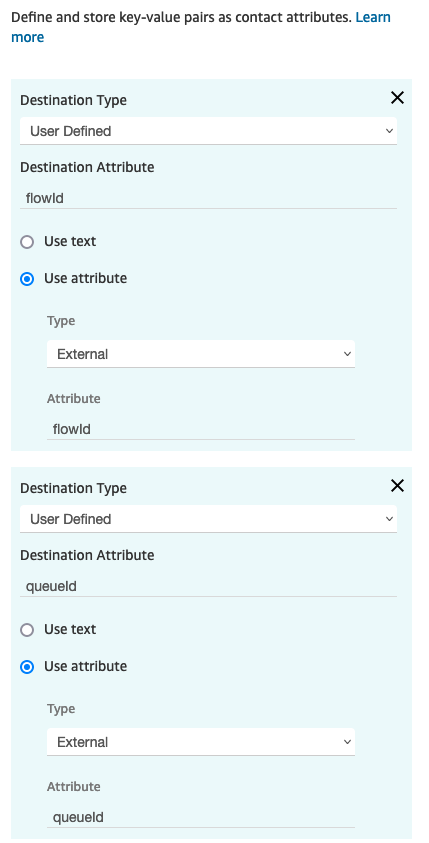
Clicking on the “Set Contact Attributes”  call flow step in this example we get the following:

Contact Attributes You can see that the lambda function is pulling back two variables from the associated database tables: queueId and flowId.   in the above contact flow, after we set the contact values, obtained from an “External” database  we”transfer to flow”.   The external flowId points to the flow we want this DNIS to be used for follow on call handling.

The flow will eventually transfer to a queue, which we obtained from the same “External” database. Like the flowId, the queueId is now a “user defined” value. No reason you could skip the “set contact attributes” step and just use the $,External.flowId but by the assignment and the use of $.Attributes.flowId we associate the value with the CTR and make it more easily available for screen pops etc.

(see the blog on should I route to a queue or route to a flow?)

Additionally we could also pull back any other information we might want that would change based on the number the caller dialed. For example a customer greeting.   Did the call the Kin-sue Knife help line or the Hotel reservation line?   Maybe this is an Executive suite application in which the operator has to answer “thank you for calling <yourcompanyname>.

Advanced DNIS Routing

It may be that we want to route the caller to an IVR Menu of options based on the DNIS. You can easily handle this by the flow you route the caller to, but do you really want to do the newbie “copy and save as” to repeat the same contact flow for each DNIS?   There is now reason why the database can point to a generic IVR flow.  The generic IVR menu would have menu options that are variables that might be named “optionOne”, “optionTwo” etc.   These options would be defined in the database and in this way, each DNIS could point to the same IVR based contact flow but the menu prompt and all the options would be obtained via the lambda function from the referenced database.

This solution along with the Lambda function and Video tutorial is also available in our online store!

As always we would be glad to assist with this solution just click or call! – DrVoIP@DrVoIP.com