TOP ShoreTel Connect Installation Gotcha’s !

So you are upgrading to ShoreTel Connect!  Watch out for these blistering hot spots:

Assume you have a call center that works three shifts, with 15 Agents per shift.  In the Pre-Connect world, you would define 45 agents but you would only need licenses for 15.  The Pre-Connect ECC license strategy was “concurrent users”.  The new license strategy requires you to license 45 Agents.  Additionally, all agents have to be named in the iPBX, costing you an additional “per seat” license for the newly named agents.  Before, 45 agents could log into extensions Agent1 through Agent15 using their AgentID to differentiate them for reporting purposes.   Wow!  I hope you don’t find this out the hard way.

Here are some of our favorite ShoreTel Gotcha’s:

1 – Ever have to move route points from one server to another?   You CAN NOT use the batch utility to do this and must remove and then reinstall each route point.   So much fun on a large contact center deployment ( If you know SQL you can actually modify the configuration database to do this).

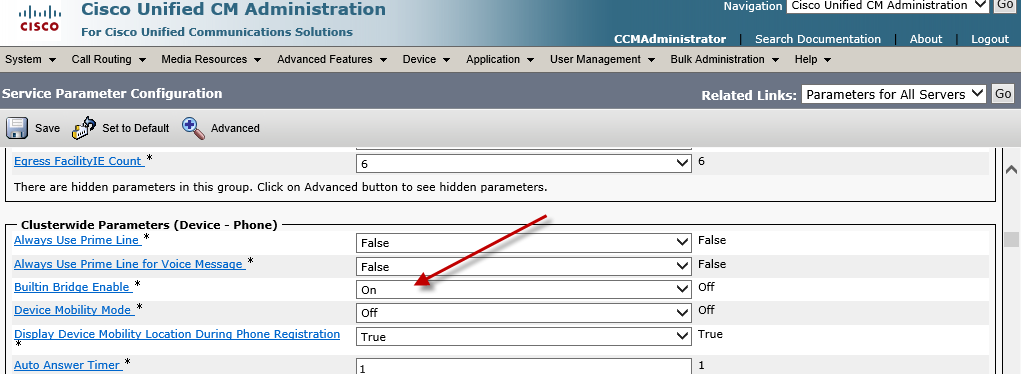
2 – Want to change IP address of your HQ?   If you are using the new family of 400 phones, you will have to touch each phone individually and manually CLEAR the Configuration for the new Option 156 and DHCP values to take hold.  How would you like to upgrade 3K phones across five times zones to learn that gem!

3 – Gee, would it not be nice to use DNS Name resolution in the Phone Setup?  You could just change the IP address in DNS and update your entire deployment!

4 – Is it no time to get rid of the DB9 Serial IO cable for switch configuration?  It is the 21st century and we sill do not have USB on ShoreTel switches?  When was the last time you had a serial printer cable with an DB9 connector hanging around your tool bag?

5 – Setting up OBDC connectors still use 32-bit connector and do NOT support AD login.   If you are connecting to Microsoft SQL, for example, if you use an AD credential your ECC Script will fail.

6 – Active Directory  integration is a one way sync out of the box.   Even adding the ShoreTel professional Service add on for AD will not solve all your issues!

7 – ECC Shifts will destroy you if you do not fully understand their use and impact.   Create a Shift to close on of your Customer Service Queues at 1PM and end up closing your entire call center!  (See this Blog entry).

8- You can not enter anything in the External number field for transfer a call but  9+1+NPA- NXX-XXXX.  No 9+011-44-204-668-5000 for example.  It will not work! Not for a call handling mode, CTI route point, External Assignment.  Nada. no bueno, NFG!

Useful and Helpful Event Log error entries!  Our Personal favorite:

ShoreTelError

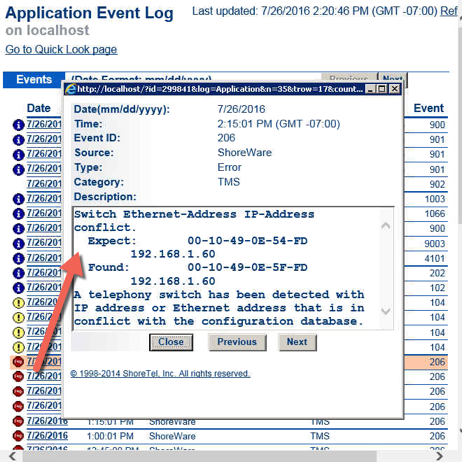
Send us your favorite Installation and Maintenance Gotcha’s and we will update the list and credit you for the contribution!

DrVoIP@DrVoIP.com


Configuring Compliance Recording with CISCO Workforce Optimzaiton

For compliance will you Record Audio or Screen?

There are a range of products and services that can be used to “record” phone calls on a CISCO CUCM, UCCX and UCCE. These products range in sophistication from services that simply save a wav file of a recording which you can search for by time and date, to very sophisticated recorders with advanced index and search capabilities. Some products even include speech recognition functions that can be used to search files for a particular call or even handle a recording base on the audio content.  CISCO Workforce Optimization and Advanced Quality Management adds desktop screen recording and metrics that can also be used for evaluations and service observing.

All of these products have one characteristic in common; they require you to configure a recording capability in your CUCM to copy the media stream from the target source to the recording server. There are a number of options for doing this including SPAN recording and other options that require you to configure your Ethernet switches to accommodate the recording function.  The simplest method to copy media streams is to use the Built in Bridge or BiB of a CISCO phone.  Clearly this can only work for a specific set of CISCO phones, but most phones support this function.

General Recipe!

The following is a basic general recipe for setting up your CISCO CUCM for recording and identifies some of the decisions you have to make along the way.

  • Gateway or Phone;
  • Notification or not; Notify the caller, or the Agent or both?
  • Route Pattern for Recorder along with a Partition and Calling Search Space.
  • Create a Recording Profile;
  • SIP Trunk Setup between CUCM and Recording server; and options CUCM and Gateway;
  • Identify Users and add them to the proper CTI Recording and Monitoring Group;
    CTIPemissions
  • Enable BiB on the phone;
    BiB
  • Enable Recording on the DN;  Auto always or Selective and reference Recording Profile;

Basically you are creating a conference call between the “source media”, the CUCM and the Recording server.    The actual configuration has a lot of details and you will need to carefully consider each element, but the actual setup is routine for your average deployment engineer.   We summarized them below in video format.

You can also use CISCO XML services to enable SELECTIVE recording in which a phone is recorded only on the demand of the user.  This uses the Calabrio XML api and Phone Service option in CISCO.  This will enable the user to push RECORD, PAUSE, RESUME and STOP.  The second video walks you through the configuration options for that service.  This can also be deployed in Finesse as a desktop button!