How can an Agent Originate an SMS message in Amazon Connect ! – Part 2 Routing the Return Message

SMS Return Message Routing

In part 1 of this blog we looked at three options that enable an Agent to make originate an SMS message:

  • Option 1 – User a TASK Template
  • Option 2 – Create an HTML Form (DrVoIP favors this approach)
  • Option 3 – Create an Email to SMS solution

The key flows in any of these solutions, is to write the Send_TO_Number, smsMessageContent, AgentID (extension number, login, username), and timeStamp to a dynamodb table when originating and outbound SMS.  This is possible with all three solutions, but we like option 2 the best.  Option 1, with all of its strangeness has the advantage of being an action taken within the contact center, making a historical record more practical.  The other two options, start outside the call center and the origination event is not noted for historical records in the out of box archive methodology of the Amazon Connect Instance.

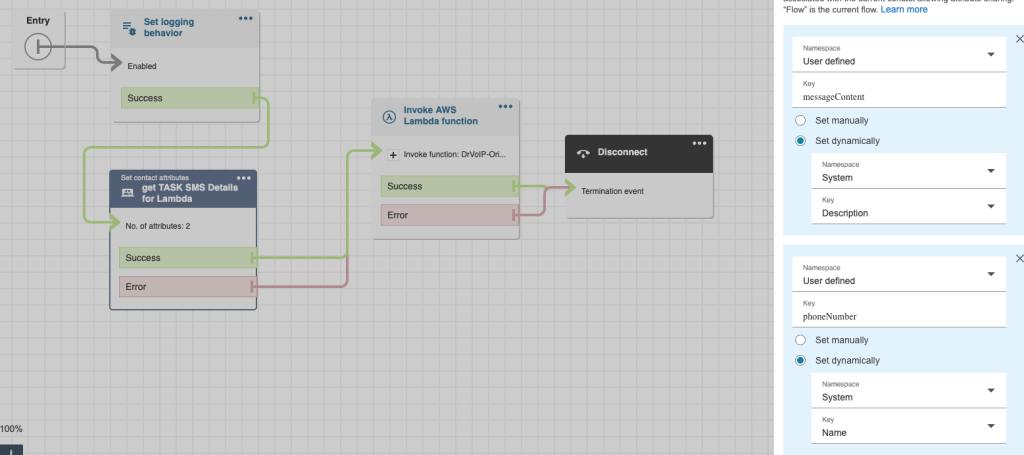
Option 1 Task Template launches Contact Flow

The TASK solution gets the Origination SMS job done and works just fine.  The Contact Flow the TASK points to contains an invoke Lambda that sends the messageContent and phoneNumber on to Pinpoint SMS.  There is no real way however, to capture the Agent that initialized the Task.   We tried writing the phoneNumber and TaskID along with a timestamp to a dynamoDB table, then invoking another lambda to look up the phoneNumber it in an inbound contact flow, but it was just ugly and did not identify the agent that originated the outbound SMS.  You need someway to ID the Agent so you can “set working queue” by agent and get the incoming return message routed accordingly.   Given that custom fields (as of this blog) can not be passed as a contact attribute, there was not way to add the Agent ID to the Task Template.

Another major challenge is that the CHAT API used by SMS (and chat for that matter) does not, in general,  support Contact Attributes.   Let us assume you want to ask the customer to enter the order number so you can look up the status.  They might provide that number, but there is no way to extract that data and assign it to a Contact Attribute for further processing later in the contact flow.

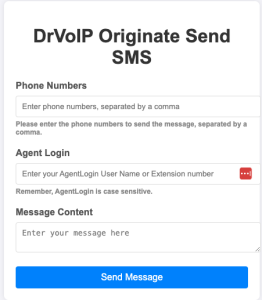
Enter Option 2 (Static website to launch HTML form)

The benefit of popping an HTML form is that you can prompt the Agent to enter something to identify themselves.  This would enable you to invoke a lambda function to  write the phoneNumber, AgentId and timestamp and even the smsMessgeContent to a dynamoDB table for later processing.   That function would also include the SDK that enables you to find the agents unique ID and also route that to the database.  The entire DB item would include:

customerNumber – this would become the partition key in your dynamodb table;
smsMessageContent – the text of the outbound SMS message content;
agentID – obtained by using the Agent username and the SDK to get the agentId a unique value for each agent.
timeStamp – date and time of the item creation.

The inbound contact flow handler we could grab the Customer Number, invoke a lambda function to request the agentId so that the chat session (i.e. SMS) could be routed to the agent that originated the outbound message using the “Set Working Queue by Agent” step in the contact flow associated with the SMS number.  We would also invoke a lambda function to retrieve the smsMessageContent from the stored item and assign it to a contact attribute for later use.  (Developer Note: It would be possible to retrieve both the agentId and the smsMessageContent in one invocation, but parsing a JSON object in a contact flow is not worth the trouble, it is easier to make two invocations).

When the agent accepted the incoming chat, the ongoing back and forth of the chat transcript (i.e. SMS) would be captured and stored.   How would the agent know what the original outbound message contained?  We need a strategy for presenting that to the agent and adding it to the transcript for historical reporting, or additional processing by LENS etc.     Using the Agent whisper function, we would use the contact attribute created for smsMessageContent to satisfy this requirement.

This option, in our opinion, is the optimal solution for originating an outbound SMS message and routing the return message to the agent who created the message in the first instance.  It captures all the activity, makes it available to the agent and other features of the Amazon Connecct instance.

Enter option 3 Email to SMS

In this option we want to use email to launch the SMS handler using the configuration provided in Part 1.   The thinking here was to use SNS rather to trigger a Lambda rather than Invoking  Lambda from inside a contact flow triggered by the Chat API.  Do not connect the SMS phone number direct;y to the Instance.  We created two SMS handlers: one inbound Lambda to handle either an SMS that did not ordinate by an Agent.  it could also handle a return message originated by an Agent.

Email Outbound

Using the email client we were able to launch an outbound lambda that would be able to parse the message and write the From (i.e. Agent ID), Subject (i.e. target recipient phone number)and a times stamp  to a dynamoDB table.  No need to log the message content, we would pass all the variables off to the Pinpoint SMS number.

SMS Inbound

The inbound SMS triggered the lambda which would use the phone number to index the dynamoDB table and bring back the AgentId.  It might be necessary to use the AgentId to look up the Agent Name or ARN, but the result was much cleaner and seemed to work just fine!   With the AgentId we were  If there was no matching number in the database then the message was treated as a new incoming SMS and routed to the default workgroup set in the contact flow.

TTL

We needed a ‘garbage collector’ that could go into Dynamodb and clean out any entries that had a time stamp that exceeded whatever we set as the Time To Live (TTL) value.

How can an Agent Originate an SMS message in Amazon Connect !

Pinpoint SMS

For some time now, you have been able to channel SMS messages through the Amazon Connect CHAT API, using Pinpoint services.  Typically, you would create a new project, enable SMS and then use SNS to trigger a lambda function to handle your SMS conversation.  Most recently, AWS has created Pinpoint SMS, a dashboard that enables you to directly integrate SMS services into your Amazon Connect instance, appearing like any other phone number.   This enables you to capture an SMS event directly to a contact flow eliminating the need to use SNS.

How to Originate an SMS in Amazon Connect?

Getting an inbound SMS message into the call center and routed to the next available agent in a specific queue has been a feature for some time.  As high lighed above, it is now even less complex as we can eliminate the use of SNS, enabling a contact flow to trigger the  lambda function that would handle the SMS session.   The real trick, however,  is how can an Agent originate an SMS message?   If an agent could originate an outbound SMS message, how would the return message be routed back to the agent who originally sent it?

Origination Options?

In this blog we will consider three different strategies that enable an Amazon Connect Agent the ability to ORIGINATE an outbound SMS message.  As noted above, responding to an inbound text message is well documented but originating an SMS message is a real challenge!  (Figuring out how to route the return message to the Agent that originated the message, is yet another challenge! )

  • Option 1 – User a TASK Template
  • Option 2 – Create an HTML Form
  • Option 3 – Create an Email to SMS solution

Each option is successively more complex to configure, each requiring additional AWS services including Lambda and ultimately DynamoDB tables.    Lets take these options one at a time and hopefully learn something as we attempt these different solutions and learn how to configure them.

Can an Agent Launch a Contact flow?

In order for an Agent to originate an SMS message, we needed to find away for an Agent to launch a Contact flow.   The contact flow can string together the steps we need to generate an outbound SMS.  We can turn on logging, trigger a lambda function, pass in the target phone number and message content and hand the message off to Pinpoint SMS for processing.   How can a agent launch a contact flow?  First we considered using a quick connect in which we could modify one of the default handlers to form the contact flow steps we required.  Unfortunately, with the exception of the External quick connect which had no call flow associated with it, the others required the Agent to have an active call before they could trigger the quick connect.  Drat! Foiled again!

Option 1 – Enter the TASK template!

We discovered that TASK templates might be a solution!  Creating a TASK template we found that we could add custom fields!  Yeah! So lets add a field for a phone number and one for message content! Also we might want to know which agent originated the message so we could route the return message back to that agent.   This started to feel like a real solution and but hen reality set in.  The good news was that you could assign the TASK to a contact flow!  This was very powerful, enabling the Agent to enter the phone and message and then send the TASK to the contact flow where we could invoke Lambda to handle the rest.   That is when the bad news surfaced!  There is no way to pass a custom field as a parameter that you could take advantage of in a “Set Contact Attribute” step.  Ah Snap!

Digging through the documentation we did find that there are only three variables (at the time of this bog) that can be passed as contact attributes.  These are the TASKid, the Name of the Task and the Description of the TASK.  So to solve our problem, we had to play with words such that NAME would now = phoneNumber and Description would now =the  messageContent.   This worked remarkably well and has become our current solution for enabling Agents to originate an outbound SMS message.

Click for Video on the DrVoIP channel!

The advantage of this solution is that you do not need to write any code other than the Lambda handler that your contact flow will invoke to send the outbound SMS through Pinpoint.  The entire solution uses existing Amazon Connect resources: Tasks, Contact Flows and the CHAT API behind the scenes.  The downside is the user interface is not intuitive and agents need to remember which field it the real phoneNumber and messageContent field.  It is not a workable solution if you are concerned about routing a return message to the Agent that originated the message.  If those are not concerns, then this is an effective and easy solution to implement.

Option 2 – Use an HTML form

Given the challenges of launching a contact flow, it might be easier to create a pop up HTML form.  When the Agent wants to originate an SMS message, they click a link that presents an HTML form.  The form has a field for the phone number of the recipient,  the message content.  The form also has a field for the Agent ID, which we will discuss further in part 2.    To enable this configuration we need to string together several AWS services:

  • Pinpoint SMS, which we assume you already have setup and handling inbound SMS to your call center instance!
  • We need to build a static website to host our HTML form.   The website will be built in an S3 bucket, in the same region and account as the Amazon Connect instance.
  • The HTML form needs to POST the form contents to an API Gateway.
  • Lastly, the Gateway needs to launch a lambda function to process the  request and provide a hand off to Pinpoint 2 way SMS.  Putting the api-gateway behind CloudFront as a subdomain defined in Route 53, can assure website security if you couple it with a cognito user group for authentication.

Option 3 – Create an Email to SMS solution

This is the most sophisticated of the three options, but is also the most powerful.  It also is the best solution for enabling a return message to be routed to the Agent that originated the message.   The configuration will require configuring a number of AWS services:

  • You will need access to your DNS records, or you will need to create a new domain in Route53, the AWS DNS service.
  • We will be creating a subdomain.  As our domain is DrVoIP.com our new subdomain will be SMS.DrVoIP.Com.
  • This subdomain will add a MX record in the appropriate DNS.   The MX record will point to an SMTP service, in this case using AWS Simple Email Services (SES).
  • SES will have an email receiving rule that will route any incoming email to this subdomain, to an SNS topic.
  • The SNS topic will trigger a Lambda function.
  • We need a Lambda function that will process the event and parse the recipient phone number, message content and the FROM field of the incoming email.  We will discuss the FROM field part 2 of this blog.

How to get the return message back to the originating Agent?

The next challenge was getting the return SMS message routed back to the Agent who originated the message to begin with.  As noted above, the CHAT stream does not provide a way of extracting attributes.   For example, lets assume your chat conversation asks the visitor (keyboard or SMS) what is the order number they are enquiring about?   We can overcome this with some clever event management and we will discuss this option in Part 2.

Routing a return SMS message to the Agent that originated the message, is a subject we will explore in Part 2 of this blog on Amazon Connect SMS channel management!