Amazon Connect – Can Agents log in and out of individual Queues?

Agents in Multiple Queues

One of the more requested features among call center managers is to freely move Agents in and out of customer service queues!   In Amazon Connect, routing profiles associate agents with queues.  If Agent Gandalf DeGrey is a member of the Technical Support team and also a member of the Customer Service team he would most likely belong to a call profile aptly named “TechSupport&CustomerService” (Voice and Chat).

Queue Priority

Call Profiles not only associate the agent with the queues that they engage customers through, but they also enable you to set the priority of each queue.  If Gandalf is able to server both queues and both queues have callers waiting for an Agent, which caller will Gandalf be presented with when he again becomes Available?   The answer to this is based on the priority established in the routing profile for each queue in the profile.   It may be that Gandalf is particularly skilled in the area of Technical Support and it has been determined that he should answer these call request first and only handle customer service calls when the Tech Support queue is empty.   This is handled by configure the routing profile in such a way as to favor technical support callers.

Call Profile or User settings determine Priority?

So do we set the priority based on the user or in the routing profile?   The fact is that the call routing profile determines the priority of calls processed by the users configured in that call profile.  This is a powerful tool that enables a great deal of options in the configuration of call handling goals.   Contact centers are living dynamic  entities that change the level of demand by the hour, the day of the week and external events of the day!  There is not a staff for-casting solution that can cover the impact of the days events on a call center.  For that reason, we need a way to dynamically reconfigure our work force to meet the demands of the day.

Can you move an Agent between Queues?

We created the Dextr dashboard feature set to enable options that most call center managers demand.  Being able to move an agent between queues to reconfigure the call center to meet the demands of the day is most certainly an essential management tool!   The Dextr dashboard for Amazon Connect enables you to quickly reconfigure your agent pools easily with a few key strokes by those with the required permissions.    The Dextr dashboard has a user management TAB and enables you to easily move users between queues!

Creating Matching routing profiles

In this example, Gandalf  is in the “TechSupport&CustomerService” (Voice and Chat) profile that enables him to handle calls for both Technical Support and Customer Service.  Events of the day are such that we need Gandalf to service only Technical Support callers.  To enable this, there would be a Technical Support call profile that only serves callers to that queue.  Agents that are assigned to this call profile will be fully dedicated to the Technical Support Queue.

To effect this change, click the User TAB and select the agent management wants to reconfigure.


Then select the the call profile you want to assign that agent to and save your change.


The DexterDashboard enables the call centers most required features available to Contact Center supervisors.   Head over to https://DexterDashboard.com and sign up for a free trial of 15000 minutes of usage.  Try before you buy and pay only for what you use1   Tell them DrVoIP sent you!


Amazon Connect & Dextr now support Chat

Dextr Website Chat Integration

The ability to integrate your Company Website with your call center is a powerful customer experience management tool.  Being able to integrate your website with a ChatBot is even more powerful, but imagine the power of being able to escalate a chat session to a voice call!  Now that is a truly powerful customer engagement strategy and now a standard Amazon Connect Call Center feature.

Features of Amazon Connect Chat

The Chat functionality enables you to reuse the very same contact flows that you established for a voice call or you can create new contact flows that are chat specific.  This significantly reduces the deployment time.  A “Play prompt” step, for example, that would normally be spoken to a caller, is now pushed out as a chat message.   Chats are persistent and given the asynchronous nature of these interactions, responses can be anytime over a 25 hour period.    Let us assume you have a chat session with a client who asks a question about your product or service and the agent asks a follow  up question to clarify the customers enquiry.  Maybe the customer has to go find the answer form another team member and does not reply for an hour.   The Agent might disconnect, but if the customer continues the chat session later, a new session will be created with the entire chat history  and transfered to a new agent.  It is possible also to send the chat back to the same agent, but assuming that agent is no longer available, the entire chat history is made available to a new agent.


The Dextr Dashboard implementation

Dextr now includes the Chat engagement option as part of its standard desktop agent offering and the Engage tab now shows Phone, SMS, Email and Chat!   Dextr also adds Chat to its activity screen adding a new icon and a READ button.  The Activity page now notes the chat details including the appropriate metrics.  A supervisor or agent with the proper permissions can also bring back the entire chat history, by hitting the READ button, in a manner similar to how Dextr brings back a recorded phone call!

Dextr is a subscription based portal in which, if you have an existing Amazon Connect call center, you can be driving a Dextr dashboard in less than 15 minutes!   If you don’t have a Dextr dashboard, we will be happy to create one for you!  Ask DrVoIP about our Dextr Contact Center Managed Service Solution in which we provide an  Amazon Connect Call Center for your enterprise, with no money down, no contracts and pay only for what you use!   We take care of everything from deign, through setup, training, “go live”, on going technical support and a Dextr Dashboard for every agent at a nominal per connected minute, exclusive of telephone carrier charges!   DrVoIP@DrVoIP.com


Amazon Connect Tips, Tricks and Trouble Shooting!

What no Delete for Contact Flows?

One of the first discoveries you will make while configuring contact flows is that you can NOT delete a contact flow.   Once it is created, you can “save as” but you cannot delete it.  There is a good reason for this and hopefully by the end of this blog it will make sense to you.   Out of the Box, Amazon Connect comes pre-configured with a wide variety of contact flows and system parameters.  You will see this listed as sample and default in a newly created instance.  If you poke around you will also see that a schedule of basic hours has been configured along with a basic queue.  There are preconfigured security profiles and preconfigured routing profiles along with a small library of professionally recorded voice and music  prompts.


This pre-configuration and population of basic and default parameters is done for a reason that also helps explain why you cannot delete anything after you create it!   Assume you open a new Amazon Connect instance and following the setup menu, add a telephone number.  Assign that number in the drop down window in the phone number configuration to point to the “Sample inbound flow (first call experience”.   Then call the number.  This Call flow will make use of most if not all of the default and sample contact flow listed in a fresh out of the box, unmodified Contact instance.  Since we did not configure an agent or queue it draws on several preconfigured parameters including the “Default Customer Queue” which describes what a caller hears while waiting for an Agent to become available and the “Basic Queue” along with the “Basic Hours”.

How Amazon Connect stages Default Contact Flows

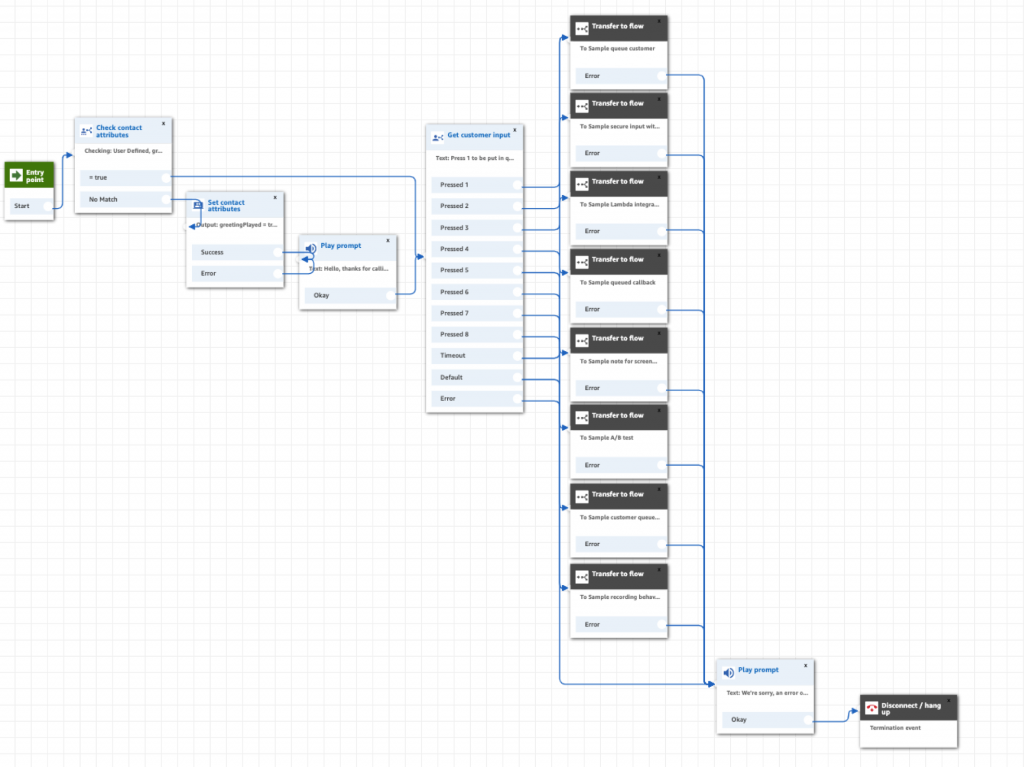
If you open the “Sample inbound flow (first customer experience)”  note that it does NOT make use the “Default customer queue” step.  How is that we hear it if it is not in the contact flow?  When the call is transferred to an Agent we did not even configure yet (we are logged in as the Instance Administrator on a CCP softphone), we even hear the “Default agent whisper”.   Nor did we configure a Queue?  Likewise if we put the caller on hold we are tapping the “Default customer hold” contact flow.  If we are in Call Wrap up, the caller would be hearing the “Default customer queue” contact flow while awaiting for an agent to become available.

This is the key reason you can not delete anything!  To do so would jeopardize the stability of the Connect Instance.  These defaults assure that configuration newbies cannot stray materially from the experience they intended to configure.   While the Connect instance is setting up an outbound connection to the agent CCP softphone, and even longer if dialing an agent’s hard phone.   The caller will hear the “Default customer queue” experience.  We recommend that you get a “ring back” audio prompt and use that in either the default customer queue or the customer queue you create.  We think it is a bit confusing for a caller to call in and hear music while being transferred.  You should also note the possible impact on your inbound call statistics.   Additionally, note that billing started the moment your caller hit the phone number regardless of the fact that they are not yet connected to an agent.

Creating and Modifying Contact Flows using “Save As”

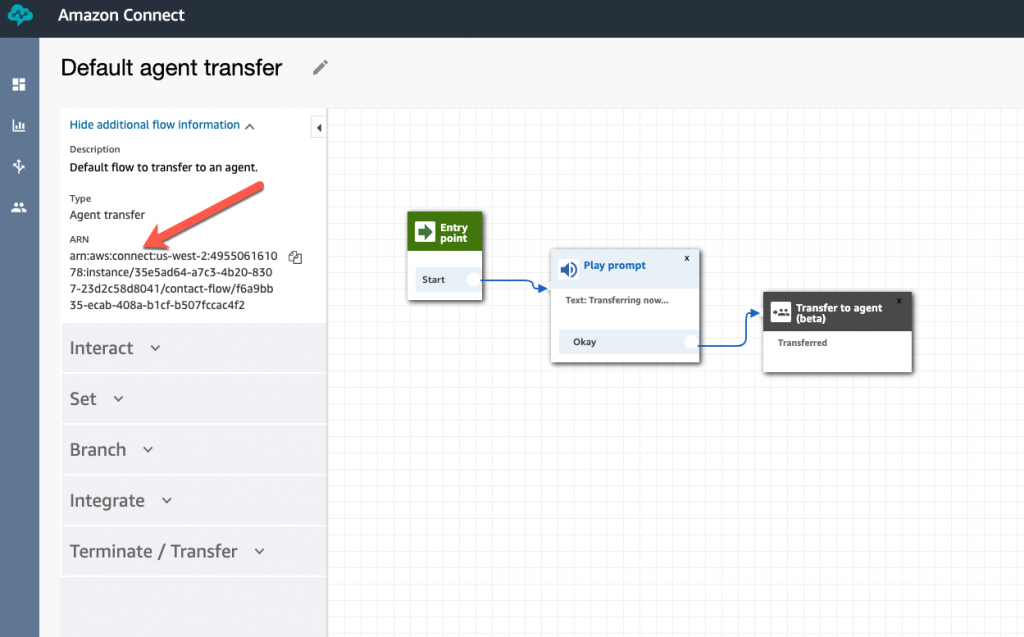
Each of the Contact flows in an Amazon Connect instance has an Amazon Resource Number or ARN. This is a globally unique identification number and defines every contact flow in the instance.  Generally, you will build a new contact flow from an existing one.  To do this, you first open the contact flow you want to copy and do a save as.    You have to pay attention here, or you will have a big problem!   Some folks open a contact flow,  change the name and make some modifications and then publish it!  It will show up in your list of contact flows, but it will still have the ARN of the original contact flow even though you renamed it!   This means that other contact flows that call on that original contact flow will now get all your changes!   What you want to do is rename the contact flow and do a “save as” in this way you create a new ARN and will not be over writing the original contact flow.


Not all Contact flows have all contact flow Options?

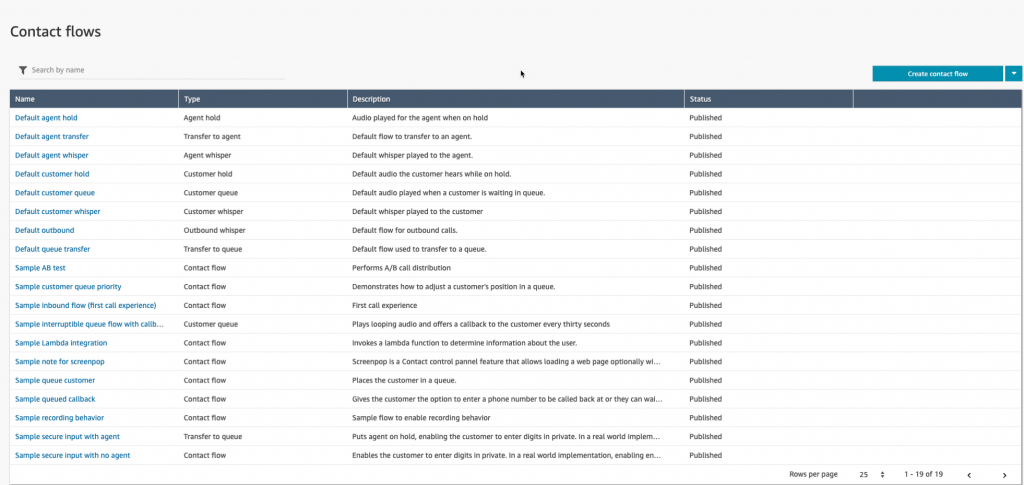
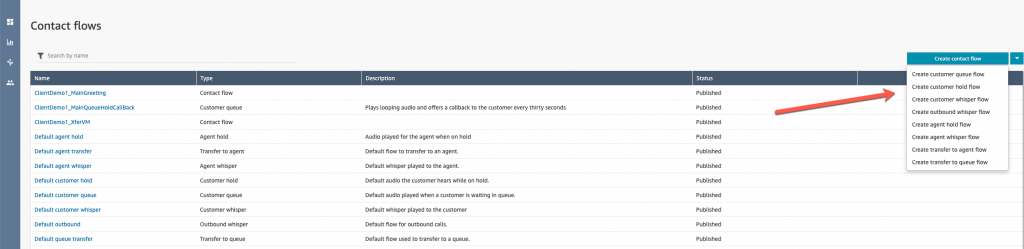
There are about 9 different types of contact flows that you can create to meet your call flow requirements.  If you create a new Contact Flow you need to understand that not all contact flow types will have all the contact flow options.  For example if you are describing the experience you want a customer to have while in queue waiting for an agent to become available, you will  open the “Default Customer Queue ” and do a “save as” to create your experience.   Do not expect to find a “Transfer to Flow” option in the list of possible steps as that option is not available in this type of contact flow.  The list of step options changes based on the type of contact flow you are creating, so keep this in mind!
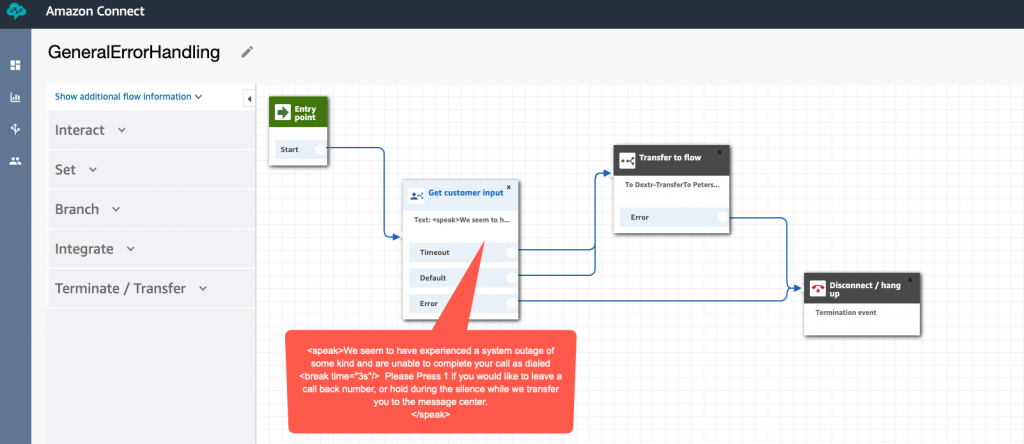
 

Error Handling

Generally, every step in a Contact Flow has an error exit.   We have found that it is best to create a Contact Flow named “error handling” and to use this as the solution to all of the options that you must provide an error exit.


Use Speech Markup Language for Text to Speech prompts!

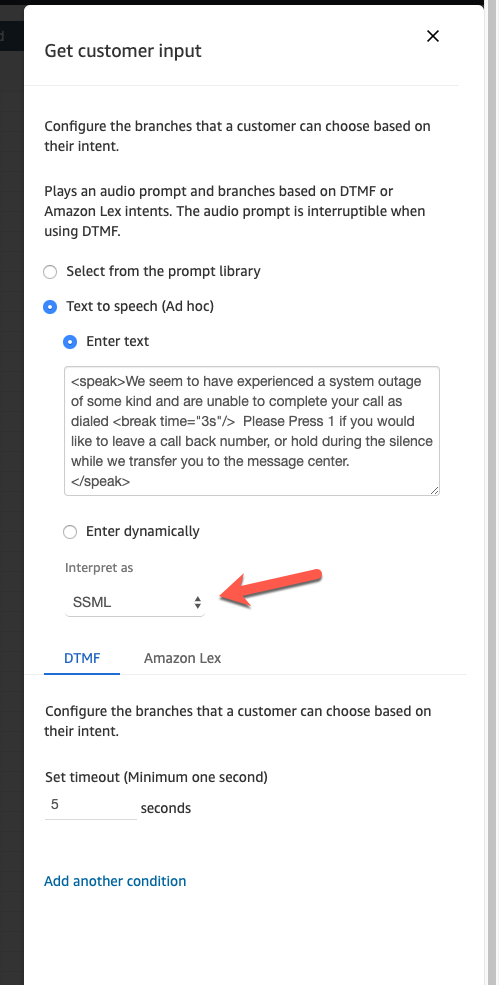
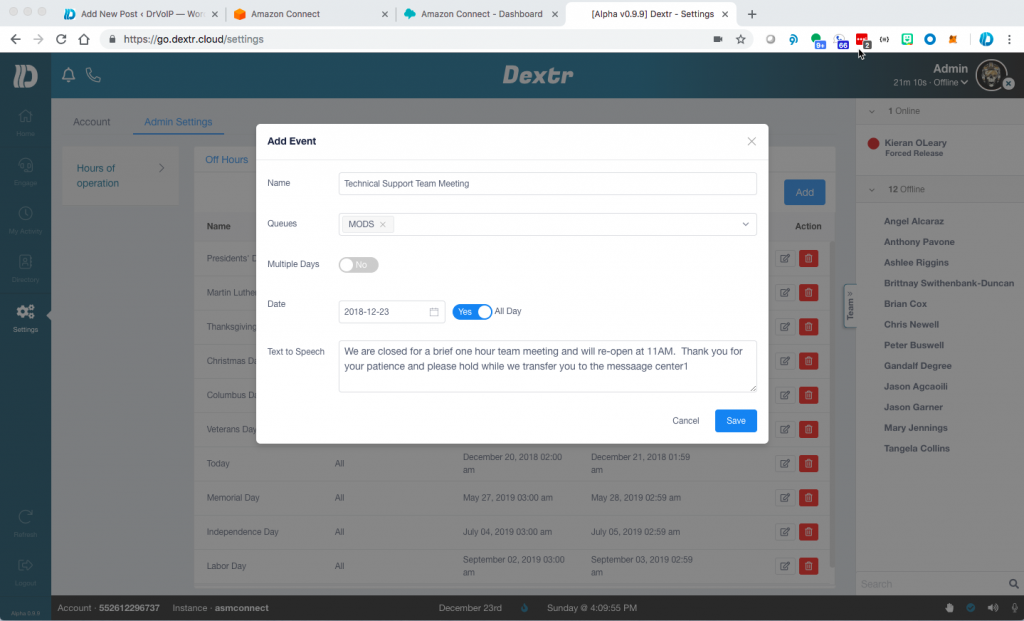
As a consultant deploying call center and IVR solutions, one of the most frustrating aspects of the implementation is waiting for clients to get their voice prompts together!   Generally we will not start an implementation until we have the prompts!  Text to Speech is a life saver for deployment engineers.  You can create prompts on the fly and let people test them, suggest modifications and really fine tune the prompts to achieve the desired level of customer care.   When the prompts are all agreed to, you can then get them professionally voiced or not!  We find that Amazon Polly is an excellent option for prompts but we also suggest that you use the Speech Synthesis Markup Language option.  In all of the prompt areas you can choose between loading a Wave file, or using Text to Speech. When using Text to Speech you have the option of interpreting the text as text or as SSML.     SSML enables you to add tags that can control the various components of speech including tone, pitch, speed and format.   You may want a number read as a phone number for example, rather than a long integer.   SSML is simple to configure and it very powerful.  Learn to use it always and you will have very excellent results.

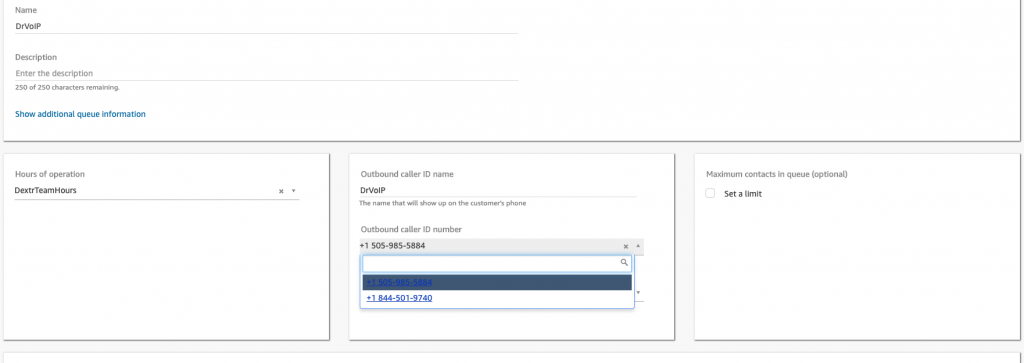
Don’t forget to assign outbound phone numbers to your Queues

In Queues in which Agents are expected to make out bound calls you must associate a phone number to that queue for outbound dialing.  The Agent will not be allowed to make outbound calls if they do not have a phone number assigned to the queue.  You can also try to put an outbound name in the same configuration area, but there is no guarantee that this name will be displayed to the CallED party.  The phone number will most likely display to the CallED party, however names are provided by multiple options at both the carrier level and the end device level.

Trouble Shooting 101

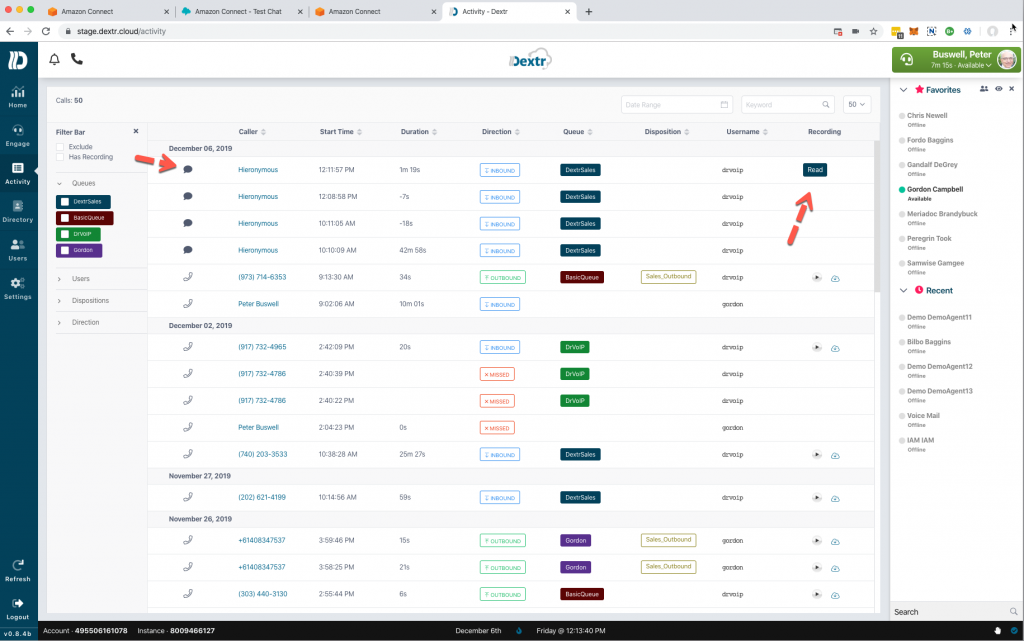
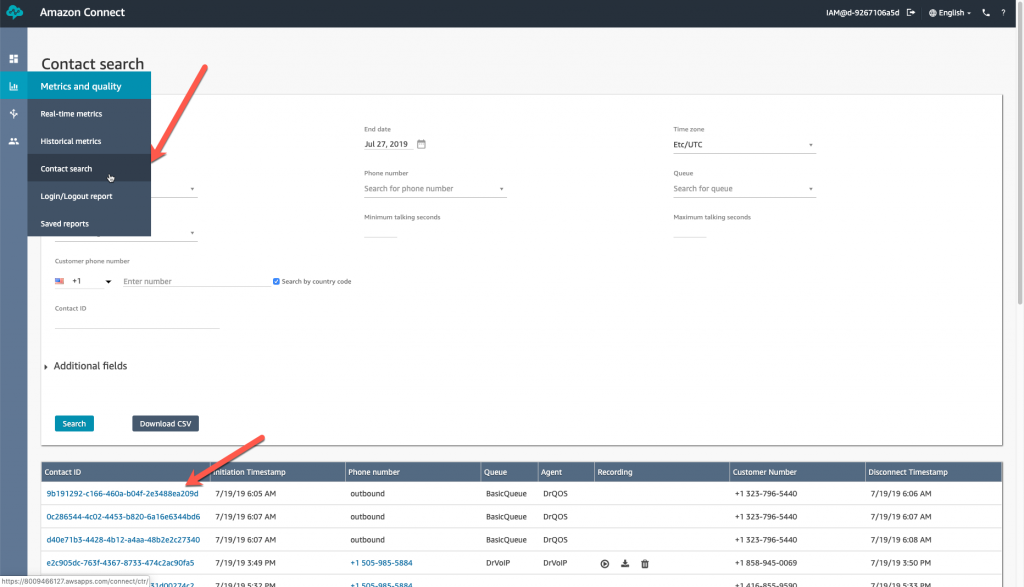
When trouble shooting Amazon Connect contact flows your best friend is CloudWatch and Contact Flow Filters!   Lets take a look at each of these tools to better understand how they work together to provide a history of how a specific call behaves.    First while in the Connect dashboard you will find under “Metrics and Quality” you will find a  TAB for “Contact Search” .  Selecting this option will enable you to set search filters for the contact record you are trouble shooting.  You can filter on the usual date and time parameters, but also by queue, and by call type and direction (Inbound, Outbound, Transfer, API, Call Back and Queue Transfer).   The goal is to obtain the “ContactId” the key to all activity in the Connect Instance.  If you know this ContactId you can just search for it and skip the filters.  Optionally you can just “Search” and you will see a list of ContactId’ based on the default filter.

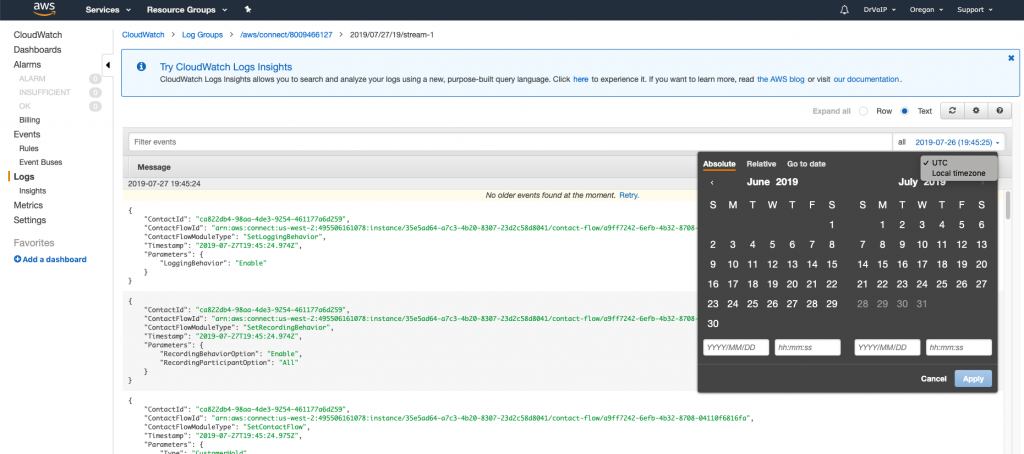
Now that you have the Contact ID you can move over to CloudWatch (this assumes you have enabled logging) and you can search for this ContactId record and follow the entire call flow from start to finish,  Go to the CloudWatch service, click on Logs and then locate the “Log group” for your Amazon Connect Instance.  This will pop a list of “Log streams” and “last event time”.  Find a row that closely matches the date and time of your target ContactID and open that log stream by clicking on it.

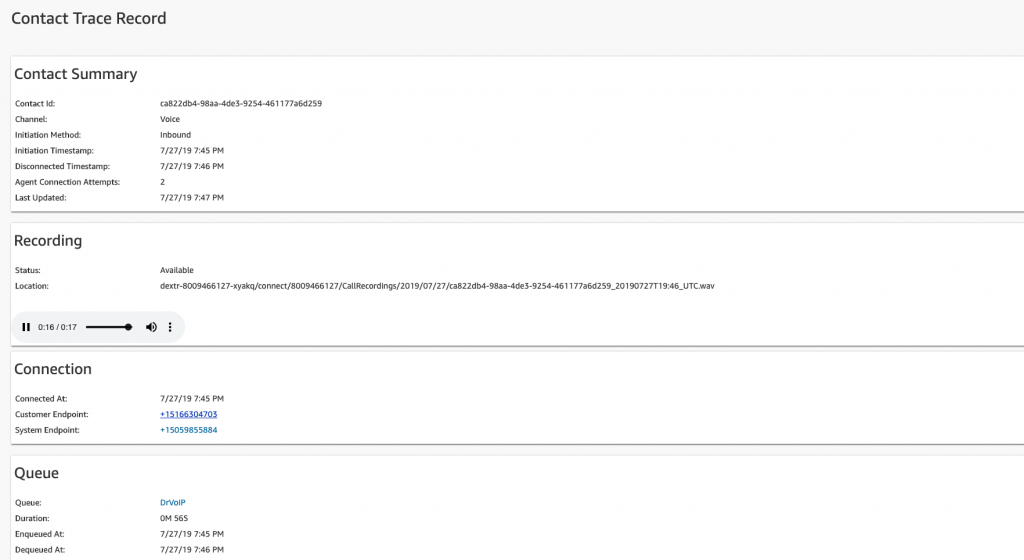
Note that the time in the even stream is in UTC and matching log times is always interesting.  In this example we searched for a particular Contact ID in the Connect dashboard and it shows that the call we are interested in had a “Initiation TimeStamp” of *7:46 PM”  GMT/UTC  or Zulu  time (if you are military, which all mean the same time reference regardless of where you are located on the globe).


The Contact ID is a clickable link, and will bring up some information of interest as contained in the Contact Trace Record.  There will be a Contact Summary, A recording if enabled with the location of the recording and a playback button, Connection Endpoint pairing and Queue information.

Heading over to CloudWatch and checking the respective Log Stream in the instance log group, we find that the time is being adjusted to the GMT offset of the time zone the Instance time reference, which in our case is GMT -7 hours!  S o the Contact Filter Search in the Amazon Connect dashboard is being Time Stamped for GMT/UTC but the log is offset (Terminate at 7:46 PM in dashboard is listed at 12:48 in the CloudWatch logs).   Keeping track of this time offset will drive you a bit nuts, but if you are aware of it, you can figure it out.  SUMMARY – Look in Cloudwatch for the UTC offset in your Connect Instance and NOT the time stamped in the Contact Filter of your Amazon Connect dashboard!


When searching for records in the CloudWatch logs you will note that you can set it for ROWS or TEXT and you can also select to search by specific times and choose between UTC time or Local Time zone>

When you set your search by ROW you will get an orderly list of multiple Contact ID’s within the event range reported.  Logs are posted about every minute or so.  In an instance with a heavy call flow you are going to find many different Contact ID’s in that event range and will have to search for a specific record using a search filter in the format of “ContactId” = “ca822db4-98aa-4de3-9254-461177a6d259”.   In Text mode you can also search using the CTRL F feature of your browser.

When you use the ROW mode you will get a list of Contact Flow steps that, by pushing the down arrow will open each step for inspection.  This is necessary to see each step of your call flow, what Contact FlowId  was used by ARN.

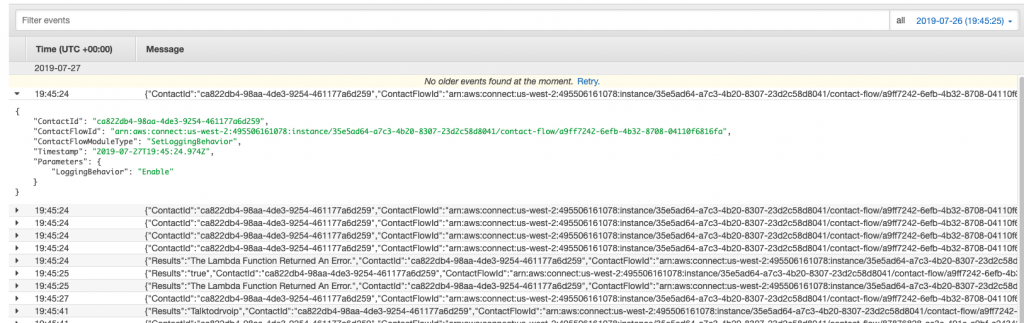
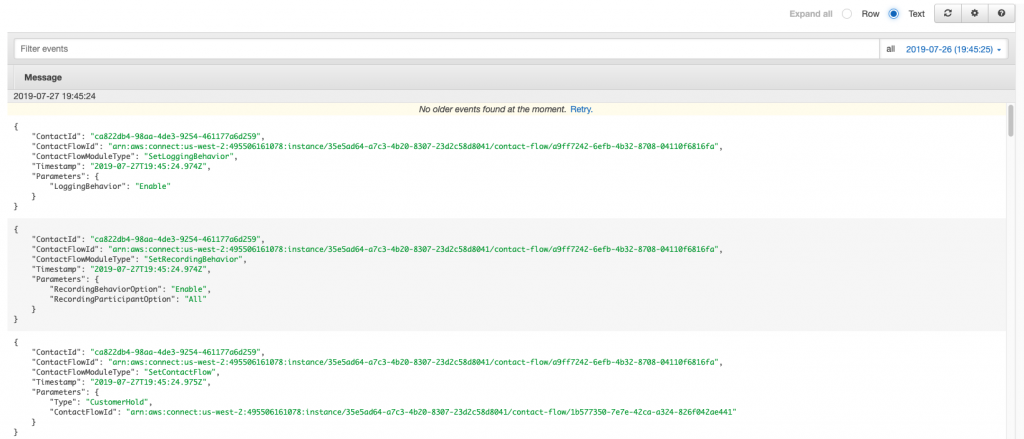
Selecting the TEXT mode will generate the same list of JSON objects but they will be fully expanded:

CCP Trouble Shooting

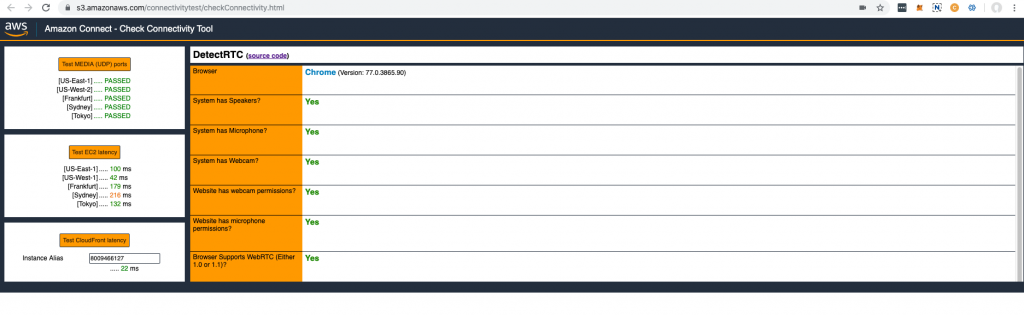
There is a very useful tool for testing the connectivity of a specific desktop call control (CCP) to your Amazon Connect instance.  It provides useful information about the latency, resource, reachability and connectivity that are essential base lines for trouble shooting.   Click here!

CCP LOGS

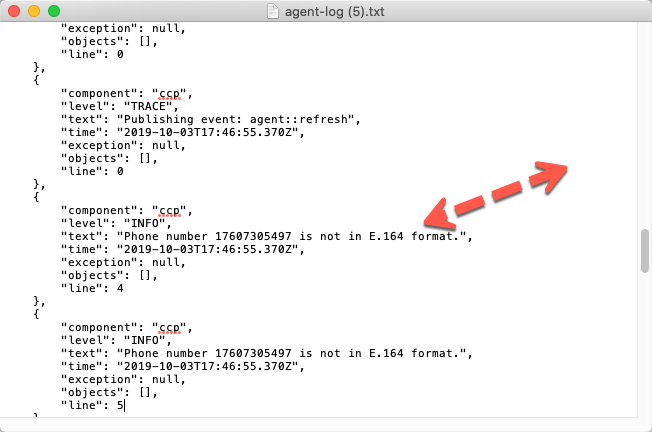
On the CCP you will find the little GEAR symbol and if you click on that you will be able to download the logs for this Agent Desktop.


You can open the logs with any text editor and the content often spells out the issue pronto quick!


(to be continued)


A Call Center for Cheap, Penny Pinching, Tightwads on a budget!

We Design, Deploy, Service and Customize Amazon Connect!

Since 2008 DrVoIP had been working  in the support of VoIP based call centers from CISCO, Avaya and Mitel/ShoreTel solutions.   Since 2017 we have focused exclusively on AWS services with a particular focus on ‘Amazon Connect” call centers.   From Recording and Voice Mail solutions, through Workforce Management and Voice analytics we have provided custom software  integrations on time, on budget and with the highest customer satisfaction scores.  Our references are public, verifiable and serve as a guide to our abilities and commitment to excellence.

We are not here to run up your professional service bill.  We are here to help you realize your call center vision an always work on a “fixed fee” basis.

We deploy “virtually” and “globally” so just click or call! – DrVoIP@DrVoIP.com

DrVoIP fixed cost deployment packages

  • Complete design, deployment and training base package includes:
    • Amazon Connect instance setup in customer AWS Account, with usage billing direct from AWS;
      •  Up to 10 inbound toll or DID numbers
        • DNIS direct to queue routing or 1 IVR DTMF Options Menu
      •  Up to  5 Customer Service Queues
      • English Language support (option for Spanish, French)
      • Unlimited Agents
        • We configure 5 Agents for your use as a template and you configure all the others you may want
      • Up to 5 Routing Profiles
        • Routing profiles bind Agents to the CSQ they are assigned to work in.
      • Voice Mail with Email and SMS delivery
      • Queue Hold  with options for “call back”, voice mail, transfer or continue to hold for Agent
      • Website Chat
        • a single queue connector that enables website visitor to “chat” with call center Agent
      • Dextr Dashboard integration
        • Dextr can provide email routing, text routing, real time and historical reporting
      • Fixed Price Deployment $2995
        • Larger call centers quickly quoted!
    • OPTION PACKAGES
      • Multiple Language support
      • DIAL by Extension
        • Each agent has faux Extension number that can be used for direct call to agent
      • Dial by Name
        • Speech Recognition enables caller to speak a name (i.e. Tom) or function (i.e. Sales)
      • CRM Integration
        • Standard Publish Connector for Salesforce, Zendesk, Freshdesk, ZoHo, ServiceNow and others
          • Functionality defined by the CRM provider and author of the connector
      • CHAT BOT
        • FAQ, or Data acquisition before escalation to a Call Center Agent.
  • Free Trial of Dextr Dashboard is included!

To order an Initial Basic Configuration package and receive a detailed planing guide click here .  Contact DrVoIP@DrVoIP.com or Better yet,  Call 800-946-6127 ask LEX for the the Doctor!

Amazon Connect Call Center build strategy

We offer qualified companies a no cost “Proof of Concept “ (POC) Amazon Call Center Instance built in our portal for your use and testing with your agents able to log in and take phone calls on a number we provide.  A POC can be set up within a few hours!  From the POC, we design and deploy a solution that meets your requirements in your Amazon Connect portal.  We make use of our discovery process and planning guides.   We also build our solutions with our own Agent dashboard, named Dextr.   Dextr  provides the core feature set  that all call center professionals expect including voice, text and email routing to the ‘next available agent’.   We can also provide outbound “auto campaign dialers” to increase agent productivity for notifications, recorded announcements and appointment reminders.

Your TCO is further reduced, when compared to the cost of the  software engineering or professional services required to obtain the same feature set as that available to Dextr subscribers.    Dextr is a UCaaS solution that front ends Amazon Connect Instances with a custom agent dashboard and supervisor display.  Any enterprise with an Amazon Connect instance can onboard themselves at https://Dextr.cloud.  We deploy “virtually” and “globally” so just click or call!

DrVoIP Amazon Connect for the Business Manager

  1. What makes up a Basic Amazon Connect Call Center?
  2. Amazon Connect Discover Questions for Call Center Planning
  3. Amazon Connect Planning Guide
  4. Amazon Connect Historical Reporting Options
  5. The ROI and TCO when using the Dextr Dashboard
  6. Amazon Connect Check List
  7. Amazon Reporting Elements
  8. Understanding Amazon Connect Billing
  9. Amazon Connect & Dextr.Cloud Agent Dashboard
  10. Three Minute Video Overview of the Dextr Dashboard for Amazon Connect 
  11. What are “soft limitations” on new accounts?
  12. Advanced Post Call Survey strategies 
  13. Speech Analytics now a standard part of Amazon Connect and Dextr!

DrVoIP Amazon Connect for the Technical Manager

  1. Amazon Connect Basic Configuration Tutorial
  2. Amazon Connect Custom integration Tools
  3. Amazon Connect Configuration “tips and tricks”
  4. Tech Tip – Understanding LEX BOT Versioning and Alias 
  5. Deep Call Back from Queue without losing your place in Queue 
  6. Simple, Cheap and useful Voice Mail Solution 
  7. Is Today a Holiday Check?
  8. Amazon Connect “Forced Release” Options 
  9. Amazon Connect building prompts with Polly
  10. Building Conversational LEX Solutions
  11. Amazon Connect Call Back from Queue Options
  12. Email Routing in Amazon Connect
  13. What are “Soft Limits”
  14. Building Custom CCP for CRM Integrations
  15. SMS Inbound request for call back 

DrVoIP YouTube Channel – Complete Amazon Connect Configuration training!

Amazon Connect Email Routing using Dextr.Cloud

The Dextr Dashboard for Amazon Connect Agents has added email routing to its existing voice and SMS/MMS channels.   Similar to a voice call, an incoming email message is routed to the next available in the queue assigned for email.   Dextr will collect emails, provide auto responders.   The email is “sticky” and the email conversation will stay with the first Agent to respond to the email until the conversation is ended.  Similar to the Dextr SMS channel, if the original agent is not available to handle the follow on conversations, the entire conversation will be forwarded to the next available agent.

Setup is easy, in the Channels tab of a Dextr user with Administrator permissions, simply enter the appropriate email user, password, imap and smtp host address!  Then configure the queue that should be the target of an inbound email along with the initial email auto responder and the end of conversation auto responder.  Multiple emails can be established and can point to different customer service queues!

Email setup and queue selection!

Agents can manage email and voice calls depending on the permissions and queue assignments.  Creating an email named CustomerCare@yourcompanyname.com can be routed to the customer service team.  Email is an asynchronous yet powerful customer tools and many folks prefer it to waiting on hold for the next available agent!  When an incoming email is routed to an available agent, they accept the mail exactly as they do a voice or sms call.   Opening the ENGAGE EMAIL tab displays the content of the incoming email.  As the email conversations ping pongs back and forth, the agent will see the entire email conversation in the ENGAGE portal.

The Agent will find the accepted email in the email client registered for that agent’s email box.   The agent will then respond to the email and Dextr will assure that the recipient of the email sees that it is from the address of the origitanl email TO: filed.   There is a button to END the conversation and when clicked, the final auto responder defined during the email channel setup, is sent to the author of the original incoming email.  (Those familiar with ShoreTel ECC routing will be very comfortable with this email implementation which has the additional benefit of being “sticky”.  If the agent who originally responded to the incoming email is unavailable, the entire email conversation is forwarded to the next available agent for follow up.

Dextr email routing is a bundled feature in your subscription and you should give it a try!  Price is what you pay, value is what you receive.   DrVoIP@DrVoiP.com

Dextr a Customized Agent Dashboard for #Amazon Connect Call Center!

AWS Connect CCP

Building out call centers on AWS, you learn a lot about opportunities for productivity enhancements!   One of the first issues that we noted was that the standard Contact Control Panel or CCP, which is basically a WebRTC soft phone client, though very useful has many opportunities for improving the Agent experience.   The list of request features is growing and as a result, we have taken on the development of  a customizable AWS Connect Agent Dashboard!


Call DrVoIP for AWS Call Center migration assistance.

If your only introduction to AWS is Connect, their cloud based call center product, you have successfully created your first call center instance and you are now taking inbound phone calls!   It was remarkably easy and with no real ‘geek” training, most call center professionals were able to log in, setup an instance, organize a call flows, create agents and voice prompts, obtain a phone number an in a few hours, you were taking phone calls!  Wow!

AWS Demo API’s

Did you know that the Agent CCP is completely customizable?  AWS provides a number of API’s and Connect Streams that a software engineer can access toward the goal of building an Agent Dashboard with a set of features and tools that are unique to your call center environment.  There is even a site you can log into and test some of the available API’s.   If you go to http://connectdemo.com and click on the “demo sites” you can see some examples of customized CCP, Click to Call, Screen Pops and other tasty code bits.

Agent Streams

We note that there are many “connect streams” that a developer can tap to create their own version of CCP.   The supervisor side, however is not as fully formed and there are not as many streams and API’s available to support Supervisor requirements like real time queue and agent metrics.   In fact we had to develop our own socket layer communication strategy to implement the features we envisioned in our dashboard.

Recently we have discovered new and not readily available API for other AWS streams.  Some are only available depending on your support contract status.

Agent Dashboard Feature Set

The list of functions and features that we have added to our CCP is still growing but we set a goal of making the dashboard painless!   For example there is nothing to install.  Our application needs to be added by your instance administrator as an application end point in the Connect dashboard.  Once that is complete, the user just points at our portal and enters their instance name (you can even upload your own logo).   The traditional AWS Connect CCP shows up and you login as normal.   Once your credentials are established, you are then presented with the revised Agent Dashboard as shown below.

AWS Connect Dextr Agent Dashboard feature set

Most folks have asked for a “team status” display.  As an Agent I want to see the status of the other agents on my team.  So the first attribute we added was just that, a team status display.    Each agent has their own Activity List showing all of their calls both inbound and outbound.   Next to each call is a link to hear the recording of that call. Supervisors can select all calls, but agents only see their own call recordings.

Each Agent has a personal contact list with contacts that they have entered for their own use.  This augments the “quick connects” that they system administrator had created.  Here is the feature list:

  • Nothing to install! Instant Access via https://go.dextr.com which has video instructions for on-boarding;
  • Customizable Logo and YourCompany custom log-in URL;
  • Role based Login (supervisor, agent, administrator)
  • SAML support;
  • Agent Team Status Display;
  • Agent to Agent Chat
  • Agent Call Activity with (click to return call);
  • Directory System with Click to call;
  • Help Button – Alert Supervisor;
  • Queue Monitor – including calls in queue, max waiting time; optional red, yellow tags)
  • Personal Recording; (permission option);
  • Supervisor Permissions add: Login/Logout (change agent state) Monitor, coach and Barge in;
  • All Recording search and play (see note 1 below);
  • Real Time Metric review Report Generation
  • Ability to set Holiday Schedules and “ad hoc” closings with new close prompt (think team meeting).
  • Push Announcement String out to Agent Dashboard for alerts and other notices.
  • Omni-Channel SMS/MMS enables test and pics to the next available agent
  • Omni-Channel email routing to the next available agent
  • “no headset” audible alert options for softphone

We are also planning to integrate or Click2WebChat functionality as an advanced feature option.  This would bring website co-browsing, video chat, SMS and keyboard chat into the call center!  The Dextr screen shows the Agent interface including the Video and Chat links.

How do you set a Holiday Schedule in Amazon Connect?

Dextr enables a user with Admin privileges to open a window and create both HOLIDAYS AND AD HOC closings.   The instance is initially stocked with all US Federal holidays already listed.  The Admin can modify, add or delete these dates.  They can also specify, via the drop down window, which queues they are closing.  There is also a Text to Speech window in which the supervisor can enter the text of a prompt that will be played to a caller should they call during that time slot.

We named the dashboard Dextr!  There is nothing to install.  Follow the video instruction below and have your Amazon Connect Administrator add us as a trusted application, then head over to our portal, log in and put Dextr to work for your team!

If you have a requirement for the CCP we would also like to know more about your requirements, so let us know.   If  you do not have an AWS Connect instance, DrVoIP will build you a “proof of concept” portal for no charge!  Remember, the American Business Communications landscape will be littered with the bleaching bones of those companies that do not adopt Amazon Connect as the enterprise call center that manages customer engagements!


Add DNIS routing to your ShoreTel ECC Contact Center!

Why Route by DNIS?

Routing by the number the caller dialed, or DNIS is the preferred routing strategy for any Call Center call flow.  Clearly you can assign a DID phone number to a specific call flow and anyone who knocks on that door is answered by the same group of agents.   It is much more efficient to grab the DNIS information, however, and use it to index a database to retrieve the call routing information.  In this way, we only need one door to the call center!  The DNIS might be used to route a call to the proper product or service group and it may also be used to retrieve client information that the call center Agent needs to see displayed  in order to provide a custom care answer prompt.

Consider the requirements of a Hospital that is providing “centralized scheduling services” for 1000’s of primary care physicians.  When the inbound call is presented to the Agent, the requirement is that the caller be greeted with a customized answer prompt.  For Example:  “Doctor Leary’s office, are you calling to make an appointment?” or “Thank you for calling Doctor Williams”.  This type of dynamic call handling can best be managed by using DNIS information to retrieve the Doctor’s name from a database   We do this regularly in CISCO UCCX and ShoreTel ECC Call Center solutions and the process is essentially the same for both solutions.

ShoreTel ECC Route by DNIS example

First, we need to create a DNIS Map in the ShoreTel PBX; a ‘route point/IRN ‘ combination to pass the call to the ECC;  and an ODBC connector from the ECC server to your favorite SQL database server.   The SQL server would host the database your scripting application needs to access in order to obtain the correct answer prompt.  Lets assume that the database contains a very simple table structure:

DABASE = DNIS_listofDoctorsOffices = (Field1 = DNIS Number, Filed2 = OfficeName, Field3 = QUEUE_IRN)

You would then write a simple script to take the incoming DNIS information and use it to index the database and get the OfficeName and maybe the Customer Service Queue that handles that office (City or State or what have you).  There is no limit to the information you could retrieve and present to the Agent,  For example: Name, Service Class (Platnium, Gold or Silver), Renewal date, last order, shipment date, the list goes on.   In this simple example the script would take the DNIS and use a SQL expression to retrieve the answer prompt data:

Select * from DNISlistof DoctosOffices where DNIS = %DNIS_NAME%Sample ECC Script Screen

Creating a DNIS MAP in ShoreTel iPBX

In the ShoreTel iPBX Trunk Group it is necessary to create a DNIS map for two reasons:  First, the ShoreTel ECC can not read the DNIS directly, it requires the administrator to fill in the “dialed number” column in the DNIS map.  The ECC has a mandatory call profile filed named DNIS-NAME which will be auto filled with the information you provide in the DNIS map “dialed number” column.     Secondly, unlike a DID number that might be directly mapped to an extension, we need a way to get the incoming call connected to the IRN on the ECC that is running the DNIS SQL lookup  Script.   In this example, the Destination field of the DNIS Digit Map in the ShoreTel iPBX Truk Group points to the Route Point/IRN in the ECC that supports the script.


DNISMAP

POPing the Agent Display with useful Data

The ShoreTel ECC has two variables data types: Mandatory or System Variables; and User create Variables.  The Mandatory variables are system call parameters like ANI or DNIS and a long list of other system based data.   ANI contains the digits that make up the caller identification and that is also often used to retrieve database information.   If you are using ANI you will need to do some string manipulation to strip off the +1 from the 10 digit number, or format to match your database.   User created variables are the name you create for the fields you will get from your database.  Useful examples would be CustomerName, DateOfService, AccountBalance and RenewalDate.    Any Variable, User created or System,  can be pushed out to the Agent Display within the ShoreTel Communicator.

ScreenPop

What is your Call Center Application Requirement

We have seen it all, so we are always interested in your requirements for custom CRM integration and Call Flow management.  Give us call or drop us an email and play “stump the vendor”.   We would love the challenge of finding yet another new ShoreTel ECC or CISCO UCCX Contact Center application requirement!

[show_related ids=”2828, 2610 ,2447, 1378″]

UCCX Instant Contact Center “Killer Script” $295?!

The Vision!

It has long been our vision to create a UCCX script that can be used to rapidly deploy a new Customer Service Queue.   We appreciate that each Contact Center is different, but there is a set of expectations most folks have for the basic call flow and feature sets.  Between the vision and the reality is a leap of faith, but we have emerged a Generic Customer Service Queue consisting of a small library of scripts, professionally recorded audio prompts, XML document files and supporting sub flows that, taken together,  provide a very rich call center solution.  If you are building out your Contact Center with CISCO UCCX as your call processing engine, this script will get you operational in a fraction of the time it would normally take to design and develop a script form scratch!   If you are running at least Version 8 or higher on an Enhanced license, the resulting contact center script provides a rich set of features.


Included Feature Options:

  • Auto configuration based on the Number Called;
  • Holiday List checking for programmed closures;
  • Supervisors are enabled to open and close a CSQ on demand;
  • Supervisors can record a custom closed message (meetings, emergencies etc.);
  • Call flow can provide for Language selection (Press 1 for English);
  • Each CSQ can be optioned to play estimated wait time and position in queue;
  • Each CSQ can be optioned to enable a “call back without losing your place in queue”;
  • Each CSQ can be optioned to allow caller to leave a message, bailout to operator, or arrange call back;
  • Each CSQ is checked to assure there are agents logged in;
  • Music or Message while in Queue can be optioned on a per CSQ basis;
  • Extend Call Holding Options can be offered based on max time in queue;
  • Each CSQ can be optioned to enable the processing of a list of off site agents that can accept a remote call;
  • Custom layouts can be created to push information to the Agent Desktop Display based on CSQ;

QueueOptions.XML

The heart of the script is the “Queue Options” file that is read with each new phone call received by the system.  The script then configures itself to identified CSQ options based on the called number.  The called number is used to retrieve the options for the target CSQ from an XML file.  For example, callers to the Customer Service CSQ may be prompted with estimated wait time and position in queue, while the callers to the Technical Support Queue are not offered this information.   Perhaps arranging a “call back from queue without losing your position” is a feature that is offered to Platinum callers but not to the Silver clients.  Each CSQ can have different prompts and customer care messages for those waiting for the next available customer service representative.  The options offered callers can be different for each CSQ.

Call Center Administration

Emergency closure?   Authorized users, typically the call center supervisor, is issued a PIN and Queue number.   This enables them to call the included CCAdmin IVR Module, enter their PIN number and then select the CSQ number.  They are the offered the option to open the CSQ, or close the CSQ and record a new closed greeting.    No more calling down to the System administrator every time you want to close the CSQ for a team meeting!

The script is optimized to provide the richest set of functionality based on a wide cross section of call center applications and at the lowest possible cost both for acquisition and ongoing maintenance.   As the script is both extensible and reusable, it can be used for future CSQs and as such, it will save you money on into the future!   Give us a call and we can download the script to your UCCX Contact Center, configure the options and have you up and running with a professional call flow and sound with in few hours!  Clients who purchase this option will continue to get follow on updates as we continue to add new functionality!

We have updated the Script for 2019, so watch the new video which details the new feature set!