ShoreTel Version 12 – Configuring Users Part 1

Adding Users in ShoreTel is among the most common tasks a system administrator will be expected to perform.  We suspect once the ShoreTel solution is fully deployed, you will generally not have to tweak Trunks, Switches and Application Servers, but you will always be handling requests from USERS to make changes.  These changes will run from adding New Users to changing the feature access of existing Users.    Most User options can actually be changed by the Users themselves but often they will call System Administration or the “help desk” and expect your  assistance.   ShoreTel Users have wide range of very rich features that they can configure to meet operating business goals.  The list of features ranges form “twinning” to “find me follow me”, call handling modes, and  “personal operators”.   There is also a range of options for customizing ring tones, wall paper, Communicator Tool Bars, and phone buttons.  Adding users is easy!  Understanding feature configuration options and how they interact with the ShoreTel system requires a bit more study.

Generally, ShoreTel phone extensions to not exist without an associated User.   This is a cultural issue as much as an architectural issue.   In  a CISCO deployment, for example, it is very possible to setup auto-registration and allow a range of new phone to plug into the network, register with the Call Manager, obtain an extension number and  be come a fully functional phone.   In the ShoreTel architecture a phone can register with the ShoreTel sever but it does not receive an extension number until a User account has been associated with the device.   These are modest but interesting differences in iPBX architectures.

We also have the concept of Class of Service and User Groups when we consider user configurations.   All systems generally have this concept. Again, in a CISCO deployment you would work with Partitions and Calling Search Spaces and they are virtually the same as User Groups and Class of Service permission containers.    ShoreTel has a very flexible User Group and Class of Service container strategy that is easy to configure, manage and assign.  Generally, we want to create individual User accounts, but we often want to make changes to a Groups of Users.  For this reason there is  a handy Batch utility for making it easy to make mass changes to your system configuration.

Working with User configurations is an essential part of ShoreTel System Administration.  The attached video clip outlines the process of making User Configuration Changes in ShoreTel using Version 12 of ShoreTel ShoreWareDirector!

Use your iPad as a SIP extension on your ShoreTel iPBX?

We have been experimenting with mobility options for some time now, setting up SIP phones on mobile devices like the iPhone.    ShoreTel has a range of mobility options, most of which we have discussed here in previous blogs, so setting up a softphone is nothing  new for ShoreTel.    Recently, I discovered a new SIP softphone by CouterPath Corporation the company that brought you X-Lite, one of the most popular free phones on the net.    The new offering is named Bria and is ideally suited for your iPad.   Bria is a more of a “carrier grade” softphone enabling both voice and video calls over IP, the ability to send IM messages and transfer files to your contacts.  I particularly like the option of downloading additional Codecs like G729 which is really useful for a ShoreTel remote phone.   Bria  also has Enterprise features like LDAP/Active Directory integration and some Workgroup capabilities like a Busy Lamp Field.  Most importantly it seamlessly integrates with your iPad VPN which brings me back to ShoreTel.

We have configured a bunch of different SIP phones to work with ShoreTel.    Candidly, they all work really well internally, on the Enterprise WiFi.   Setting SIP up on ShoreTel is a relatively straight forward process.   Pick an ShoreGear switch in the site you are planning to register with and set up a port for SIP.  You do this through the drop down menu on the SG switch through ShorewareDirector.   Set the port for 100 SP Proxies.  Note the IP address of the switch.  Now you have to set up your USER and note the SIP password for that User.    When you setup your softphone you will need this information so keep it handy!  (In the library there is a Video Cheat Sheet that shows you how to set up SIP in ShoreTel). The Bria setup is also very straight forward.  Remember that when it asks for Account Name it wants the Extension number of the USER you created in ShoreTel.  Put the IP address of the ShoreGear switch that provides proxy services as the Domain and enter the SIP password you created for the USER.   The Display Name can be whatever you want.

The Bria phone should register if you have WiFi and you should be set to use your iPad as your ShoreTel extension.    This is great for wandering around your own facility.  If you have the ShoreTel ”WebAgentDashboard”  you can wander around  your Call Center with  a Supervisor Real Time display and have a ShoreTel extension with you the entire time.   Kool stuff,   but what about when you are at Starbucks or some other location?   How will your Bria connect with ShoreTel?   We have successfully created a L2TP VPN back to the ShoreTel Server from both the iPhone and the iPad.   Apple cleverly built a VPN client into all devices.   Once the VPN is operational, you can bring up your Bria softphone and extend your ShoreTel extension to any location that has WiFi access.  Optionally, you can bring the Bria connection up over your G3 data network.  You can extend that Supervisor Real Time Display as well!   The Bria comes up and completes a SIP registration with the ShoreTel and the performance is remarkable.

At first I had some reservations about using the Bria on an VPN over G3.   Establishing the VPN tunnel, then running a Ping back to the Server, indicated Latency in the 425 ms range!   Not exactly within the recommended target of 150ms mouth to ear.  None the less, it worked and was very usable.  We are fooling around with using the Bria as an IM agent on the ShoreTel Collaboration server (see previous blog) and I guess we will figure out how to make use of the Bria video and presence.

At the end of the day,  you have a range of Mobility options on the ShoreTel and you should figure out which option is the most effective for your mode of operation.   It is very possible to take your office extension with you, in fact we think the Desktop is dead!  Your cell phone is your desktop!
Setting up the Bria on an iPad

ShoreTel Mobility Router System Admin Video Cheat Sheet!

The blog on the ShoreTel Mobility Router as one of the options offered by ShoreTel for remote worker connectivity, generated a lot of email requests. I have an opportunity to install, configure and test the solution including the Roam Anywhere Client on an iPhone. It is really a great product and should be well received in the market for campus wireless as well as for the growing Mobile workforce. The attached video provides a quick overview of the SMR System Administration Interface and is not meant to be a tutorial on the subject, just a quick tour of the basic admin portal.

System configuration is relatively straight forward, but very specific. Without getting into the infrastructure requirements, there are steps in the configuration that must be accomplished to bring up a useable platform. The SMR will connect to your PBX using both SIP Extensions and SIP trunks. Licenses, Authentication SSL Certifications, Time Servers, DID numbers and Network Interfaces are all necessary components to a successful deployment. The ShoreTel Roam Anywhere Client or RAC, can be downloaded from the Mobility Router itself for Crackberry and Nokia, or from the Apple AP store if you are installing on an iphone.

We were able to use a ShoreTel SIP extension and drag it half way round the world to China! It worked flawlessly. The RAC comes up, attempts to register with the local server IP through a WiFi connection and failing that, negotiates a SIP registration through the public IP as an SSL connection. Once provisioning has completed, you have a fully functional Extension on your state side ShoreTel PBX as a SIP extension. You can place extension to extension calls and dial 9 calls as if you were standing in your home office. A call to your primary extension is typically set to ring both your desk phone and your SIP extension out over the Campus WIFi or over the internet to the WiFi WAP nearest you. Answering on your iPhone SIP extension and nobody would know you were working remotely. Think of the cost savings!

The ROC will attempt a WiFI connection first, then try over your Cellular Data plan and then finally a Cell Call. The router tracks all of that and reconfiguration happens automatically. You might want to set your ROC to use WIFi only. If you do not have a local access number where you are traveling, the Cell Call will be back to the SMR DID stateside, entering the router as a SIP trunk. Setting the Network options to WiFi Only assure that all your calls are made through the Secure Voice facility, basically an SSL connection over WiFi to a public IP address that port forwards to your mobility router. The router requires care and feeding and constant monitoring, but the platform has a wide range of maintenance and troubleshooting tools. The documentation is excellent, but your deployment team will need expertise in SIP, telephony, computer networking and have a strong background in controller based wireless technology.

Though now owned by ShoreTel the router will work with CISCO, Avaya and basically any PBX that supports SIP trunks and extensions. When we find a moment, we will compare the RAC and SMR functionality with a BRIA SIP soft phone, both on an iPhone.

Fixed Wireless Convergence and Mobility Options for VoIP

ShoreTel Mobility Options

We have been steadily moving through a range of mobility options on our way to achieving true fixed mobile convergence.  We want to take our Office Extension away on our Cell phones and have the same functionality away from the office as we do in the office!  Originally, people forwarded their office extensions to their Cell phones.   Not the best solution, but clearly the easiest to set up.  The problem however, is that the caller to your office extension might end up anywhere including your cell phone voice mail.  So much for a maintaining a business presence!

ShoreTel addressed that issue, but adding a couple of useful features. For example, you can use External Assignment.  Someone calls your desk phone and you can have it re-assigned to your home phone or cell phone.  The benefit over call forwarding alone, is that the call profiles you set up for each of your call handling modes are followed as if the caller were going to your desk phone.

Find Me Follow Me with the auto option was also very useful for that reason.  When your desk phone was called, it could be routed to your cell phone.  You had to explicitly accept the call or the system would take the call back and put it in your personal Voice Mail box.  This is clearly superior to just forwarding the call off to your cell phone, risking the possibility of having the caller end up in a personal cell phone voice mailbox.

Twining (see other blog video) is also a favorite strategy for extending your office phone to your cell.   Why not ring both devices when your desk phone is called?   In this way you could answer on either device and you could also seamlessly move the call between the devices.  For example if I am on my desk phone and need to jump into my car and race off to the next appointment, but do not want to terminate my current call, I can simply hit the move button and the call now appears on my cell.  Likewise, if I took the call on my cell phone, I can now *23 and send it to my desk phone enabling me to move seamlessly from my car to my desk.

The Mobile Call Manager is another exciting option for extending your desk phone to your cell.  Using the ShoreTel Mobile Call Manager, we get a GUI on our phone that allows us to setup our call handling,  review voice messages and otherwise experience most of what we see in the desktop Communicator.  I can externally assign my desk phone to my Mobile Call Manager and setup phone calls that originate at the office.

All of these are useful tools, but none come close to true fixed mobile convergence.  I want my cell phone to be smart enough to enable me to take and make office phone calls regardless of where I am on the planet.   I also want the phone to work on any available WiFi connection and to seamlessly move between G3 and WiFi without dumping the call in progress.   You walk into Starbucks and your cell phone is smart enough to jump on the WiFi and establish a secure connection back to the office and register with the office mobility server.  Any call coming into your office desk phone will now ring your cell phone as a SIP extension!

With a true mobility router, a call to my desk phone will ring both my office extension and my mobile extension.  I can answer the call on either extension and have full feature access.  While out on the WiFi I can still access my office directory, history, voice mail and manipulate active calls to allow conference and transfer functionality.  If my WiFi drops my G3 connection can pick up and continue as my office SIP extension.

Calls to my Cell phone are personal business and calls to my office desk are for business. I want each of these callers to receive appropriate call handling.  If I make a call to a personal contact, I want my CID to be different then my CID to a business contact.  The phone should be smart enough to route business calls to the company VM and personal calls to my personal VM.   All of this is possible with a true Mobility router.  All that is required is a PBX that supports both SIP trunks and SIP extensions.   Most if not all of the IP based PBX solutions in the market support this capability and the ShoreTel Mobility Router and ShoreTel Roam Anywhere Client make true fixed mobile convergence a reality!

email comments to DrVoIP@DrVoIP.com

ShoreTel System Administration Version 12

We have not had an update to our System Administration video series since Version 8.    System Administration had not significantly changed over the various new releases, so we did not feel the need to do an update.  Our Version 8 stuff is still relevant and useful no matter what Version of ShoreTel you are on.   We actually installed our first ShoreTel system on Version 3 Build 3.1.11100  back in the day when Shoreline only had Analog phones!  You might be interested to know that first system is still installed and we have continued to upgrade it over the last nine years!   We had to make a hardware change for the first time recently, but come on!  9 years on the same system!  That is amazing.   Talk about ROI!  We have watched with old blue Shoreline become the new Orange ShoreTel while steadily improving the functionality, scale, and architecture over the years!   Somewhere around Version 4, we grew IP phones,  but System Administration was relatively the same.   When we moved from the old Microsoft Access Database in Version 7 to the MySQL database in Version 8, System administration was still basically the same, but we finally cranked out a tutorial revision.     Now, as the solution matures development that was taking shape in Version 10 and 11,  we figure it is about time to do a new System Administration Series, so we are starting to crank out Version 12!

A note to DrVoIP fans and critics: occasionally I log in here and see comments that you have left.  Unfortunately, I turned auto comments off because it just became another place for Viagra advertisements and other Spam.   I do enjoy the interaction with those of you who find the blog useful, however, so please keep the comments coming.  Just Don’t try to post them here as the spam filter now kills all blog comments.   Please just send them on to Peter@DrVoIP.com!  Thank you all for your support and encouragement!

What is new in ShoreTel Version 11/12?

Software development is a process, not an event.  Having said that, from time to time, we have an event.  The release of a new version of software is such an event.  The software development process, however, continues.   The decision as to where to draw the line to separate one release from another is a complex interaction of competing goals.  The Marketing folks are trying to keep up with the competitive feature package from another vendor.   The support team desperately needs a patch for a nasty unforeseen system configuration that introduces an undesirable result and the software team has an aggressive agenda of its own making.

The list of new feature demands is unending.  Driven in part by user requests, marketing objectives and the pressures of other vendor releases.    If your product is built on Microsoft, clearly you are under pressure to stay compatible with any new releases they might make available to the market.  In fact, as it relates to ShoreTel, many people were seeking Windows 7 support when what they really want is Microsoft Office 2010 support!   Was it 64 bit desktop computers or 64 bit server software that the market demanded?  Do we do the Apple IPhone? Is that web based Communicator really needed in this release or can it wait?   Fixing the release of new features is one of the most challenging business decisions that companies have to make.

Generally companies try for two DOT releases per year and one major new release every year.  For ShoreTel, we generally expect a DOT one and a DOT two release.  For example we might have a Version 10.1 in general availability (GA) while we are beta testing a major release like 11.0.    We move to a GA release with the DOT and 11.0 becomes 11.1 available to all.   Currently, as of this post, ShoreTel is in GA on Version 11.1 while beta testing Version 12.0.  The GA Version of ShoreTel 11.1 has a host of exciting new features, but architecturally we are most interest in 64 bit server support; virtualization, Windows 7 Support, browser based Communicator  and distributed Databases.    Version 12 completes the Microsoft compatibility by supporting Outlook 2010.

Distributed Workgroups was made available in Version 10, which enables the continued operation of Workgroups on a distributed voice mail server (DVM) even if the HQ server failed.   This has some attractive options, but having an operating workgroup might be limited by an inability to have users log in or out of the workgroup.  Version 11 enables distributed database capability.  This means that in the absence of a HQ (e.g. read/write database) server, a user on a DVM could change their call handling mode; or a change in schedule from Off-Hours to On-Hours could be effected.   You have to chose one over the other and I would encourage you to choose the distributed database.   Best practice dictates that a Workgroup should be backed up by a Hunt Group that contains all the agents who make up the Workgroup.  In this way a failure of the Workgroup, still provides a call flow that reaches all Agents.  A distributed database, in my humble opinion, has higher impact.  IN a multi-site deployment, you will want to change call handling modes even if the HQ server is down.   This  combined with a backup hunt group, gets the job done more effectively.

The browser based Call Manger is yet another power new feature capability.   Now all those MAC users have an option!   I suspect that more and more call control will be built into browsers limiting our dependency on the various O/S issues.   Who cares if we support Windows 9 as long as we have a browser option!

Stupid phone trick #7 – How to make iPhone calls from my ShoreTel handset!

Yeah, I am sure you were just dying to know how to call your iPhone and have your ShoreTel phone ring?  Better yet, pick up your ShoreTel handset and make a call out your iPhone?    Actually, it is a useful integration and one that I recently had the opportunity to implement.   Many carriers have plans in which you can  call any of your “family members” without racking up minutes.   This is useful when calling from cell phone to cell phone, but how useful is it for the office?   If you have a field sales force running around the market with cell phones, and you as manager need to call them frequently, you might not always be on your cell phone!  This means that each time you call them, using your office phone system, you are paying full fare for the call whatever that might be.

It is very possible to Integrate your cell phone with your ShoreTel phone system in a way that enables you to enjoy the benefits of both systems.    You can link your iPhone to ShoreTel such that when someone calls your cell phone, your ShoreTel desktop phone will ring.  Answering the ShoreTel handset, cuts you through to your cellular caller. (Yes, your ShoreTel Communicator does a screen pop with the Caller ID of the Cellular caller).  Likewise you can you can initiate a call on your ShoreTel handset and direct it out your cellular network.  There have been a number of solutions in the market for putting cellular gateways on your PBX.  Generally they have the advantage of making the cellular access available to everyone on the phone system. They also have the disadvantage of being fairly pricy!

The solution we implemented can be described as a black box that uses blue tooth technology to couple your office handset to your favorite cell phone.   Drop me line and I will send you the solution and you to can do stupid phone tricks!  Drvoip@drvoip.com

Virtualize your ShoreTel Contact Center or ECC on ESXi?

Running the ECC on a virtual server is “not a supported configuration”, but will it work?  Often we encounter installed base solutions that are pushing the support envelop with market driven customer requirements.  Windows 7 may not be a supported desktop OS for a ShoreTel Communicator, but try telling an end user client that is it “not a supported configuration” after they just did an enterprise wide PC refresh.   We quickly learn the difference between “not supported” and “does not work”, and find a way to get Communicator running under Windows 7.   Similarly, we are beginning to see more Virtualization requirements surface in the installed base as well as written as requirements in new deployments.    Prior to Version 11, virtualization was “not a supported configuration” for a ShoreTel HQ or DVM server.    Now, not only are we being asked to virtualize ShoreTel,  we are being asked to consider running a ShoreTel ECC in a virtual environment.   We already know it is “not a supported configuration”, but will it work?  We determined to find out for ourselves if this solution could be configured and we created a an environment in which we could configure, test and experience a Virtualized ShoreTel Contact Center.

There are any number of issues you need to resolve when considering a Virtual Server environment.  Is this going to be a customer premise based implementation or are we moving all of these servers  to the “cloud”.   How many servers will we need to host on our Virtual Machine? RAM? Network Interfaces? Storage requirements?   These are all on the list of questions that should be answered before attempting a Virtual server implementation.   In the case of the ShoreTel ECC, we also had one other (excuse the pun) key issue to worry about.  Each ShoreTel ECC has a “dongle” or USB lock that must be installed on the server prior to deploying the ECC application.   We had already learned how to bring up a ShoreTel HQ server and a ShoreTel DVM server in a virtual environment, but to bring up a ShoreTel ECC we had to solve the “dongle” issue.    Fortunately after considerable research, trial and error,  we were able to configure a USB driver for our Virtual server that enabled the installation of the ShoreTel ECC application!

In our test configuration we built out a host platform using vSphere  ESXi running on an HP DL360 with 2 Intel; Quad Processors and 32G of RAM with a Network Attached Storage.   The ShoreTel HQ and DVM servers came up with little or no problem.  They need to be configured before ShoreTel software load of Version 12.0 with a hardware configuration that meets ShoreTel minimum server specifications.  In fact, it is hard to show it to you as you would not be able to see any difference between a Virtual ShoreTel and a ShoreTel server running directly on a hardware platform. T he ECC had some real challenges and we are still uncovering characteristics of the deployment that need special handling like the USB driver as previously mentioned.  The results are very promising and we can only find one issue that we can not resolve.  The application runs flawlessly however, and we are encouraged by what we have experienced with the deployment.  Send a request to drvoip@drvoip.com and we will share the recipe with you!   The attached video clip walks you through the configuration of the vShpere host and the ShoreTel servers, including the hosted ECC application.

ShoreTel Browser Based Call Management Options!

If you have ever installed a ShoreTel solution in an environment with other than Windows desktops, you know you lose some of the Sizzle! The Personal Call Manager could not be installed on Mac computers for example! Well known to those who know it well, however, was the fact that there was a functional web interface to the ShoreTel system. This web interface made it possible for Users who did not have a Windows desktop, to make use of many of the configuration options available to Users with a full blown “fat” Personal Call Manager. Just point your browser at your ShoreTel server with a slash “ShorewareWebClient” and you would be presented with a Log in screen. Enter your User credentials and you would be able to manipulate your Call Handling mode, Voice Mail and Find Me options.

With the introduction of Version 11, ShoreTel has eliminated this barrier to non Windows base Users! Using nothing more than an Internet Browser you could now have full access to all the real time call management functionality of a full blow Personal Call Manager, now renamed Communicator. This means that hosted Users and Mac Users could now enjoy all the beneifts that ShoreTel real time call management has to offer! Just browse to your ShoreTel server with the slash Communicator option, provide your log in credentials and a full blown Personal Communicator populates your Exporer! If you prefer you can use Safari or Firefox as you are no longer limited to IE! The broswer based Communicator enables the User to manipulate a real time phone call, access Voice Messages and configure call handling modes. You can even record your call handling mode Greetings, something you could not do using the ealier Browser implementations!

ShoreTel 11 marks a significant step into the future of Unified Communications and sets the stage for a variety of cloud based solutions. Mobility, virtualization and browser based applications are becoming the minimum daily adult requirement for communications funtionality! IMHO the business landscape will be littered with the bleaching bones of those companies who fail to incoporate this key requirements into their business communications model. The film clip shows both the pre-release 11 browser options and the real time call management options of ShoreTel 11. Comments welcome!

ShoreTel Contact Center Overflow Concepts and Direct Calls to Agent!

I would like to kill call center challenges with one blog!   In many call center environments, it is possible that an agent has a Direct in Dial (e.g. DID) number that a client might call and bypass the entire call center process!   For a call center manager, this is very frustrating!  You create a Contact Center to organize the flow of calls to your Technical Assistance Center, and clients by pass the process by calling your Agents/technicians directly!

Clearly, you can eliminate this by not giving DID numbers to Agents, but we end up doing this to facilitate an orderly problem resolution strategy.  You might give a client a “homework” assignment and ask them to call you back.   They might object to being put at the back of the queue again, so you give them a DID number that gets them directly back to you.  The challenge is, that this call would not be accounted for in your contact center reporting!   So how then do you provide this feature and also create a mechanism for enabling your contact center to capture all calls for Agent Performance reporting?  One answer is to establish a “service” that has only one Agent in it!   Then build out a DNIS/DID route point to IRN relationship that brings that DID number into the call center and routes it to the Agent.

Actually, it is not a bad strategy!   The Contact Center can now account for all calls, even the ones that reach your Agent through a DID number and you can apply normal Contact Center routing tools like “overflow”, which brings me to my second point!   Is it possible to overflow calls to more than one other group?  Based on more than one overflow time in queue?

The Contact Center provides a wide variety of methods for handling callers in queue awaiting service.   One of the more interesting concepts is the ability to “overflow” a caller from one group to another group based on the amount of time they have been waiting in queue.   This contact center parameter is set within the “service” and can be found in within the tab labeled “Overflow”.

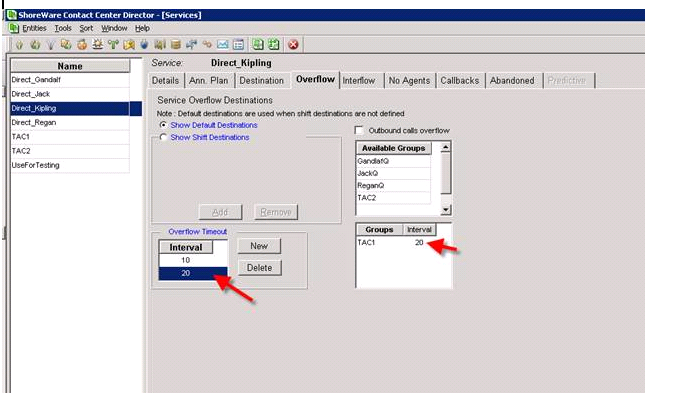
In figure One below, you can clearly see that we have a number of services defined, including a service named TAC1.   Let us assume that this is a technical service group and that TAC1 is comprised of Agents/technicians that include Agent Gandalf, Kipling, Regan and Jack.      You can also see that a service has been enabled by the name “Direct Kipling”.    This service was created to enable callers to Kipling’s DID number to be brought into the Contact Center, and routed to Kipling even though they did not enter through the TAC1 service.   Hopefully, we can now count the phone calls Agent Kipling is handling that otherwise would not be reportable!

ecc_figure_1

In Figure One we can also see that we have set an “Overflow” counter that,  should anyone be in the Kipling Queue for 10 seconds they will overflow to the TAC1 queue.  What is interesting is that when you overflow in the ShoreTel Contact Center,  you don’t leave the queue you are in, you basically add another queue containing agents that have a cumulative effect on the call.    Should that “overflow” not result in an available agent and the caller continues to wait for service, you can actually set a second timer that would “overflow” (e.g. expand the number of agents ) to yet another queue.

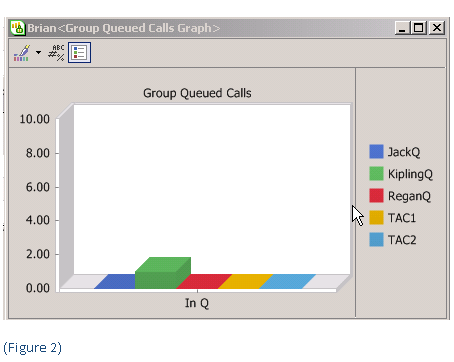
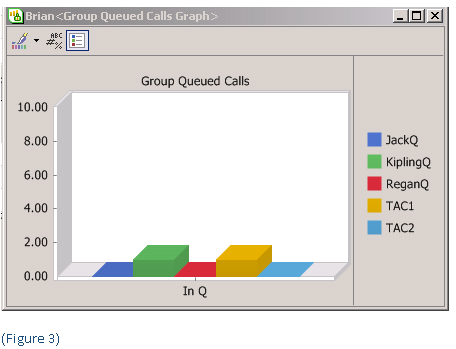
In Figure two, you can see the original call in the Queue for Kipling.  After the pre-configured overflow interval is met, the call is distributed to the “overflow” queue but is also available to the original queue.  You can see this in Figure Three, by noting that the call is now in queue in both the Kipling and TAC1 queue.   In this way, if an agent becomes available, in either the original queue or the “overflow” queue, the call will be answered.   Had we set up a second interval timer in the Service, we could expand the number of Agents to include the additional group specified by that timer.  This is one of the more interesting, if not misunderstood capabilities of the ShoreTel “overflow” concept!

ecc-figure-21ecc_figure-31