How can an Agent Originate an SMS message in Amazon Connect ! – Part 2 Routing the Return Message

SMS Return Message Routing

In part 1 of this blog we looked at three options that enable an Agent to make originate an SMS message:

  • Option 1 – User a TASK Template
  • Option 2 – Create an HTML Form (DrVoIP favors this approach)
  • Option 3 – Create an Email to SMS solution

The key flows in any of these solutions, is to write the Send_TO_Number, smsMessageContent, AgentID (extension number, login, username), and timeStamp to a dynamodb table when originating and outbound SMS.  This is possible with all three solutions, but we like option 2 the best.  Option 1, with all of its strangeness has the advantage of being an action taken within the contact center, making a historical record more practical.  The other two options, start outside the call center and the origination event is not noted for historical records in the out of box archive methodology of the Amazon Connect Instance.

Option 1 Task Template launches Contact Flow

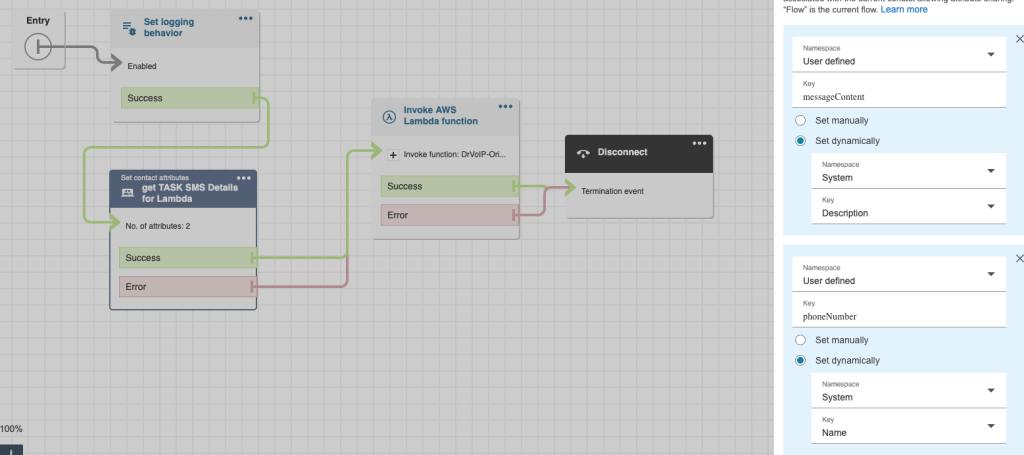
The TASK solution gets the Origination SMS job done and works just fine.  The Contact Flow the TASK points to contains an invoke Lambda that sends the messageContent and phoneNumber on to Pinpoint SMS.  There is no real way however, to capture the Agent that initialized the Task.   We tried writing the phoneNumber and TaskID along with a timestamp to a dynamoDB table, then invoking another lambda to look up the phoneNumber it in an inbound contact flow, but it was just ugly and did not identify the agent that originated the outbound SMS.  You need someway to ID the Agent so you can “set working queue” by agent and get the incoming return message routed accordingly.   Given that custom fields (as of this blog) can not be passed as a contact attribute, there was not way to add the Agent ID to the Task Template.

Another major challenge is that the CHAT API used by SMS (and chat for that matter) does not, in general,  support Contact Attributes.   Let us assume you want to ask the customer to enter the order number so you can look up the status.  They might provide that number, but there is no way to extract that data and assign it to a Contact Attribute for further processing later in the contact flow.

Enter Option 2 (Static website to launch HTML form)

The benefit of popping an HTML form is that you can prompt the Agent to enter something to identify themselves.  This would enable you to invoke a lambda function to  write the phoneNumber, AgentId and timestamp and even the smsMessgeContent to a dynamoDB table for later processing.   That function would also include the SDK that enables you to find the agents unique ID and also route that to the database.  The entire DB item would include:

customerNumber – this would become the partition key in your dynamodb table;
smsMessageContent – the text of the outbound SMS message content;
agentID – obtained by using the Agent username and the SDK to get the agentId a unique value for each agent.
timeStamp – date and time of the item creation.

The inbound contact flow handler we could grab the Customer Number, invoke a lambda function to request the agentId so that the chat session (i.e. SMS) could be routed to the agent that originated the outbound message using the “Set Working Queue by Agent” step in the contact flow associated with the SMS number.  We would also invoke a lambda function to retrieve the smsMessageContent from the stored item and assign it to a contact attribute for later use.  (Developer Note: It would be possible to retrieve both the agentId and the smsMessageContent in one invocation, but parsing a JSON object in a contact flow is not worth the trouble, it is easier to make two invocations).

When the agent accepted the incoming chat, the ongoing back and forth of the chat transcript (i.e. SMS) would be captured and stored.   How would the agent know what the original outbound message contained?  We need a strategy for presenting that to the agent and adding it to the transcript for historical reporting, or additional processing by LENS etc.     Using the Agent whisper function, we would use the contact attribute created for smsMessageContent to satisfy this requirement.

This option, in our opinion, is the optimal solution for originating an outbound SMS message and routing the return message to the agent who created the message in the first instance.  It captures all the activity, makes it available to the agent and other features of the Amazon Connecct instance.

Enter option 3 Email to SMS

In this option we want to use email to launch the SMS handler using the configuration provided in Part 1.   The thinking here was to use SNS rather to trigger a Lambda rather than Invoking  Lambda from inside a contact flow triggered by the Chat API.  Do not connect the SMS phone number direct;y to the Instance.  We created two SMS handlers: one inbound Lambda to handle either an SMS that did not ordinate by an Agent.  it could also handle a return message originated by an Agent.

Email Outbound

Using the email client we were able to launch an outbound lambda that would be able to parse the message and write the From (i.e. Agent ID), Subject (i.e. target recipient phone number)and a times stamp  to a dynamoDB table.  No need to log the message content, we would pass all the variables off to the Pinpoint SMS number.

SMS Inbound

The inbound SMS triggered the lambda which would use the phone number to index the dynamoDB table and bring back the AgentId.  It might be necessary to use the AgentId to look up the Agent Name or ARN, but the result was much cleaner and seemed to work just fine!   With the AgentId we were  If there was no matching number in the database then the message was treated as a new incoming SMS and routed to the default workgroup set in the contact flow.

TTL

We needed a ‘garbage collector’ that could go into Dynamodb and clean out any entries that had a time stamp that exceeded whatever we set as the Time To Live (TTL) value.

Membership notification system using AWS Pinpoint SMS!

The Challenge!

We had a voice notification system setup to alert member of our “club” about meetings and special events.  It consisted of a Dynamodb table that listed the phone numbers of the club membership; several lambda functions to access and update the database and an Amazon Connect instance to drive the telephone network requirements.   It worked well and got the job done.   Administrators would call up the application, enter a security authorization code, reset the database, record a new greeting and have a message delivered to every member within minutes.  The only complaint was having to maintain the membership database.  Members came and went and someone had to keep the database updated!

The Solution

Text had an interesting advantage!  Members would be able to add or delete themselves from the database themselves.  You would add yourself to the notification list by texting the work JOIN to the published notification number.  If you wanted to leave the list, simply send the word STOP to the same number and you would be removed.     This seem like a perfect solution, creating a self healing application that  would free if not eliminate the need for administrators.

AWS Pinpoint SMS to the rescue

Some of the components we used in the voice notification system were still required.  The dynamodb table and lambda were still critical components.  We did not need to use Amazon Connect for the telephone interface as AWS Pinpoint had an SMS interface.  We also needed to add SNS so that an incoming SMS message would trigger the lambda function to parse the message.     Pinpoint at the time we implemented the first version of the product did not have a facility for testing the application.   SMS spam has become such an issue, that you are now required to register your “campaign” and have the carrier approve it before you can send your fist text message.  There is now a newer version of Pinpoint SMS that has a test facility, but you are still required to obtain approval for your planned usage of the SMS functionality by carrier.   The process is frustrating and may take more than 30 days to complete, so be forewarned!

Bells and Whistle Options

Members would send the word JOIN to be added to the notification list, but who could send messages to the list?  The goal was to eliminate dependence on an administrator to send SMS messages that might originate from different parts of the organization.   To accomplish this, we created a SEND option!  We defined an environmental parameter that was the “secret password” and if this word was the first word in the incoming text message, Lambda would strip it off and forward the rest of that incoming message to the membership list.  (How kool is that)?   In our next version, we added the ability to customize the JOIN message to include firstName and lastName.


Amazon Connect Emergency Notification System

Emergency Notification?

There are a number of use cases for an application that can process a list of contacts to be notified by voice message of an impending event.  The event may be an emergency or  a notification of a community activity of interest to the list subscribers.   Even an appointment reminder falls into this category, so it is not necessary to have an actual ’emergency’ to have a requirement to mass notify a subscriber or customer group.

Basic Functional Spec

We had need of a “campaign dialer” like a solution and we found that all the parts we needed were available in AWS and Amazon Connect.   We hammered out a basic functional statement that had the following features:

  • The application requires the admin to authenticate;
  • A facility exists to record a new message to be played by the dialer;
  • The Dialer had to be able to simultaneously dial a large number of list members by contact group code;
  • The called individuals could enter a response code  to enable a transfer or follow up action (press 1 to transfer to an agent, Press 2 to reschedule,  etc.)
  • All contacts would be coded as notified even if they hung up, to eliminate redials.
  • A facility exists to reset the database in preparation of a new campaign.

The resulting solution contained the following modules:

  • Dialer Setup Module: (Authorization to use the notification system; Menu to reset database,  record new outbound voice message and initiate outbound campaign
  • DynamoDB table to contain the subscriber or customer list with associated fields to support the application (subscriber name, zip code, result code, etc.)
  • Lambda functions to read/write subscriber database and record audio to prompt file
  • Administrator notification of campaign dialer status through SNS

The solution is coded with four contact flows that enable group alerts to be sent simultaneously.  The AWS services used include Amazon Connect, DynamoDB, Lambda, Kinesis and optionally SNS. Depending on your contact center soft limits, the dialer will contact a minimum of 50 subscribers per phone call.  The following video details the configuration and the entire application is available in the DrVoIP.com store including the lambda functions and sample DB configurations.


Powerful Amazon Connect Call Back from Queue Configuration Strategies!

The Amazon Connect Call Back from Queue Dilemma!

Assume you have a call center that follows the sun from coast to coast!  You team starts in NY at 7AM EST and ends in California at 7PM PST.    You offer call back options to callers waiting to speak with an agent.   A caller enters the queue at about 6PM PST and leaves a request of a call back when an agent becomes available.   The call center closes at 7PM PST but the call was not yet handled by your contact center.  The next morning, at 7AM,  Agents start the new day and the first call presented to an Agent is from the call back queue, the call left over from last night.  The outbound call is dialed, and your Agent is now speaking to a very angry Customer in San Francisco where the time is no 4AM PST!

The Call Back Queue Problem

Once a caller is sent to the call back queue, there is nothing you can do about this!   Let’s look at some options that we might apply to better control this call back activity:

Call Back From Queue Configuration Options

First, let’s create a switch to turn off call back requests during times outside a 10AM-4PM window.    This is a simple “check hours of operation” step in your queue hold flow.  Check the current time, and if it is outside the window, your contact flow will not offer the  call back option to callers.    This will keep callers from being left in the call back queue over night at the end of the working day.

Optionally, we can still offer the call back, but use the time window to determine if we should route the caller to the call back queue.  We can still offer the call back, but if check the time and find it is outside of the window, we do NOT want to send the caller to the call back queue.  Remember once the caller is in the call back queue, we lose control of the call back!   Using Lambda and DynamoDB, we can write the callers request to a call back list for later processing,  rather than putting them in the call back queue.    We can then develop a watch dog timer, that scans the call back list and when the call back window reopens, we can stuff the caller request into the call back queue.

These options will offer a greater degree of control over the call back process, but what about that San Francisco caller?  How do we make sure we are not calling folks back in the wee hours of the morning?   We need to add additional logic to our function and additional attributes to our database items.   We can look at the area code of the caller requesting the call back, then compare the area code to a time zone map.


How can we improve these configuration options?

Clearly you can ask the caller what time they would like to be called back.  That would work and can be an additional attribute in your database items.  You would still use the above configuration options, but also take note of the time range the caller wants to be called back.

Check for existing call back requests!

Your call back configuration should also check to see if this caller has already made a request to be called back?  If you run a call center,  you know folks call in and request a call back, hang up, wait a few minutes and then call right back in and impatiently request another call back as if that might speed up the process.   We need to check our database of call backs and make sure this caller is not already subscribed to a call back request.

Check the caller’s phone number?

After requesting a call back, your configuration should note “I see you are calling from 1-844-4DrVoIP, is that the number you want us to call you back at”?    We can then confirm that number, or ask them to answer another number.

How to get to an Extension number?

The standard call back strategy is to dial the number and hope the target caller is reached.  Unfortunately, more times than not, a receptionist or voice mail IVR answers and wants to know how to complete your call.   Your configuration may need to not only ask for the number to call back on, but an extension number of name of an individual to ask for when the call back is dialed and answered by other than the person who requested the call back!

These are simple but powerful ways of taking the Amazon Connect call back engine and adding features and functionality to achieve a level of control over the call back function.  They distinguish a call center configured with little though to the call back strategy form a call center configured to maximize customer interaction success!

If you would like some help configuring these options, give us a call at 844-4DrVoIP or email and we would be eager to help you! – DrVoIP@DrVoIP.com


Amazon Connect – Play Pre-Recorded messages to remote Voice Mail?

Recorded Message Use Case

In an outbound  call center an agent may make several hundred phone calls each and every working day.     When the person they dialed does not answer and the call is forwarded to voice mail, the Agent leaves a message requesting a call back indicating who to call and at what number?    The message is most likely very similar for each called party, requiring the Agent to be enthusiastic and engaging for each message left!

Is there a better way?

There is a cheap and dirty way to do this!   Each Amazon Connect Instance has a “Default Outbound” contact flow.   This contact flow is used for all outbound calls even if you do not specify it.  In fact you cant specify it, or an alternative.  Usually in contact flows, you can do a “save as” on any of the sample or default contact flows and then reference them in your own contact flow designs.   The Default Outbound contact flow however can not easily be used n this way.

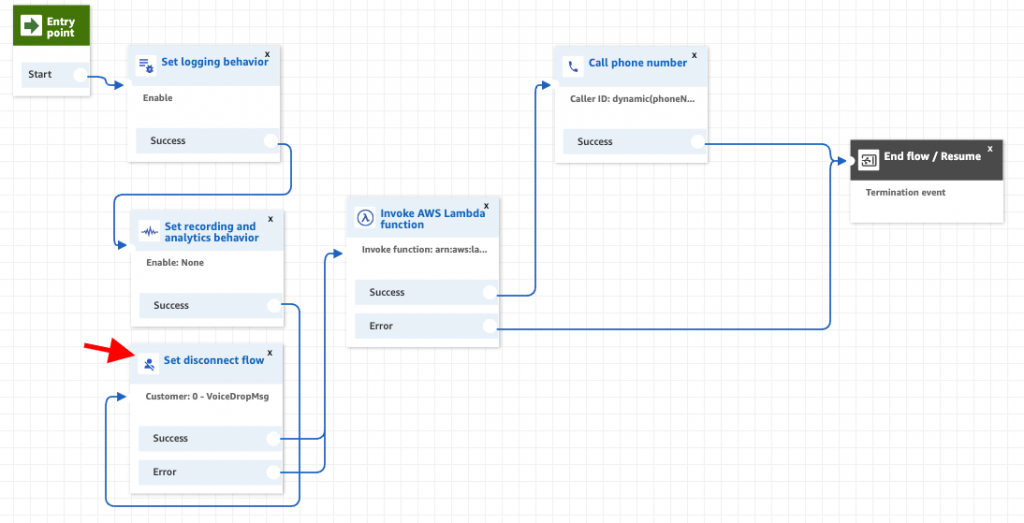
What you can do is modify the outbound contact flow and add a “set disconnect” step in that contact flow.    This step is activated when the Agent hangs up and the outbound line is still up.   In this use case, the “set disconnect flow” point to a simple contact flow that has  “play prompt” which contains the message you want to leave in the called parties voice mail box.  The agent, hearing the call has been forwarded to a voice mail, simply hangs up!  The contact flow then plays the prompt asking for a call back!  Cheap but very workable!   (This is a video clip that reviews this configuration).

Note: The Lambda function in this configuration is to support a different function, that of selecting the Caller ID the agent wants to display to the called party.  You can see the details of that configuration at this link.

How about multiple message play options?

What about enabling the Agent to select from multiple messages?  Can each Agent have their own pre-recorded messages? The use case would be the same as configuration as above, but with a couple of changes.  The first change is we need to create a custom CCP that would have the buttons we need to indicate which message the Agent wants published to the called party.  This might be individual buttons or it might be a drop down list of available numbers.    Secondly, we would need a lambda function to retrieve the messages from a Dynamodb table prepared for this purpose.

The following video reviews how this configuration might work with a customized CCP.

Give us a call or email DrVoIP@DrVoIP.com if we can help you with this function!


Amazon Connect “Auto Post Call Customer Survey”?

Most frequently asked Question about Amazon Connect this week!

At a time when we are buried building “work at home” solutions a question has surfaced as being the most asked question of the week!  Can you write a script that provides “after call” customer evaluations?   The challenge with after call surveys is that they need to be automated with no Agent transfer required.  Why would an Agent transfer an obviously unhappy customer to a post call survey?  The only callers the Agent will transfer are callers who are obviously happy with the manner in which the Agent handled the call.   The requirement is that after the Agent hangs up, the customer previously selected for a survey, is automatically transferred to the survey solution!  (Special thanks to Gordon Campbell Dextr.Cloud CSO for bringing this issue to the table)!

Can we automate the after call survey?

The fact is, using Amazon Connect it is very possible to automate the after call survey.   We have created a solution in which some percentage of inbound callers are auto magically transferred to the post call survey dialog.   The solution can be very simple or implemented with more complex options.  In any case the solution will most certainly involve several other services from the AWS pantheon of technology infrastructure solutions:

  1. Clearly you need an Amazon Connect Instance configured with the DrVoIP Post Call Survey script
  2. A decision needs to be made as to how many calls should be transferred to the survey as a percentage of the total call volume.  From 1-100% are possible.
  3. A decision needs to be made as to the customer answer collection technology.  Are we going to use LEX as a Speech Bot to collect the callers survey response, or is a good old “press 0-9” input acceptable?
  4. The actual survey questions have to be scripted and need to map to either a LEX Intent/Slot or a Touch Tone value.
  5. A lambda function(s) will need to be created to write the results to a database.
  6. A database for the results needs to be available to host the responses by caller.  Left to our own design we would make use of DynamoDB but you can make use of any database you prefer.
  7. A report generation and administration resource needs to be created.

As it turns out the automation of the post call survey transfer was solved and we can do this with little modification, if any, to your Amazon Connect existing contact flow scripts.   The above list, however, determines how much time and effort is required to do provide this facility.   In fact, some folks already have a survey solution and the only requirement is to transfer the caller to that solution.    If we have to create a solution then the complexity of the solution is determined by the answers to the questions and decisions posted above.  For example, using LEX is certainly a real possibility with real benefits. Speaking is always better than hunting and pecking a touch tone input device.   Reading and writing to a database is also not that demanding of a task, though it does  take some time to create reusable functions that are not restricted by the number of questions asked.

The Report Generator!

Actually, the last item is the big expense.  You can have a simple and utilitarian GUI interface to setup the survey questions and report the results.  Using S3 and simple static HTML interface works just fine, but is not as fancy as having a GUI with all the latest flashing and dynamically changing “on click” options.

Survey Options

We have been able to randomize the questions asked, which is a nice feature.   Noting if the caller has already taken the survey in a previous call is also doable.  We are always learning new requirements and when we think we have heard them all, someone comes up with another request!    We actually enjoy the “stump the vendor” game, so please do not hesitate to ask us for features that you dream up!   Post Call automated customer surveys  are most certainly within the scope of what you can do with Amazon Connect!  Just give us a call and we can scope it out in no time!  – DrVoIP@DrVoIP.com


Give Amazon Connect Phone system features with “Dial by Name” functionality

Press 1 for…. Why?

It is the 21st Century and there are two technologies that are still in use: Fax and DTMF Call Trees!   Why, I am not sure as there are so many more effective technologies available to replace them.  Why we still have caller “self navigation” by “Press 1 for this and Press 2 for that” is one of the great mysteries of life in the 21st Century  (the other is why are folks still sending faxes)?   I get that Speech Recognition used to be so very expensive that it could not be adopted by but the largest enterprise organizations.  Today however, thanks to services like LEX in the AWS ecosystem, there is no longer any economic deterrent to the rapid adaptation of Speech recognition to the basic IVR based call tree.

Phone System or Call Router?

Amazon Connect is not a phone system in the way that Ring Central or 8X8 is a phone system.  Amazon Connect is a call routing solution with telephony functionality that enables call answering, screening, routing and queuing services to be applied using “rules” and “contact flows”.   You can configure a variety of AWS services to significantly enhance the basic call routing engine to achieve superior functionality within a reliable, resilient and elastic cloud based architecture.  Now instead of saying “Press 1 for this and Press 2 for that” we can say “Hello, tell me how I can route your call”?

Amazon Connect Dial By Name Contact Flow

One of our most popular configurations is a “Dial by Name” functionality that we enable on our LEX based, Speech fired automated attendant.   “Thank you for calling DrVoIP, my name is LEX and I can route your call if you speak the name of a function like sales or support, or say dial by name”.    Now that is a powerful caller experience and significantly functional while providing a memorialized  customer experience that differentiates your enterprise from those companies stuck in the 1980’s with DTMF IVR automated attendants.

Building LEX solutions into your Amazon Connect instance is not that complex though it will require a considerable amount of trial and refinement.  If you want to do a dial by name IVR you will also need to be a competent software engineer and have an understanding of both lambda functions and dynamoDB data structures.  (Better yet, contact DrVoIP and we will do it for you)! LEX will prompt your callers to provide spoken input like someones last name, but you will need a lambda function to take that input and use it to index a database structure.  The database will contain the target information you will transfer your caller to.

Interestingly enough,  you can transfer a call to a phone number or the ARN of a Queue, Contact Flow and Prompt.  This makes it very possible to route calls to individual agents within the contact center or to a service in your call center.  The processes requires:

DynamoDB – Table to hold endpoint contact data

Lambda Function – Interaction between Contact Center and LEX

LEX – Speech recogntion BOT to ask callers who or what they want

The new Contact Flow will greet the caller and prompt them to “speak” the name or function they are calling for.    The Lambda function will take the Intent from LEX and pass it to DynamoDB which will return the endPointID that the caller should be transferred.    Not only does this functionality increase the personalization of the customer experience, it significantly reduces the complexity of constructing contact flows by using a dynamic configuration end point ID.

The DrVoIP.com Youtube Channel has a great deal of material on these subjects including a basic configuration and advanced configuration tutorial updated for 2020.   This site also has training materials.

Contact DrVoIP@DrVoIP.com


Amazon Connect – Is today a Holiday?

Is Today A Holiday?

Having deployed hundreds of CISCO UCCX and ShoreTel ECC and other Contact Centers, checking to see if today is a holiday seemed to be the “minimum daily adult requirement” for contact center management.  In fact one of the most popular scripts on the net for CISCO UCCX was named “HolidayCheck”!    In fact we used this script to provide an XML tutorial  on the DrVoIP YouTube channel.  Checking a list of holidays to deal with periodic contact center closings is usually a standard feature in most call center applications and telephone systems.

Amazon Connect, however, does not provide a “holiday check” out of the box!   If you want one, like many other features in Amazon Connect you are going to have to create it by writing your own function.  The good news is that the wealth of services in AWS makes this a very simple task using nothing more than a Lambda function!

Contact Flow – Invoke Lambda

An Amazon Connect contact flow would do the normal “check hours” to figure out if the caller was hitting the system during “on hours” or “off hours”.  If the call arrived during normal business hours, then the next step would be to check and see if today was a holiday.    The contact flow adds a simple “invokeLambda” function to make this determination. To simplify the lambda function, we include the list of holiday’s as an object array within the environmental variables.

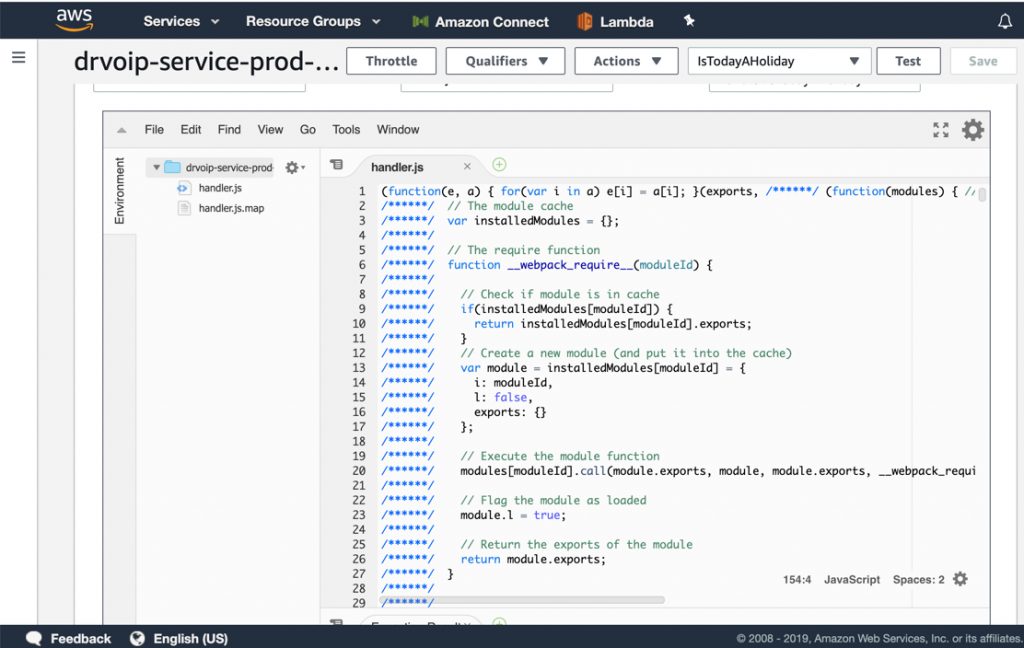
We determined to create a simple lambda holiday check function using the fewest lines of Node.js code as possible!  In fact there is no need to invoke the function by passing in a date.  You simply invoke lambda and it uses the javascript date() function to parse through your list of holidays comparing todays date with the individual list items.   What we want returned is a simple “true” if today is in fact a “holiday”; or a “false” if today is not a holiday!  Very simple!   The branch step in your contact flow will be based on this simple boolean value returned from lambda.

Improving the function

Now that we know if “today is a holiday” we have the basics in place.   Improving the function has endless possibilities.  For example:

The basic function assumes a full day closure.  What about half days.

It would also be desirable to have an ability to play a custom audio prompt based on the specific holiday closure.

Clearly you can make the administrative interface much more acceptable to a call center supervisor while eliminating the need to let non-development professionals access the AWS Console.  In the basic function, updating the holiday schedule would require folks be able to access the lambda functions directly to update the environmental variables.    Creating an S3 bucket as a static website host, with a simple HTML interface to enable system administrators to update the holiday list from year to year would be an obvious improvement.   This option would open the door to allowing supervisors to close a queue for a team meeting.

Summary

Amazon Connect is an element of a very large ecosystem in which the available services enable you to create a contact center that can meet your wildest imagination!   If you can “see it”  you can make it happen!  Optionally, you can call on DrVoIP and we will make it happen for you!

The Lambda Function is available here.

The function is written in Node.js and is built out using the Serverless framework which you will need to make use of, to deploy the function in your own Amazon Portal:

First you have to configure an AWS CLI profile in order to deploy here is steps to configure it:
step 1: Open terminal
step 2: Execute command “aws configure –profile <profileName>” it will ask for input key id, access key, and region
Next here is steps to deploy service:
step 1: Open terminal
step 2: Get to project root directory
step 3: Execute command “serverless deploy –aws-profile <profileName>”


Amazon Connect Tips, Tricks and Trouble Shooting!

What no Delete for Contact Flows?

One of the first discoveries you will make while configuring contact flows is that you can NOT delete a contact flow.   Once it is created, you can “save as” but you cannot delete it.  There is a good reason for this and hopefully by the end of this blog it will make sense to you.   Out of the Box, Amazon Connect comes pre-configured with a wide variety of contact flows and system parameters.  You will see this listed as sample and default in a newly created instance.  If you poke around you will also see that a schedule of basic hours has been configured along with a basic queue.  There are preconfigured security profiles and preconfigured routing profiles along with a small library of professionally recorded voice and music  prompts.
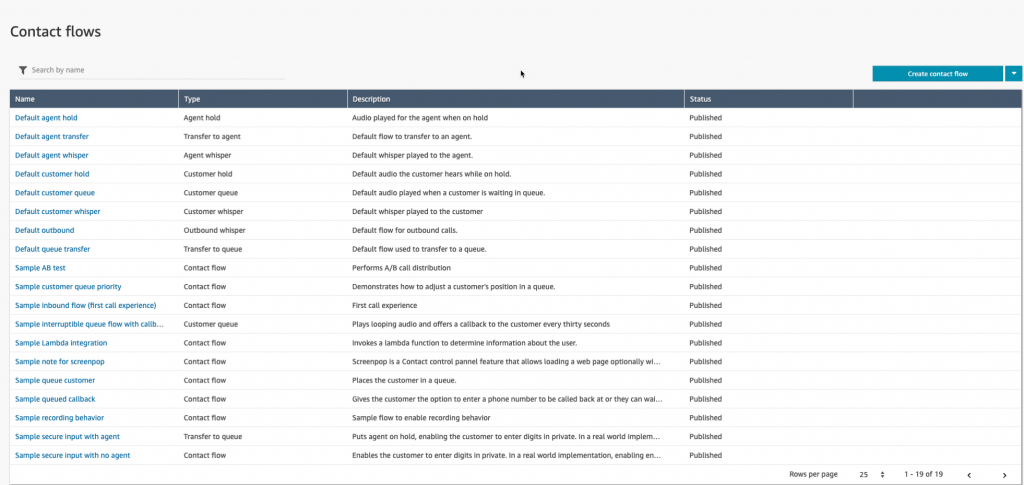

This pre-configuration and population of basic and default parameters is done for a reason that also helps explain why you cannot delete anything after you create it!   Assume you open a new Amazon Connect instance and following the setup menu, add a telephone number.  Assign that number in the drop down window in the phone number configuration to point to the “Sample inbound flow (first call experience”.   Then call the number.  This Call flow will make use of most if not all of the default and sample contact flow listed in a fresh out of the box, unmodified Contact instance.  Since we did not configure an agent or queue it draws on several preconfigured parameters including the “Default Customer Queue” which describes what a caller hears while waiting for an Agent to become available and the “Basic Queue” along with the “Basic Hours”.

How Amazon Connect stages Default Contact Flows

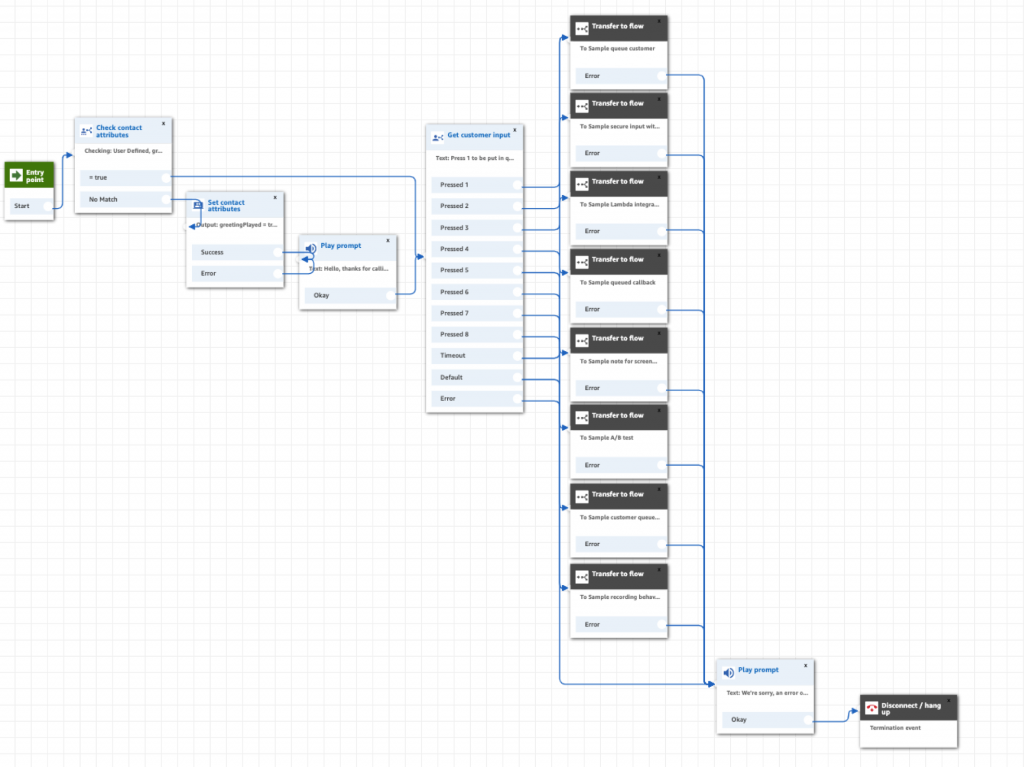
If you open the “Sample inbound flow (first customer experience)”  note that it does NOT make use the “Default customer queue” step.  How is that we hear it if it is not in the contact flow?  When the call is transferred to an Agent we did not even configure yet (we are logged in as the Instance Administrator on a CCP softphone), we even hear the “Default agent whisper”.   Nor did we configure a Queue?  Likewise if we put the caller on hold we are tapping the “Default customer hold” contact flow.  If we are in Call Wrap up, the caller would be hearing the “Default customer queue” contact flow while awaiting for an agent to become available.

This is the key reason you can not delete anything!  To do so would jeopardize the stability of the Connect Instance.  These defaults assure that configuration newbies cannot stray materially from the experience they intended to configure.   While the Connect instance is setting up an outbound connection to the agent CCP softphone, and even longer if dialing an agent’s hard phone.   The caller will hear the “Default customer queue” experience.  We recommend that you get a “ring back” audio prompt and use that in either the default customer queue or the customer queue you create.  We think it is a bit confusing for a caller to call in and hear music while being transferred.  You should also note the possible impact on your inbound call statistics.   Additionally, note that billing started the moment your caller hit the phone number regardless of the fact that they are not yet connected to an agent.
Creating and Modifying Contact Flows using “Save As”

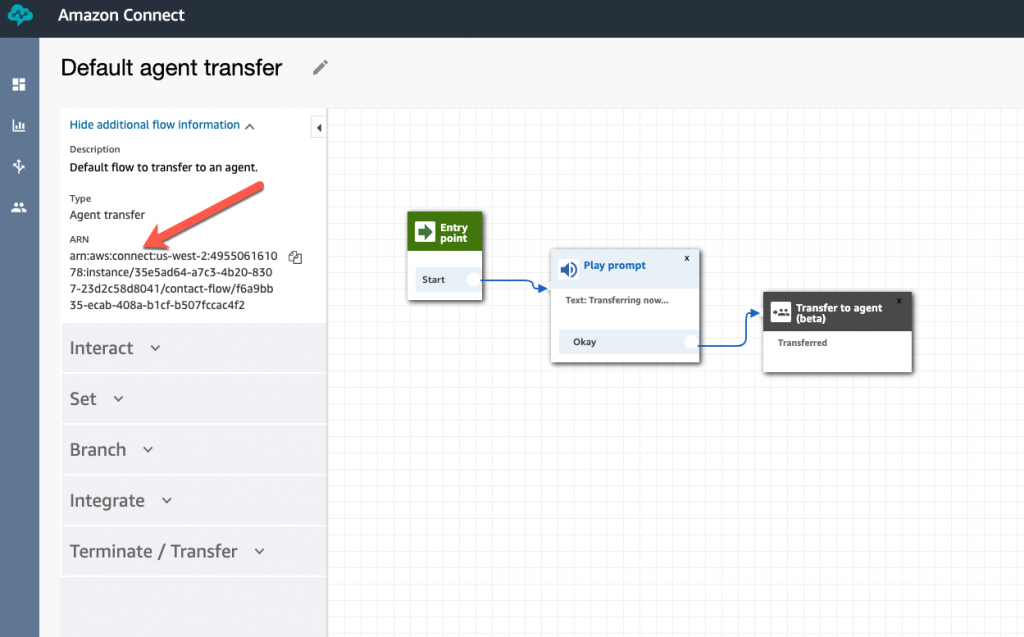
Each of the Contact flows in an Amazon Connect instance has an Amazon Resource Number or ARN. This is a globally unique identification number and defines every contact flow in the instance.  Generally, you will build a new contact flow from an existing one.  To do this, you first open the contact flow you want to copy and do a save as.    You have to pay attention here, or you will have a big problem!   Some folks open a contact flow,  change the name and make some modifications and then publish it!  It will show up in your list of contact flows, but it will still have the ARN of the original contact flow even though you renamed it!   This means that other contact flows that call on that original contact flow will now get all your changes!   What you want to do is rename the contact flow and do a “save as” in this way you create a new ARN and will not be over writing the original contact flow.
 

Not all Contact flows have all contact flow Options?

There are about 9 different types of contact flows that you can create to meet your call flow requirements.  If you create a new Contact Flow you need to understand that not all contact flow types will have all the contact flow options.  For example if you are describing the experience you want a customer to have while in queue waiting for an agent to become available, you will  open the “Default Customer Queue ” and do a “save as” to create your experience.   Do not expect to find a “Transfer to Flow” option in the list of possible steps as that option is not available in this type of contact flow.  The list of step options changes based on the type of contact flow you are creating, so keep this in mind!


Error Handling

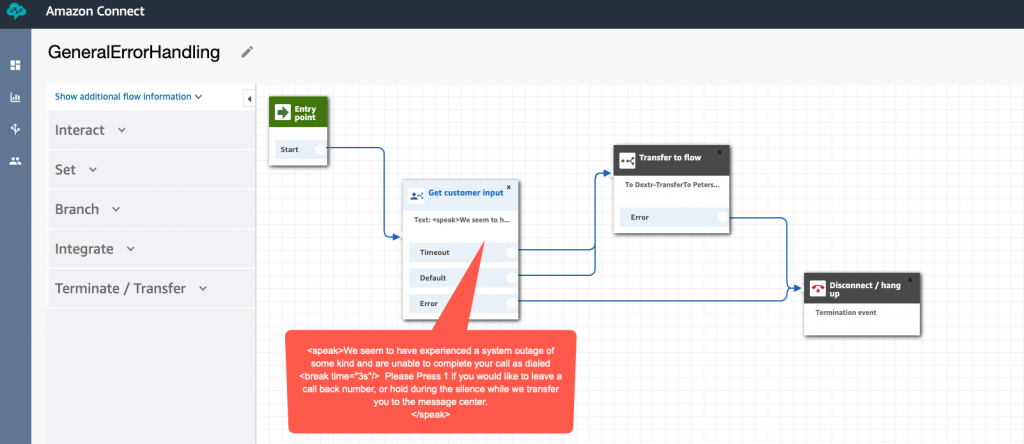
Generally, every step in a Contact Flow has an error exit.   We have found that it is best to create a Contact Flow named “error handling” and to use this as the solution to all of the options that you must provide an error exit.
 

Use Speech Markup Language for Text to Speech prompts!
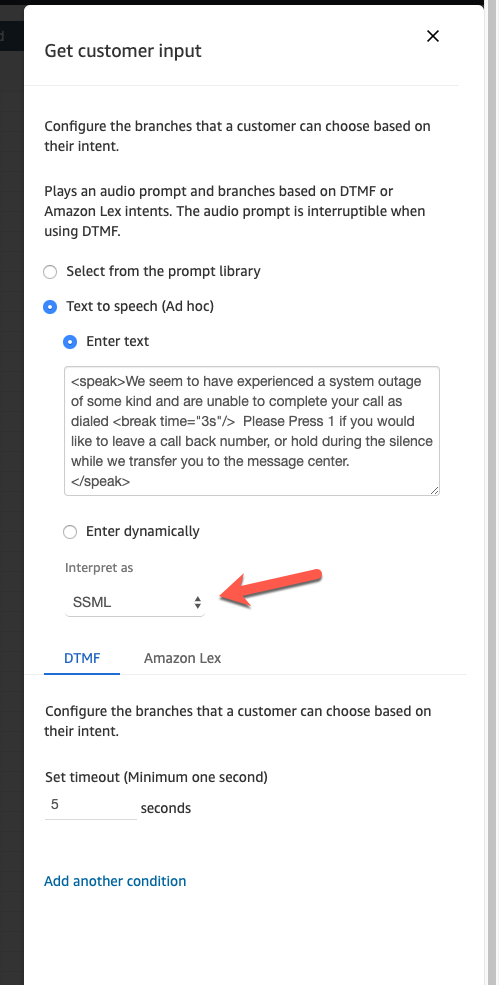
As a consultant deploying call center and IVR solutions, one of the most frustrating aspects of the implementation is waiting for clients to get their voice prompts together!   Generally we will not start an implementation until we have the prompts!  Text to Speech is a life saver for deployment engineers.  You can create prompts on the fly and let people test them, suggest modifications and really fine tune the prompts to achieve the desired level of customer care.   When the prompts are all agreed to, you can then get them professionally voiced or not!  We find that Amazon Polly is an excellent option for prompts but we also suggest that you use the Speech Synthesis Markup Language option.  In all of the prompt areas you can choose between loading a Wave file, or using Text to Speech. When using Text to Speech you have the option of interpreting the text as text or as SSML.     SSML enables you to add tags that can control the various components of speech including tone, pitch, speed and format.   You may want a number read as a phone number for example, rather than a long integer.   SSML is simple to configure and it very powerful.  Learn to use it always and you will have very excellent results.

Don’t forget to assign outbound phone numbers to your Queues

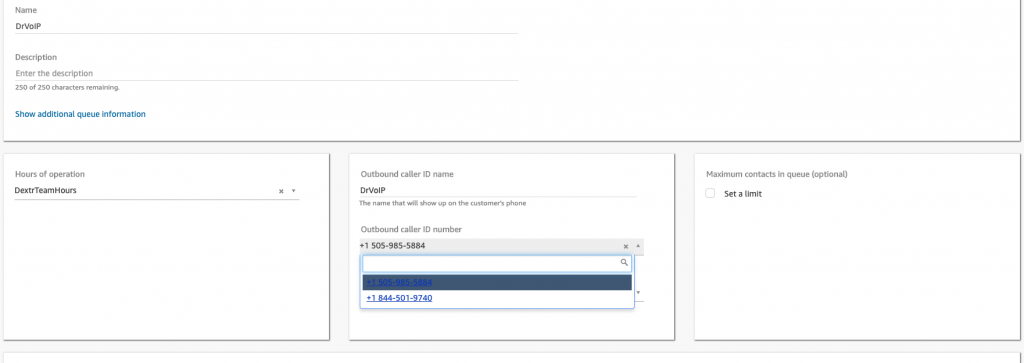
In Queues in which Agents are expected to make out bound calls you must associate a phone number to that queue for outbound dialing.  The Agent will not be allowed to make outbound calls if they do not have a phone number assigned to the queue.  You can also try to put an outbound name in the same configuration area, but there is no guarantee that this name will be displayed to the CallED party.  The phone number will most likely display to the CallED party, however names are provided by multiple options at both the carrier level and the end device level.
Trouble Shooting 101

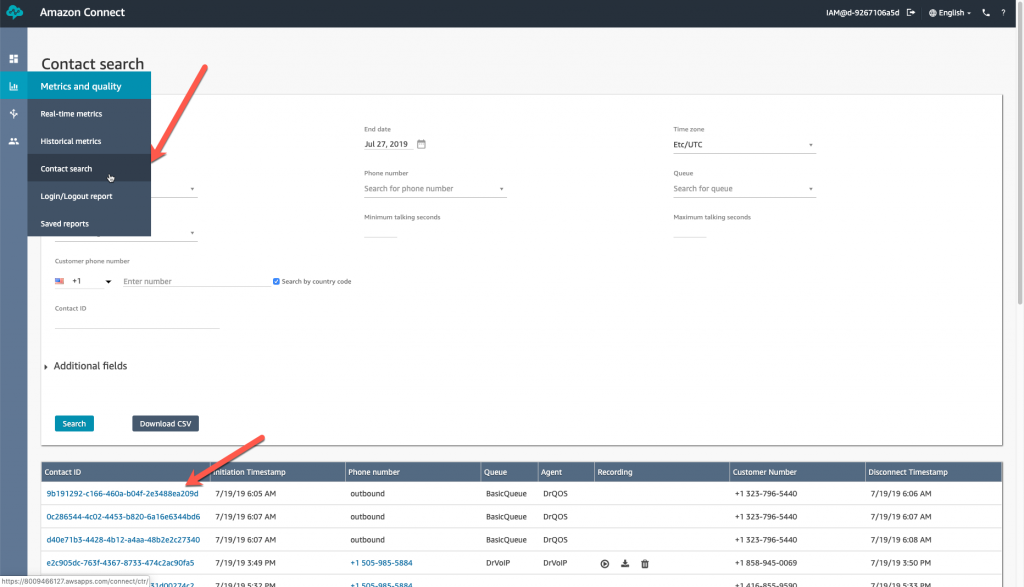
When trouble shooting Amazon Connect contact flows your best friend is CloudWatch and Contact Flow Filters!   Lets take a look at each of these tools to better understand how they work together to provide a history of how a specific call behaves.    First while in the Connect dashboard you will find under “Metrics and Quality” you will find a  TAB for “Contact Search” .  Selecting this option will enable you to set search filters for the contact record you are trouble shooting.  You can filter on the usual date and time parameters, but also by queue, and by call type and direction (Inbound, Outbound, Transfer, API, Call Back and Queue Transfer).   The goal is to obtain the “ContactId” the key to all activity in the Connect Instance.  If you know this ContactId you can just search for it and skip the filters.  Optionally you can just “Search” and you will see a list of ContactId’ based on the default filter.
Now that you have the Contact ID you can move over to CloudWatch (this assumes you have enabled logging) and you can search for this ContactId record and follow the entire call flow from start to finish,  Go to the CloudWatch service, click on Logs and then locate the “Log group” for your Amazon Connect Instance.  This will pop a list of “Log streams” and “last event time”.  Find a row that closely matches the date and time of your target ContactID and open that log stream by clicking on it.

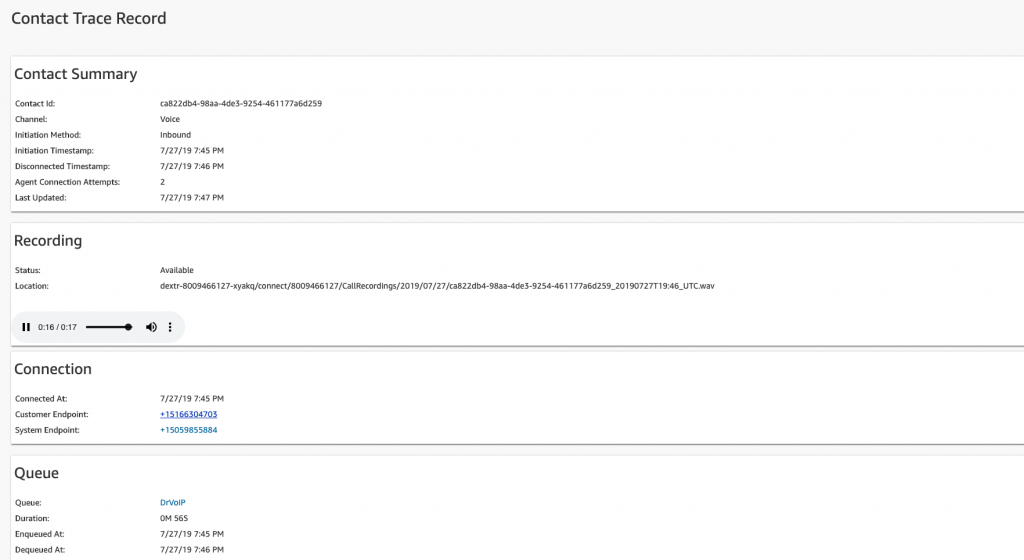
Note that the time in the even stream is in UTC and matching log times is always interesting.  In this example we searched for a particular Contact ID in the Connect dashboard and it shows that the call we are interested in had a “Initiation TimeStamp” of *7:46 PM”  GMT/UTC  or Zulu  time (if you are military, which all mean the same time reference regardless of where you are located on the globe).


The Contact ID is a clickable link, and will bring up some information of interest as contained in the Contact Trace Record.  There will be a Contact Summary, A recording if enabled with the location of the recording and a playback button, Connection Endpoint pairing and Queue information.
Heading over to CloudWatch and checking the respective Log Stream in the instance log group, we find that the time is being adjusted to the GMT offset of the time zone the Instance time reference, which in our case is GMT -7 hours!  S o the Contact Filter Search in the Amazon Connect dashboard is being Time Stamped for GMT/UTC but the log is offset (Terminate at 7:46 PM in dashboard is listed at 12:48 in the CloudWatch logs).   Keeping track of this time offset will drive you a bit nuts, but if you are aware of it, you can figure it out.  SUMMARY – Look in Cloudwatch for the UTC offset in your Connect Instance and NOT the time stamped in the Contact Filter of your Amazon Connect dashboard!


When searching for records in the CloudWatch logs you will note that you can set it for ROWS or TEXT and you can also select to search by specific times and choose between UTC time or Local Time zone>
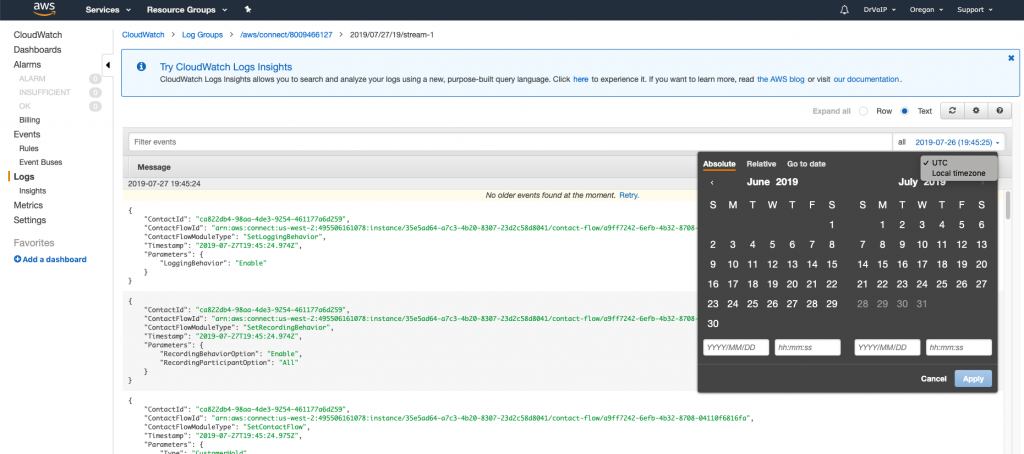
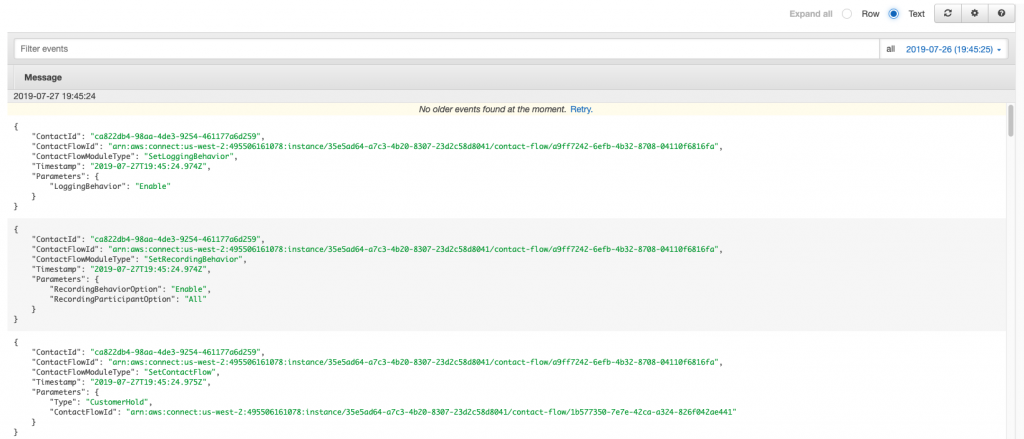
When you set your search by ROW you will get an orderly list of multiple Contact ID’s within the event range reported.  Logs are posted about every minute or so.  In an instance with a heavy call flow you are going to find many different Contact ID’s in that event range and will have to search for a specific record using a search filter in the format of “ContactId” = “ca822db4-98aa-4de3-9254-461177a6d259”.   In Text mode you can also search using the CTRL F feature of your browser.

When you use the ROW mode you will get a list of Contact Flow steps that, by pushing the down arrow will open each step for inspection.  This is necessary to see each step of your call flow, what Contact FlowId  was used by ARN.

Selecting the TEXT mode will generate the same list of JSON objects but they will be fully expanded:
CCP Trouble Shooting

There is a very useful tool for testing the connectivity of a specific desktop call control (CCP) to your Amazon Connect instance.  It provides useful information about the latency, resource, reachability and connectivity that are essential base lines for trouble shooting.   Click here!

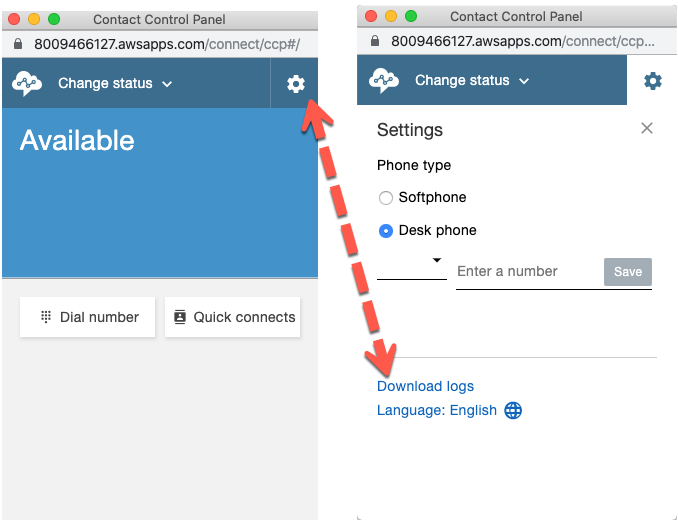
CCP LOGS

On the CCP you will find the little GEAR symbol and if you click on that you will be able to download the logs for this Agent Desktop.
 

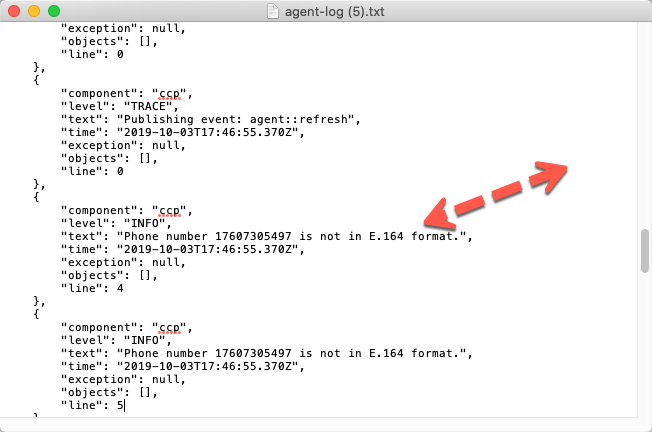
You can open the logs with any text editor and the content often spells out the issue pronto quick!
 

(to be continued)


A Call Center for Cheap, Penny Pinching, Tightwads on a budget!

We Design, Deploy, Service and Customize Amazon Connect!

Since 2008 DrVoIP had been working  in the support of VoIP based call centers from CISCO, Avaya and Mitel/ShoreTel solutions.   Since 2017 we have focused exclusively on AWS services with a particular focus on ‘Amazon Connect” call centers.   From Recording and Voice Mail solutions, through Workforce Management and Voice analytics we have provided custom software  integrations on time, on budget and with the highest customer satisfaction scores.  Our references are public, verifiable and serve as a guide to our abilities and commitment to excellence.

We are not here to run up your professional service bill.  We are here to help you realize your call center vision an always work on a “fixed fee” basis.

We deploy “virtually” and “globally” so just click or call! – DrVoIP@DrVoIP.com

DrVoIP fixed cost deployment packages

  • Complete design, deployment and training base package includes:
    • Amazon Connect instance setup in customer AWS Account, with usage billing direct from AWS;
      •  Up to 10 inbound toll or DID numbers
        • DNIS direct to queue routing or 1 IVR DTMF Options Menu
      •  Up to  5 Customer Service Queues
      • English Language support (option for Spanish, French)
      • Unlimited Agents
        • We configure 5 Agents for your use as a template and you configure all the others you may want
      • Up to 5 Routing Profiles
        • Routing profiles bind Agents to the CSQ they are assigned to work in.
      • Voice Mail with Email and SMS delivery
      • Queue Hold  with options for “call back”, voice mail, transfer or continue to hold for Agent
      • Website Chat
        • a single queue connector that enables website visitor to “chat” with call center Agent
      • Dextr Dashboard integration
        • Dextr can provide email routing, text routing, real time and historical reporting
      • Fixed Price Deployment $2995
        • Larger call centers quickly quoted!
    • OPTION PACKAGES
      • Multiple Language support
      • DIAL by Extension
        • Each agent has faux Extension number that can be used for direct call to agent
      • Dial by Name
        • Speech Recognition enables caller to speak a name (i.e. Tom) or function (i.e. Sales)
      • CRM Integration
        • Standard Publish Connector for Salesforce, Zendesk, Freshdesk, ZoHo, ServiceNow and others
          • Functionality defined by the CRM provider and author of the connector
      • CHAT BOT
        • FAQ, or Data acquisition before escalation to a Call Center Agent.
  • Free Trial of Dextr Dashboard is included!

To order an Initial Basic Configuration package and receive a detailed planing guide click here .  Contact DrVoIP@DrVoIP.com or Better yet,  Call 800-946-6127 ask LEX for the the Doctor!

Amazon Connect Call Center build strategy

We offer qualified companies a no cost “Proof of Concept “ (POC) Amazon Call Center Instance built in our portal for your use and testing with your agents able to log in and take phone calls on a number we provide.  A POC can be set up within a few hours!  From the POC, we design and deploy a solution that meets your requirements in your Amazon Connect portal.  We make use of our discovery process and planning guides.   We also build our solutions with our own Agent dashboard, named Dextr.   Dextr  provides the core feature set  that all call center professionals expect including voice, text and email routing to the ‘next available agent’.   We can also provide outbound “auto campaign dialers” to increase agent productivity for notifications, recorded announcements and appointment reminders.

Your TCO is further reduced, when compared to the cost of the  software engineering or professional services required to obtain the same feature set as that available to Dextr subscribers.    Dextr is a UCaaS solution that front ends Amazon Connect Instances with a custom agent dashboard and supervisor display.  Any enterprise with an Amazon Connect instance can onboard themselves at https://Dextr.cloud.  We deploy “virtually” and “globally” so just click or call!

DrVoIP Amazon Connect for the Business Manager

  1. What makes up a Basic Amazon Connect Call Center?
  2. Amazon Connect Discover Questions for Call Center Planning
  3. Amazon Connect Planning Guide
  4. Amazon Connect Historical Reporting Options
  5. The ROI and TCO when using the Dextr Dashboard
  6. Amazon Connect Check List
  7. Amazon Reporting Elements
  8. Understanding Amazon Connect Billing
  9. Amazon Connect & Dextr.Cloud Agent Dashboard
  10. Three Minute Video Overview of the Dextr Dashboard for Amazon Connect 
  11. What are “soft limitations” on new accounts?
  12. Advanced Post Call Survey strategies 
  13. Speech Analytics now a standard part of Amazon Connect and Dextr!

DrVoIP Amazon Connect for the Technical Manager

  1. Amazon Connect Basic Configuration Tutorial
  2. Amazon Connect Custom integration Tools
  3. Amazon Connect Configuration “tips and tricks”
  4. Tech Tip – Understanding LEX BOT Versioning and Alias 
  5. Deep Call Back from Queue without losing your place in Queue 
  6. Simple, Cheap and useful Voice Mail Solution 
  7. Is Today a Holiday Check?
  8. Amazon Connect “Forced Release” Options 
  9. Amazon Connect building prompts with Polly
  10. Building Conversational LEX Solutions
  11. Amazon Connect Call Back from Queue Options
  12. Email Routing in Amazon Connect
  13. What are “Soft Limits”
  14. Building Custom CCP for CRM Integrations
  15. SMS Inbound request for call back 

DrVoIP YouTube Channel – Complete Amazon Connect Configuration training!