Deploy an Amazon Connect Contact Center for $195?

Pay Only for what you use

We have been working with Amazon Connect since the product was introduced back in 2017.   “Pay only for what you use” is a very attractive economic principle!  We note that a lot of folks login into AWS and spin up a contact center and then though they get it working, it is featureless and they need help.   We have built  “proof of concepts” contact centers over the years many of which have matured into full blown, fully feature contact centers complete with CRM integrations and custom agent dashboards.  Sometimes, in the sale process, it is just easier for everyone to just take a seat in the call center and learn by experience.   The technical team and the business teams all get to use the product and gain useful insight into how Amazon Connect can be a winning customer engagement platform for your business.

Historically, we had offered access to a demo system with your own incoming phone number and call routing solution.  Just give us a few basics and we setup your incoming greeting and add your agents.  Your agents log in and you are off to the races.   This helped the business folks, but not the technical folks.  We needed another solution.

The Amazon Connect Deployment kit!

Enter our complete Amazon Connect inbound voice call center!  For about the cost of an hour of technical support you can build out a fully usable call center.  We provide the contact flows to support inbound call routing direct to a target customer service queue (CSQ).  Optionally, you can route incoming calls to an Integrated Voice Response (IVR) system that provides menu options for caller selection.    The options available to callers waiting for the “next available representative” include receiving a call back when an agent becomes available, leave a voice message or continue to hold.  There is an “after hours” call handling solution along with an error handler.  All the basics.

Video Tutorial for the non-technical Business Manager

The kit includes all the contact flows ready for download and importing into your AWS account and instance.  Along with this kit, we include a video tutorial that will not only coach you along, but provide the background you need to understand the configuration options.   A non-technical business professional should be able to have this solution fully operational and working in about an hour.


So, invest $195 and stop wasting time.  Visit the Store!  You will learn what works and what you need to achieve your Contact Center Vision.

Email DrVoiP@DrVoIP.com


Adding Video to your Amazon Connect Contact Center

Why Video?

If a picture is worth a thousand words then a video is an encyclopedia of information!   I remember a team building exercise in communications in which all the team mates sat with their back to the grease board at the front of the room.  Each team mate  had a blank sheet of paper and a pen on their desktop.   Another team member drew a simple share on the grease board and then described it verbally to the rest of the team.  Instructions included how to orient the paper and a verbal map of how to replicate the grease board drawing was narrated.   It was amazing how many different versions of the illustration were created by the team with verbal descriptions from the team artist!  No two alike!

So now put yourself in a technical support contact center listening to your caller describing how they have the yellow cable plugged into the thing next to the other thing?   How more effective would it be if the help desk technician could see the wifi router the caller was trying to install.    One call resolution time would be reduced,  average holding time would be reduced and SLA’s would improve as agents spend less time listening to caller descriptions and more time seeing issues enabling them to handle more calls and solve more problems more quickly.

Mobile Video Chat!

Enabling a link on the company website that opens a chat session with a customer service representative in your call center has always been possible with Amazon Connect.   Now with the aid of AWS Chime, you can escalate a keyboard chat to a video call complete with audio!  You can also push the chat link out to IOS and Android devices, making it possible for mobile video solutions.    Insurance companies could see real time accident reports.    Contractors could quote jobs more quickly, reducing time by eliminating site visits in favor of  video ‘meet ups”.   Telemedicine is also a rich vertical for video in the call center.

Video for Amazon Connect Contact Centers

Integrating video into your Amazon Connect contact center is relatively straight forward.   The solution makes use of a custom CCP, Chime SDK and a bit of serverless code on the back end.    Agents are alerted to an incoming request through the Amazon Connect chat facility using LEX to orchestrate the dialog and gather preliminary data from the caller.  Once the chat is connected between the caller and the agent, both have buttons to escalate to video.

REQUEST  A DEMO

If you would like a demo of this functionality, send us a request and we will send you a link. DrVoIP@DrVoIP.com


Powerful Amazon Connect Call Back from Queue Configuration Strategies!

The Amazon Connect Call Back from Queue Dilemma!

Assume you have a call center that follows the sun from coast to coast!  You team starts in NY at 7AM EST and ends in California at 7PM PST.    You offer call back options to callers waiting to speak with an agent.   A caller enters the queue at about 6PM PST and leaves a request of a call back when an agent becomes available.   The call center closes at 7PM PST but the call was not yet handled by your contact center.  The next morning, at 7AM,  Agents start the new day and the first call presented to an Agent is from the call back queue, the call left over from last night.  The outbound call is dialed, and your Agent is now speaking to a very angry Customer in San Francisco where the time is no 4AM PST!

The Call Back Queue Problem

Once a caller is sent to the call back queue, there is nothing you can do about this!   Let’s look at some options that we might apply to better control this call back activity:

Call Back From Queue Configuration Options

First, let’s create a switch to turn off call back requests during times outside a 10AM-4PM window.    This is a simple “check hours of operation” step in your queue hold flow.  Check the current time, and if it is outside the window, your contact flow will not offer the  call back option to callers.    This will keep callers from being left in the call back queue over night at the end of the working day.

Optionally, we can still offer the call back, but use the time window to determine if we should route the caller to the call back queue.  We can still offer the call back, but if check the time and find it is outside of the window, we do NOT want to send the caller to the call back queue.  Remember once the caller is in the call back queue, we lose control of the call back!   Using Lambda and DynamoDB, we can write the callers request to a call back list for later processing,  rather than putting them in the call back queue.    We can then develop a watch dog timer, that scans the call back list and when the call back window reopens, we can stuff the caller request into the call back queue.

These options will offer a greater degree of control over the call back process, but what about that San Francisco caller?  How do we make sure we are not calling folks back in the wee hours of the morning?   We need to add additional logic to our function and additional attributes to our database items.   We can look at the area code of the caller requesting the call back, then compare the area code to a time zone map.


How can we improve these configuration options?

Clearly you can ask the caller what time they would like to be called back.  That would work and can be an additional attribute in your database items.  You would still use the above configuration options, but also take note of the time range the caller wants to be called back.

Check for existing call back requests!

Your call back configuration should also check to see if this caller has already made a request to be called back?  If you run a call center,  you know folks call in and request a call back, hang up, wait a few minutes and then call right back in and impatiently request another call back as if that might speed up the process.   We need to check our database of call backs and make sure this caller is not already subscribed to a call back request.

Check the caller’s phone number?

After requesting a call back, your configuration should note “I see you are calling from 1-844-4DrVoIP, is that the number you want us to call you back at”?    We can then confirm that number, or ask them to answer another number.

How to get to an Extension number?

The standard call back strategy is to dial the number and hope the target caller is reached.  Unfortunately, more times than not, a receptionist or voice mail IVR answers and wants to know how to complete your call.   Your configuration may need to not only ask for the number to call back on, but an extension number of name of an individual to ask for when the call back is dialed and answered by other than the person who requested the call back!

These are simple but powerful ways of taking the Amazon Connect call back engine and adding features and functionality to achieve a level of control over the call back function.  They distinguish a call center configured with little though to the call back strategy form a call center configured to maximize customer interaction success!

If you would like some help configuring these options, give us a call at 844-4DrVoIP or email and we would be eager to help you! – DrVoIP@DrVoIP.com


Building an “Appointment Reminder and Phone Tree” using Amazon Connect!

The Phone Tree Concept

Phone Tree’s are have a wide range of use cases from emergency notification alerts, to social function meeting announcements and even appointment reminders!   The generic functionality of this “Phone Tree” application, however, is similar in each use case.  Generally, we want to place an outbound phone call to numbers that are in a database, play a recorded announcement, prompt and collect digits, update the contact list and even allow the caller to be transferred to a live agent, BOT or message center.

Example Application: meeting alert and dinner reservation!

In this example we want to contact all the members of the club and inform that that a dinner meeting is planned for a specific data and time.   We want to know how many members will attend both the dinner and the meeting.   The recorded announcement might be something like ‘The White Hat Hacker club will meet this Friday evening at the clubhouse at 7PM.  Dinner will be served at 6PM and a reservation is required.  Please press 1 if you are planning to attend the meeting and the dinner, press 2 if you are attending the meeting only, or press 3 to indicate you will not be in attendance at this meeting”.     We also want to report the results of this survey to the meeting management via an email when all contacts have been notified.

This functionality could easily become an appointment reminder for a medical clinic.  The clinic wants to alert all patients that have an appointment for tomorrow to be reminded of that appointment.  This would use the same Phone Tree application and work the same, but the message might be a bit different: “This is Doctor VoIP’s office reminding you that you have an appointment tomorrow. Please press 1 to confirm the appointment or Press 2 to speak with a scheduling co-ordinator”.

Basic Configuration elements:

To get his application working we are using two major contact flows, a dynamoDB table containing the numbers to be dialed and three lambda functions.  The lambda functions include the outbound dialer API, the reset database and the update database functions.   The contact flows are used to validate the credentials of the dialer administrator, reset the database for fresh calls and to initialize the dialer function.  The second contact flow is the contact flow that plays the outbound announcement, prompts and collects digits and then updates the database.

  • DynamoDB Table – Minimally the table contains the number to be dialed and the status code.  The dialer looks through the table list for entries that have a status code of zero.   The table is updated with a new code based on the digits collected from the caller, or it marks the table with a status code of 3 to indicate the caller was contacted but did not enter any digits.
  • Lambda dialer function ( DrVoIP-InitiateOutboundCampaign)  (i.e.  – reads the database and once the caller is dialed, transfers the caller to the contact flow that plays the announcement and collects the responses.
  • Update database function – each phone call requires the database status code to be updated,
  • Reset the database to zero  function – Sometimes the list may be used more than once.  For this reason we want to clear the current status code before initializing the dialer. Clearing the database resets all entries to a status code of zero.
  • Contact flow Authorize Dialer – this is a simple contact flow that first asks the caller to input their ID number and PIN.  This is done to validate the caller is authorized to initialize the dialer.  Once validated, the application asks the caller to press 1 to initialize the database to zero or press 2 to initialize the dialer.   Pressing 1 launches the reset database function to mark all entries with a zero status code.  Press initializes the dialer and enables all entries with a status code of Zero to be contacted.
  • Contact flow Announcement – this simple contact flow plays the announcement to the called party and prompts them to enter a digits in response.   The digit is used by the update database function to set the status code equal to the digit entered by the caller.
  • SNS – Simple Notification System is used to send a summary of the dialer results to anyone subscribed to the SNS notification.  In this application we are using SNS to send an email to the meeting managers with a count of dinner reservations!

Improvements?

The application described above, works well and gets the job done!  Sweet and simple, but what can we do to improve this application?   Currently the outgoing announcement is hard coded in a ‘Play Prompt’ contact flow step.   We have the option of enabling this to be a contact attribute that reads in a new prompt each time!  Optionally, we could implement a “record to file” solution enabling someone to call in to the authorization contact flow and record a new announcement!

The dialer database is also manually maintained.  It would be useful to enable either the table to be uploaded or to have a web administration interface so that folks do not have to have access to the AWS Management console to make use of the application.   If you are using a CRM package, it might be better to have linkage to an external database.


Give us a call and we can implement this application or talk about building you a modified version!  – DrVoIP


Amazon Connect – Start/Stop/Pause/Resume voice recording?

Recording and Analytics

While configuring Amazon Connect contact flows you will find a “SET Recording and Analytics?  step that you can make use of to set the voice recording behavior.   When you set the recording behavior you select recording only one channel or both the Customer and the Agent.

LENS Speech Analytics

In addition to setting the recording behavior you can switch on LENS a transcription and comprehension service.  This service is typical of call centers as they manage to improve Agent performance and customer satisfaction.   You also make a choice between post call transcriptions or real time subscriptions that can be used to alert supervisors to a real time need for interaction.


Start/Stop/Pause/Resume


Often for reasons of compliance  HIPA or PIC for example you might want to turn off voice recording while personal data, like credit card information, is being provide.   To do this, it will be necessary to create an extension to the CCP to enable the buttons need to effect the feature.    The clip below reviews a customized CCP we created to handle several features including the start/stop recording API as published.

Give us a call and let us help you with this requirement!  DrVoIP@DrVoIP.com 


Amazon Connect – Play Pre-Recorded messages to remote Voice Mail?

Recorded Message Use Case

In an outbound  call center an agent may make several hundred phone calls each and every working day.     When the person they dialed does not answer and the call is forwarded to voice mail, the Agent leaves a message requesting a call back indicating who to call and at what number?    The message is most likely very similar for each called party, requiring the Agent to be enthusiastic and engaging for each message left!

Is there a better way?

There is a cheap and dirty way to do this!   Each Amazon Connect Instance has a “Default Outbound” contact flow.   This contact flow is used for all outbound calls even if you do not specify it.  In fact you cant specify it, or an alternative.  Usually in contact flows, you can do a “save as” on any of the sample or default contact flows and then reference them in your own contact flow designs.   The Default Outbound contact flow however can not easily be used n this way.

What you can do is modify the outbound contact flow and add a “set disconnect” step in that contact flow.    This step is activated when the Agent hangs up and the outbound line is still up.   In this use case, the “set disconnect flow” point to a simple contact flow that has  “play prompt” which contains the message you want to leave in the called parties voice mail box.  The agent, hearing the call has been forwarded to a voice mail, simply hangs up!  The contact flow then plays the prompt asking for a call back!  Cheap but very workable!   (This is a video clip that reviews this configuration).

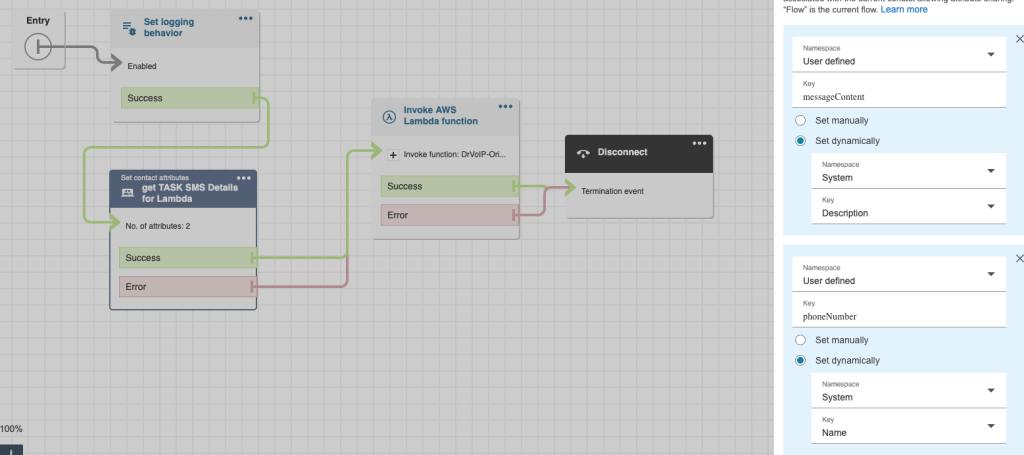
Note: The Lambda function in this configuration is to support a different function, that of selecting the Caller ID the agent wants to display to the called party.  You can see the details of that configuration at this link.

How about multiple message play options?

What about enabling the Agent to select from multiple messages?  Can each Agent have their own pre-recorded messages? The use case would be the same as configuration as above, but with a couple of changes.  The first change is we need to create a custom CCP that would have the buttons we need to indicate which message the Agent wants published to the called party.  This might be individual buttons or it might be a drop down list of available numbers.    Secondly, we would need a lambda function to retrieve the messages from a Dynamodb table prepared for this purpose.

The following video reviews how this configuration might work with a customized CCP.

Give us a call or email DrVoIP@DrVoIP.com if we can help you with this function!


Amazon Connect – Setting Caller ID and Name for Outbound dial by Agents

Amazon Connect Caller ID Name and Number basics!

Historically, the only caller ID you can send, is that of a phone number that actually appears on your Amazon Connect instance.  This has now been modified and AWS will let you send the CID of a number you can prove you own.   Lets assume you want to send the CID of your company’s main number when agents make an outbound call.  Open a ticket with AWS support, include a copy of the phone bill proving you own the number, and they will let you display that number in your outbound CID.

The following are strategies for selecting the desired CID on outbound calls.


Routing Profile impact on Caller ID

Each Routing Profile associates a User or Agent, with the Queues that they should be a part of.  A Routing profile may contain one or more Queues which can also be used to determine the priority in which calls should be answered by an Agent.  Assume that an Agent is a member of a routing profile that contains both Technical Support and Customer Service Queues.   Given two inbound calls, one for each Queue, which call  should be presented to the Agent?   This is determined by routing profiles priorities!   Also note that the Routing Profile indicates which Queue – read Caller ID – should be used when an Agent who is a member of that routing profiles makes an outbound call.

Dynamic Caller ID Strategy #1

It is possible to set the Caller ID by editing the ‘Default Outbound” contact flow that is called for each outbound call that is dialed.   This Contact Flow determines what the recording status is, names a possible disconnect flow and it also indicates the caller ID to be used for this call.  This is set by the Call Phone Number step in the contact flow.   You can hard code a number here and it will over ride the settings established in the Queue and Routing Profile configurations.

Dynamic Call ID Strategy #2

How can we set the caller ID on a call by call basis?  Is there a way for an Agent to set the Caller ID each time they make an outbound call?  The simple answer is yes.   You will need to create a Custom CCP, a Lambda function and a Dynamodb table. AWS publishes an API for dynamically setting the caller ID that will help create the configuration, but you will still need to create a modified soft phone or CCP.


The above video shows how this might work in a real world application.   The Agent is presented with a drop down list of all the numbers that are attached to the Amazon Connect Contact Center.  The Agent selects the desired number and places the outbound call.     Give us a call or email DrVoIP@DrVoIP.com if you need some help getting this designed and deployed!

URGENT NOTE on WIRELESS CARRIER CALLER ID,

Each outbound call is controlled by several factors:  First each queue has a setting that enables you to select an existing number for Caller ID.  It also enables you to display a Name.  The name however, must be set in a National database and to do this, you will need to open a technical support request with AWS.  They will manage the database update but you will need to provide the following details:

1) It is important to note that the calling name has the restrictions: no special characters, and will appear in all capital letters. Given that, please provide: a) Up to 15-Character desired Calling Name to be displayed (limit on wireline is 15) b) Up to 25-Character desired Calling Name to be displayed (limit on wireless is 25)

2) Name of business, city and state (if city and state are left blank, there are circumstances when the NPANXX of the dialing number will appear instead)

3) Type of business (technology, government, utility, etc.)

4) Type of usage for the phone number (survey, customer service, etc.)

Support will alert you when the CNAME has been associated with your selected number.  Please bear in mind CNAM services is a best effort service and the limitations are on the carrier side not Amazon Connect. AWS (nor can any other vendor)  cannot guarantee on the wireless network that the call will propagate since the wireless carriers at this time control the propagation of the CLI name on the B Number (end user receiving the call ). As for wirelines, CNAM will work well, meaning a call made to a wireline device, the CNAM name will propagate.

In order for wireless consumers to see the correct caller name on their device, they will need to be subscribed to the caller name app of their carrier. While personal and business landline phones have caller name as a default, the wireless industry requires the user to opt-in or subscribe to their carrier caller name service in order to see the caller name on their display. Below are links for the major wireless carriers and the details on how to subscribe to Caller Name on your mobile device. Note that T-Mobile now offers this service for free, no subscription required, however the user still needs to manually opt-in/download the Scam Shield app.

Verizon Call Filter levels:

  • Subscribers with Call Filter Plus – Caller Naming enabled as a paid service.
  • Caller Name expected to display. Subscribers with base Call Filter – Caller Naming not enabled, however Verizon works to “promote” Caller Name, for emergency numbers, like COVID numbers.
  • Subscribers with no Call Filter – Caller Naming not enabled. Verizon unable to provide/promote Caller name. Number only expected as the display


Amazon Connect Transfer to Queue or Transfer to Flow?

When to Transfer to Flow and Why?

A typical call flow might have a caller reach an IVR Call Tree that offers options to reach different departments and workgroups in your company.   “Thank you for calling, Press 1 for Sales, Press 2 for Customer Service and Press 3 for Administration” as boring as it might sound, is a typical call tree self navigation audio instruction prompt.  Let’s assume the caller presses 1 for sales,  do you “transfer to flow” or “transfer to queue”?

Transfer to Flow?

A flow enables  you to string together a number of setup options that customize the callers experience and enable different call handling options.  For example, you may want to reset LENS, change recording behavior, change voicing, set contact attributes and set the queue hold flow.   These options would not be available if your set the working queue and then transfer to queue from the main IVR menu, robbing you of the opportunity to establish a unique caller experience.


Transfer to Queue

You will notice that within the Customer Queue flow, there is not option to transfer to another flow!   There is an option, however, to transfer to another  queue.  You will also notice that this is one of the times you can transfer to queue without first setting the queue!    Assume you have a caller in the “customer service” queue hold flow and periodically you offer them the the option to transfer to another queue.  More likely, you may have a loop in the wait time that after an extended time transfers the caller to a “high priority” queue.

Generally, you will always transfer to flow and only use transfer to queue within the main contact flow or the queue hold flow!

Fun Fact: Brain Teaser Question:   What is the queue hold flow that the caller will be associated  with when they transfer from the “customer service” queue hold to the “high priority” queue using the transfer to queue flow step?


Dextr configures Amazon Connect Voice Call Recording by individual State Law!

To record or not to record, that is the question

It is very common to call into a contact center and he the warning message “You phone call may be recorded to improve customer service”.   Sometimes you might even hear “Press 1 if you do not want your call recorded”.    Each of the States has a law governing the recording of telephone calls.  In some states, only one party in the conversation must consent to recording.  In other states, both parties must consent to the recording.

One-Party Consent States

Alabama, Alaska, Arizona, Arkansas, Colorado, District of Columbia, Georgia, Hawaii, Idaho, Indiana, Iowa, Kansas, Kentucky, Louisiana, Main, Minnesota, Mississippi, Missouri, Nebraska, New Jersey, New Mexico, New York, North Carolina, North Dakota, Ohio, Oklahoma, Rhode Island, South Carolina, South Dakota, Tennessee, Texas, Utah, Virginia, West Virginia, Wisconsin, Wyoming.

All-Party Consent States

These states clearly or potentially require consent from all parties under some or all circumstances:

California, Connecticut, Delaware, Florida, Illinois, Maryland, Massachusetts, Michigan, Montana, Nevada, New Hampshire, Oregon, Pennsylvania,  Vermont, Washington

Note that in many states, consent requirements only apply in situations where the parties have a reasonable expectation of privacy (e.g. not in a public place). Further, what constitutes “consent” in a given jurisdiction can vary in terms of whether it must be express or can be implied based on the circumstances.

When and How to Control Contact Center Recordings?

Dextr will compare each incoming phone number, extract the area code and map the area code to the State that matches that area code.  Based on the state law, Dextr will reconfigure your recording to either be “Agent only” or “Agent and Customer”.  You have the option of playing  prompt to the caller that indicates the status of your recording.  This option can easily be applied to both inbound phone calls and outbound phone calls!

Save 80% on Amazon Connect Design and Deployments

We build Amazon Connect Call Centers, Chat Bots and Speech Recognition based customer experience management solutions.  We do this for a fixed price, on time and on budget using Dextr the omni-channel wrapper for Amazon Connect.  Dextr enables you to significantly reduce the cost of design and deployment!  Give us a call at 800-946-6127 or email us at CustomerCare@Dextr.cloud – DrVoIP


Amazon Connect Historical Reporting using Dextr Flex!

Real time or Historical Report?

If you think about reporting there is a fine line that separates a “real time” display from a “historical” record.   It would also be wise to say “near real time” as even the mechanic of displaying data takes some small amount of time.   So then, where is the line that separates realtime from historical?   The answer for Dextr Flex, is the time stamp issued when the call is terminated.

Below we describe both the revised Activity Reporting and the recently released “historical reporting” with video presentations of both.

Dextr Flex  Historical Reporting

Dextr Flex offers a fully featured Historical Reporting Engine complete with Scheduling, Exporting and Delivery Options.  Reporting has a range of canned options for date ranges and enables custom reporting ranges.  You can schedule reports once created to run daily, weekly or monthly.  Exporting can be CVS files that can be imported into most other data manipulation tools including Excel and Numbers.   Delivery options include email with PDF attachments.

Report Creation and Options

Creating a new report enables setting a name for your report and the choosing the date range, the queue and the channels (voice, sms, email, chat, announcements),  The reporting engine contains a custom “query” language, but there are a range of pre-configured search criteria that you can select for your report to include.  Generally you will select a channel, one or all channels, a date range and then apply your report filters.

Report Summary and “eye candy”

Dextr Flex presents report information with “eye candy” in a variety of formats including pie charts, line and bar charts depicting both agent and queue details.  The report summarizes:

  • Contact Handled
  • Average Holding Time
  • Average Speed of Answer
  • Average Call Waiting
  • Number of Abandoned
  • Percent Abandoned
  • Number of Missed Calls
  • Percent of Missed Calls
  • Talk  time
  • Queue Time
  • Number of Holds
  • Hold times
  • Longest Hold Time
  • Average Mean Opinion Score

Reporting Optional Details

After the Summary page is rendered you have the option to explore other details including a DNIS Report,  Queue Details and Agent Details all of which can be exported and delivered.

Call Quality Reporting

For the voice engineers out there, troubleshooting gets a bit easier with MOS reporting.  Calls are now tagged with a MOS score and you can now search for calls with below target scores.  This enables you to work through those complaints that we all get from time to time with no more detail than “it sounded bad”.   Pick the exact call by searching for MOS and obtain the related CDR data, makes troubleshooting complaints a bit more detailed!

Dextr Flex Revised Activity Reporting

Dextr has always had an activity screen.  If you are an Agent you see your Activity and if you are a Supervisor or Team lead you see all activity of your team members.  Previously you would bring up the activity screen and it was all listed chronologically.  Filters existed for all the usual Call Detail Records (CDR) and included dynamic segmentation by Agent, Queue, Date, Disposition Code, Direction.   Drilling down on an an Activity exposes all the related information regarding caller (contactID), queues, agent and contact attributes.

Dextr Flex enables LENS “keyword” search!

With the inclusion of Amazon Connect LENS technology in the Dextr dashboard, being able to “keyword” search the transcription became a mandate.   To enable this functionally Dextr Flex created a new “query ” language which also provides prepared queries but also enables custom searches.

Revised Activity Presentation

Dextr now expects you to set the Date, Channel and Search Criteria to pull back the Activity you are looking to review.  Selecting a search criteria enables you to quickly learn the query language.  Not selecting a search criteria beyond that of selecting a channel will bring back all the activity for that channel unfiltered, though you can then apply filters like queue and agent.

Activity Video Presentation

Dextr Flex Historical Reporting  Options

The Dextr Flex reporting engine is bundled with subscriptions of at least 10 dashboards and is available through the AWS Marketplace with a 14 day “free trial.”  Optionally you can acquire a single dashboard that provides historical reporting, holiday. schedules, real time metrics and ad hoc queue closing for a fixed annual subscription price. Dextr will report all activities since the date of the subscription.  Optionally, if you have been streaming your contact records to your own S3 using the optional Kinesis streaming,  Dextr will report on that historical activity. Dextr is available in the AWS Marketplace and has a 14 day free trial period.

Contact:  CustomerCare@Dextr.Cloud or give us a call at