ShoreTel VPN or MPLS? What works and saves money?

An IPsec Virtual Private Network or VPN, is sometimes used as a backup route for a Wide Area Network failure.  VPN’s are typically deployed as a “tunnel” through the Internet and as such are “point to point” solutions by definition.  Unfortunately that will not get the job done for a VoIP deployment!  If you have ever deployed ShoreTel over a VPN in a multi site network that has more than two sites,  you will note that it has problems.  The first problem you will note  is that the Switch Connectivity display within the ShoreTel ShorewareDirector management portal looks like a Christmas tree.  Normally in a finally tuned network you should see all green in the connectivity display.  In an IPsec VPN network, using a “hub and spoke” implementation or “point to point” links you will see lots of Red and Yellow boxes and switch connectivity will be inconclusive at best.

Next, you will undoubtedly experience instances of “one way audio”. Again, this is because an IPsec VPN is a “point to point” solution, when you really require a fully messed solution that can handle more than unicast packet transfers. Additionally, as IPsec applies encryption based on a “shared key” so the two end points must possess the key! IPsec does not support Multicast or Broadcast and this make it less then desirable for a VoIP deployment. Unicast is when you address the source and destination IP address to a specific target device.  Broadcast is used when you must sent to all network devices because you do not know the destination address. Multicast is used when you send to a group of devices that monitor a target IP address for network management and service subscriptions. Using an IPsec point to point VPN might get your phones to register and enable you to make phone calls, but you will be plagued by network connectivity issues that will make your VoIP deployment problematic. Your technical support center or help desk phones will be constantly ringing with unhappy users and incomplete phone calls.

You don’t have to be a Network guru to understand a “hub and spoke” topology. All communications between devices at different sites (i.e. spoke end points) must traverse the hub site if they are to communicate between each other. This might work for unicast communication, but it is inefficient and invites disaster. For two sites (i.e. spokes) to communicate the have to go through the hub, unpacking and repacking, encrypting and decrypting, sharing keys before resending packets to the ultimate destination. Assuming you are using this configuration only as a backup during a real WAN disaster, this might be acceptable temporarily. Using IPsec VPN “hub and spoke” topology in a ShoreTel VoIP deployment, it is not very useful. We have two issues: first, IPsec does not support anything other than Unicast communication; and secondly “hub and spoke” is unworkable because “spoke to spoke” communication is required.

How do we solve this? Fortunately there are two strategies that fit the bill perfectly. First, GRE or ‘generic routing encapsulation’ should be used to support broadcast and multicast communications, a core component of any network deployment, especially those of a VoIP variety. Secondly, DMVPN or “dynamic multipoint virtual private network’ technology should be implemented to assure “spoke to spoke” communications. DMVPN, which employs mGRE (muti-point GRE) and Dynamic Next Hop Router Resolution protocol (DNHRP) technologies make it possible to deploy a ShoreTel VoIP solution over the public internet and achieve MPLS like connectivity at a fraction of the cost.  Given sufficient bandwidth, this should be more than adequate.

What about encryption you might ask?   ShoreTel, CISCO and most VoIP solutions provide encryption at the network and transport level anyway, so this component may not be needed.  If you are also moving data over this mesh, then you can use DMVPN in conjunction with IPsec to assure confidentiality, integrity and authentication (i.e. CIA).  The issue is that a fully meshed communications network is absolutely obtainable with VPN technology, but you have to implement the correct protocol to achieve the desired results!

WAN configuration is an exact science as is ShoreTel and CISCO VoIP technology. If you are fortunate to have that level of expertise in one individual or one vendor, then you are moving in the right direction with your VoIP deployment. If you need help in the WAN aspect of VoIP, then you need to call on DrVoIP. We can make the network.

Is there a RAT Virus in your phone system?

If you have a device on your network that you do not have root privileges for, then your entire enterprise is at risk for a Cybercrime! Do you want to know what a Trojan horse might look like? It might very well look like a Linux appliance provided by an outside manufacturer, delivered and installed on your network. This might be a network camera, firewall, phone system or monitoring device. As network security professionals we would never allow any device to be connected to our network, in which we did not have root administrative authority. IT Directors who budget for network security, intrusion prevention and detection and apply best practice to the care and feeding of their enterprise networks seem to overlook this very large potential security vulnerability. Every day, new networking equipment, appliances and hosts are connected to your network and nobody every questions the fact that you do not have root authority?

Most of the younger folks carrying an Android device have “rooted” their phone, why? Yet you will allow your company to install equipment for which you do not have root authority? Makes no sense to us? The fact is that most modern VoIP phone systems like those from ShoreTel and CISCO are delivered with key components built on Linux like platforms. These devices are placed on the network inside the firewall and perimeter security devices yet the root privilege is not available to the system owner. A very curious practice, would you not agree? Even if you have no clue about network security and hacking, would you allow someone to come into your place of business and install a “box” for which you have not access rights?

Anyone with root access could easily put programs on that appliance that could act unnoticed by network security devices. No virus protection would take note and the device would have complete access to the entire network. A common and popular hack is the RAT, a Trojan horse that can easily be placed on an unsuspecting users phone, computer, or other network device. These RAT’s or “remote access terminals” can be remotely controlled to turn on you microphone, camera and would have full access to all files and network resources. They become remotely controlled “bots” or computer zombies. The good news is that most modern virus protection will find these RAT’s if they are installed on a host computer. What about that appliance you just added to your network, the one you do not have root access privileges? You would never even know that RAT was there and you do not even have access permission to check!

Business owners, regardless of their personal level of technical savvy, need to question every device installed on their enterprise network. Who owns the box and who administers the box? Do you have root administrative authority on every device in your network? If not, why not?

Looking for a UCCX Wall Board? – VSR2 has the vision!

If you have ever considered adding a Wallboard to your CISCO UCCX based Contact Center deployment, you know that the selections are slim.  There is a wealth of unsupported “freeware”  solutions on the net, generally the failed  result of someone trying to “roll there own” wallboard.   Clearly,  you always have that option if you have the time, talent and ongoing commitment to support Cisco’s follow on versions and upgrades.  To assure ongoing compatibility with CISCO, you need a dedicated development team!  Finding a vendor supported wallboard that does not cost as much as the UCCX itself, however, has been very difficult until now.   We recently had the opportunity to work with VSR2, a UK based  CISCO partner who has been building software based solutions since 2007.   The VSR2 UCCX Wallboard product offering is both an astonishing accomplishment and a must have product for any serious call center deployment.   Not only is the product exceptional, but the entire team behind the product is a real joy to work with!

The VSR2 installation is very simple, but it is generally done by a factory engineer over a remote desktop or TeamvViewer type remote connection.  The VSR2 solution runs on a Windows Server under IIS and interconnects with the UCCX over an Informix database connector.   Simply provide the usual UCCX database credentials and if there is network connectivity between your Windows Server and your UCCX server the install will be completed in less than 30 minutes, most of which is spent waiting for Microsoft!   We worked with an excellent engineer, Victor Spirin, who was very helpful in answering questions and also provided an initial over view of the systems capabilities.

We successfully tested the VSR2 on both UCCX Version 8.5 and Version 9 with no problems, or show stoppers to report.  The Wallboard is easy to customize and there is a great deal of flexibility in every aspect of the configuration.  Your can select your columns, content, color and triggers.  You can create multiple CSQ  wallboards, or Agent based wallboards.  In fact you can create a library of  wallboards and you can send supervisors links to previously created wallboards.   VSR2 has also developed other tools that are effective for Call Centers including a call recording capability, but it is the VSR2 wallboard that brings this company to the forefront!   They offer a 30 free trial and if installed, it would be hard for us to predict that it would ever be removed!   Take a look!


Can you create a “killer” Contact Center Script?

Most Scripting engineers working with Contact Center deployments built on CISCO UCCX, ShoreTel ECC, or Avaya have amassed a collection of script subroutines.  These subroutines are used over an over, from script to script to avoid having to recreate them for each new deployment.   Most every script needs to check a holiday schedule, check for Service Level parameters and update language options.  Why not have your new script call on one of your existing library scripts, a technique used by software engineers since the first line of assembly code was written.

We have always been preoccupied with the concept of a “killer script”.  A single, reusable script that can reconfigure itself to meet the specific requirements of the call flow required to satisfy a particular contact center application.   This concept continues to preoccupy our thinking. Saving deployment resources also reduces deployment costs, implementation, test and turn up time.  It also eases long term maintenance and documentation efforts.

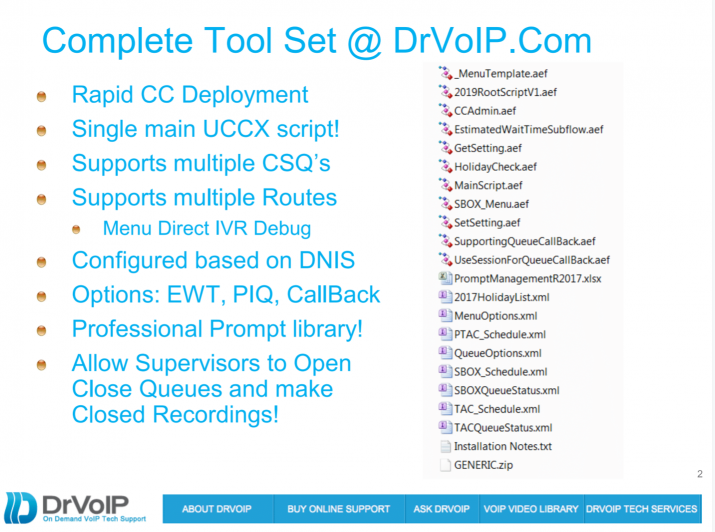
DrVoIP has emerged a “root” script that we use as the base line of any new deployment.   It contains a number of subflows, prerecorded generic prompts and call handling options that enable us to move a new call center to operational status quickly and with confidence that our code meets requirements, both known and likely to emerge as management experience is gained operating the new setup.

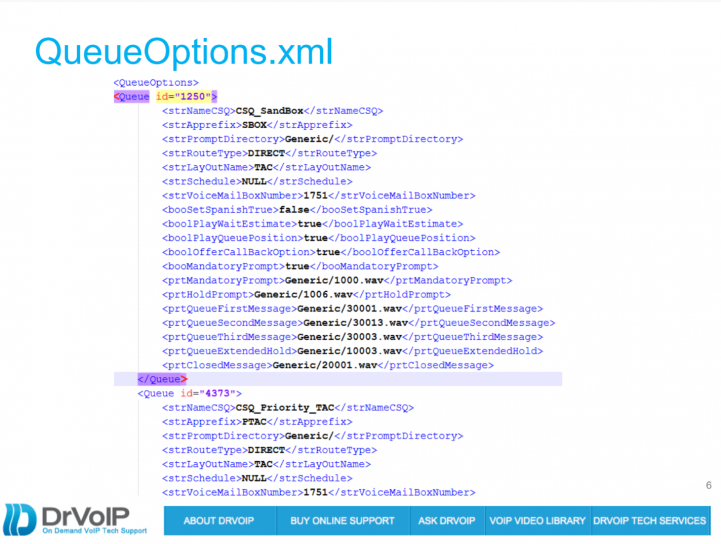
Using a “QueueOptions” XML file we are able to read in options that reconfigure the script each time it is launched.   Using DNIS as the variable that indexes the XML filewe can choose custom prompts, determine if a Menu, or IVR needs to be launched or if the caller needs to be routed directly to the agent pool.  We can also retrieve the name of the Agent Pool or CSQ, determine what options should be offered callers in queue and provide customize queue messages and even push out custom screen messages to the agent desktop.

The core script is the same for applications, the elements of which, are customized based on the called number.  We use a value that determines DIRECT, MENU, IVR, or UTILITY which will call on the necessary subflow to provide the custom call flow.   One CSQ might hear a different Menu of self navigation options then another caller might hear based on the number they dialed.

We have even emerged a range of custom numbers that minimize the potential for digit conflict.  We set the triggers in our applications, or the numbers that launch the script, to 3009998000-8999 for example.  This ten digit number looks like a typical +1 area code and number, but it can not be dialed.   As such it is an ideal way to standardize on a script that can be reused without having to worry about changing triggers.

The script can call subflows for options that might not be needed for each caller, but can be initiated if required.  For example, holiday checks, call back options, special emergency call center closings.   Audio Prompts are numbered to allow prompts to be specified but drawn from sub directories that are identified by the values stored in the XML file, indexed by the number called.  Using numbers instead of names also allows us to create a script that can allow a supervisor to re-record a specific prompt at will.

The UCCX version of this script, the generic audio prompt library and the QueueOptions.XML file is available in the subscription video library on the DrVoIP site next to nothing.  We have tested and debugged version 1 of this script using Version 8.5 Enhanced license, so I can be easily upgraded.   We will update the script with options for schedules, menus, prompt re-recording and interface it to some of our previously released modules.

Save the software!  We are now working on a similar concept for ShoreTel ECC.  The video walks you through the design concept and illustrates key elements of the core script.  Keep the cards and letters coming! – DrVoIP

UCCX Cheat Sheet – Agent Log-in in using Extension Mobility!

There is a two step process for logging into the systems if you are a mobile worker.   The first step is to log into a Telephone and make the phone your Extension number.  The Second Step is to log into the CISCO Agent Desktop (i.e. CAD) and make yourself ³Ready² to receive calls from the Contact Center.

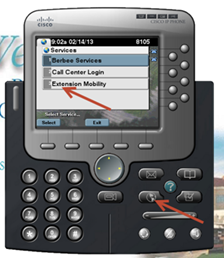
Step One:  – GoTo the phone you are logging into and press the button labeled ³services².  This will bring up a list of Services that your phone supports.  You should one or more services.  Select the Service entitled ³Extension Mobility² by highlighting it with up/down scroll button on phone or entering the menu number.

UCCXphoneCAD

UCCXLogin

Step Two:  You will be prompted to enter your User Name and PIN.   The User Name is your Active Directory (i.e. AD) login name, usually in the form of First Letter of your First Name followed by your Last Name.  For Example, pbuswell.    You will have to use the Touch Tone Pad on the phone to enter your name, and it is a bit cumbersome, but you will figure it out.    The PIN number, unless you have changed it, will be the default of 12345678

The Phone should  wink and blink¹ and reset itself.  When it comes back alive, you should see your Extension number in the Display of the Phone. This means you have successfully logged into the phone on this desk!  Please remember to reverse the process and LOG OUT when you are done.

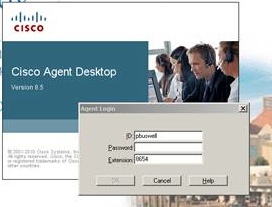
Step Three:  Log into the CAD, by bringing that software up on your associated computer.   This will be a Short Cut on your desktop, or you will find it with your mouse under the Start, All Programs, CISCO, Desktop, Agent.   You will then be presented with a screen that prompts for your User Name, Extension and Password.    Enter your AD user name as used in the above step.  The Extension is to match the Extension on your phone, and the Password is your AD password.

This should log you into the Contact Center and bring up your Agent Tool bar similar to the one below, though your buttons may be smaller.  To indicate that you are READY to receive calls, you will need to push the READY icon (mouse over ICON) to see what they do!   When you do not want to receive calls, you will push the NOT READY icon.  At the top of the tool bar you will note your current Status!

UCCXmakeReady


Repurpose your CISCO 7900 phones as ShoreTel sip Extensions!

The CISCO 7900 series of phones have been a very popular handset in the “hosted” PBX space.  CISCO discourages the use of these phones on other than CISCO systems, but there are so many of them out there, that they end up being used on a range of other systems from 3CX, ShoreTel to Asterisk and FreePBX.     A company moving from a “hosted” solution or converting from a CISCO Call Manager to a ShoreTel system, for example,  would normally wanted to protect their  investment in handsets and repurpose them for use on ShoreTel.   The CISCO 7900 family of phones has been shipping since at least 2002 and estimates have been that over 1 million handsets ship to market every day!   By any measure, the market is littered with these phones.   We would caution you however, before you hit Ebay, to understand that what you save in the purchase of handset hardware, you may end up spending in professional services and cumulated aggravation!   If you are still committed to burning up IT staff or professional service hours, there are a few key issues you will need to understand.
 
First, CISCO Call Manager solutions have historically used a proprietary protocol named “skinny” of SCCP.    Most hosted solutions  have used the  industry standard SIP protocol and because of its wide adoption by vendors in general, most new systems can support SIP end points.    CISCO 79X0, 79X1 and 79X2 handsets most have their firmware converted from SCCP to SIP before they can be used on any SIP based system or on ShoreTel.   The process of converting the firmware is not all that difficult but does require some basic resources like a CISCO login  account  and a TFTP server, though we have found the needed firmware all over the Internet.    Setting up a TFTP server can be implemented in a number of ways from open source solutions like PumKin or Tftpd64.    We prefer Tftpd64 for field deployments as it can also provide DHCP services that include the ability to specify required scope Options 150 and 66!
 
You can try flashing the phone without defaulting the configuration by just unlocking it and setting the Alt TFTP server to the correct IP address.   You unlock your CISCO phone by hitting the Menu key, scroll to the network settings, hit unlock (**#**)  for Alternative TFTP server,  set it to yes and then in the next field enter in the IP address of the TFTP server.   Experience has proved, however,  that you should reset the phone.  There are subtle differences between how the reset and unlock method is executed based on your exact model.  Generally, you reset the phone by holding the # key while powering the phone and when it starts flashing orange and red, enter 123456789*0# on the keyboard, then be patient.    Make sure your TFTP and DHCP servers are setup and working.    DHCP Option 150 and Option 66 must point the phone to the TFTP server and directory  containing the firmware files.   
 
Again you will find that you really need to tweak the SiP software version as one may run and another version may not!
You should be aware that v4.4 code uses the following tftp files (which areall case sensitive):
 OS79XX.TXT  (This file must be on the TFTP as it defines the software load WITHOUT .bin extension).
 SIPDefault  (This file denotes parameters for all phones)
 POS3-04-4-00.bin
 SIP<your mac address>  (eg, SIP00036BABD123 parameters for a specific phone)
 RINGLIST.DAT         (optional) 
 dialplan.xml		(optional)
 ringer1.pcm		(optional)

Early versions of the SIP code did not require all of these, however if they are in the tftp directory, it doesn't hurt the loading process.  Later you will still need the TFP server to obtain configuration file when you boot your CISCO phones. Power on your CISCO  and the phone should display "upgrading" and you should see file transfers in your TFTP server log.       Be careful as the phone will from time to time looks like it is dead, but it is still loading files.  It takes time and patience  will ultimately yield a phone now flashed for SIP!
 
That was the easy part, now you have to understand the configuration files, how to edit them and the boot process.    When the phone boots, it makes a DHCP request for usual IP configuration parameters including the necessary vendor specific options.   ShoreTel uses Option 156 to specify the FTP server where its phones can download firmware and configuration files.   CISCO uses TFTP and specifies that IP address in CISCO Option 150 and Industry Option 66.   When the phone boots it will first look for a “install trust list” or certificate file which it will not find in your TFTP directory,  so expect that file failure.  It will then look for a SIPDefault.cnf  which has information for all phones, and then a file that contains configuration  data for a specific phone which is named SIP<macaddresss>.cnf.
 
Edit the SIPDefault.CNF in Notepad file and change the first three values: The first line of the file,image_version, sets what firmware version we are going to use. This needs to match either the firmware version already loaded on the phone or the firmware version that you have available in the tftp folder for the phone to upgrade to. The second setting, messages_uri sets the extension number that the phone will dial to access the voicemail system.   The third setting, proxy1_address, sets the IP address for the phone system so the phone knows where to send it’s registration information.  In the case of ShoreTel make sure you point this at the ShoreTel SipProxy IP NOT the ShoreTel HQ server!
 
For real detail on the content of the config file click this link.  Each phone requires its own configuration file based on the MAC address of the phone.   If our MAC address is 00175989A49E, then our configuration file will be named SIP00175989A49E.cnf.   This file contains a list of XML tags.  You will need to modify several tag entries.  You can use notepad, but if you can make use of an XML editor like Komodo or Eclipse it will help you eliminate poorly formed XML tags.   Scroll through the file and edit the following tags:
<processNodeName>172.16.1.100</processNodeName>  should be set to the IP address of your ShoreTel SIP Proxy, NOTE the ShoreTel HQ server!

For Each extension line you want to register you will need to set the following parameter:

<authName>1234</authName>  to your ShoreTel SIP UserName
<authPassword>1234456</authPassword>  ShoreTel SIP Password


The lines also have other configuration data for displaying the Name and Extension number and you should find those XML tags easy to locate. The above tags however are the 3 minimum tags required to get your phone to register with ShoreTel. It should be understood that getting your phone to register, make and receive calls is not the same as integrating your CISCO phone with ShoreTel. Getting feature buttons to work and interfacing with the telephone book is an entirely new opportunity for head banging. Some of it can be accomplished by editing XML configuration files, but well outside the scope of this nugget ! The most likely success stories for CISCO on ShoreTel are the 7940/7960 phones. Be aware that there are subtle difference between the rest of the family like the 7941G/7960G and so forth. The 7942 and 7945 take extra tweaking and you many need to SSH into the phone to debug. It takes time, patience and perseverance to tinker with the various phone loads and XML options, but it can be done! As we get more examples, we will upload sample configurations to the Member portal.


UCCX Scripting – Working with XML documents

When writing call control scripts for Contact Centers (ShoreTel ECC, CISCO UCCX ) do you really have to start over each time?   Are there really that many differences between contact center applications?    Well, yes and no!  As we continue the search for the killer script, that “holy grail” of scripts which can do it all and never needs to be modified, we turn our attention to the wonderful world of XML!    Every Scripting Engineer has a library of routines that hey have emerged over time.  They accumulate over as the scripts become more refined with time and experience.   You would think there would be nothing new under the sun, but from time to time someone hits on a particularly creative solution to a common call flow requirement.

I have to credit Steven Griffin, a true rockstar of a  software engineer,  with opening my eyes to the possibility of using a “QueueOptions.xml” file to specify parameters you might otherwise hard code in a UCCX call control script.  I have learned from other engineers like Wesley Forvergne and Anthony Holloway how to build on this concept (these guys have all really advanced the state of the art IMHO)  and create scripts that are extensible, supportable and flexible!  Why have to write another script or launch other instance of a script just because the SLA, Menu or Schedule changed?  Why not have a Script that can reconfigure itself based on parameters recovered from a configuration file, using DNIS as the file index?   An inbound call to the contact center triggers a script which uses the DNIS to look up the appropriate configuration for the number dialed.

Maybe this DNIS differs from another DNIS only in as much as the On hours specified  in the Schedule?  If you have been using that “Day of Week” and “Time of Day” UCCX script step you have no alternative but to have either a bunch of “if” steps or creating the same script on another trigger so that you can have a different operating time.  What an inefficient waste of processor and system resources!   Why not just read in the Schedule from an XML file and use the same script for all your DNIS numbers, all on the same trigger?  You can even reconfigure the Menu and Prompts, change the voice mail box, determine if you should play “estimated time in queue” or not and just generally customize the script on the fly!

XML is just a powerful alternative to OBDC type solutions.  No special drivers, portable across operating systems, language independent and able to handle dynamic database changes.  Your XML document can be updated dynamically as required through HTTP and other web based technologies.  This makes it possible  to integrate your call flow based on input from a website entry!   How about SMS to XML?  Think of the possibilities!   I guess that is what we really enjoy about Contact Center scripting!  Never a dull moment and limited only by imagination.

The video discusses the creation of an Xpath specification assembled on the fly and uses a string value to index the XML document.   Great entertainment and fun for the entire family!


In search of the Killer Contact Center Script (UCCX or ECC)!

The “Killer UCCX Contact Center Script”

After your first 100 or so Contact Center Scripts, you begin to wonder if it would be possible to generate a “killer script”!   No matter how many hours you sit with clients and do your very best to extract their call handling requirements, it just never seems to be enough! Generally, you have some block of professional hours to complete the script, test, train and turn up before “go live”.   You ask the client for their requirements and “wish list”, then prioritize the list toward the goal of getting as much done as possible within the budget allocated to the project. You no sooner get the script up and operational and the client is  asking for six options that never came up during the time you were discussing requirements. They were never even on the “wish list”!   Last time this happened to me, I determined to write a script which would have run time options for the various script extensions I have seen over the years.  Starting with a basic Generic script which had modules you could switch in and out to achieve not only increase functionality,  but efficiency in both cost and time.

Route Type?  Prompt and Collect!

Most call flow scripts can be reduced to answering an incoming call, playing a menu of options, navigating to a Contact Service Queue, finding the most appropriate human resource or managing queue handling while the caller waits for service.  Sometimes there is no menu after the call is answered, and the call is sent directly to the Queue.   At other times, we need to provide some “prompt and collect” for database look up prior to call routing. We are always looking at operational alternatives for time of day, day of week and holiday or emergency closings.   This sounds like something we could develop into a general purpose call flow script, complete with generic record prompts in the language of choice.  So the Killer Script contains a library of professionally recorded prompts and prompt segments for enabling you to assemble your own prompt!

Where are the IVR Prompts and professionally voice WAV files?

We long ago learned never to start coding a project until we had the actual recorded prompts and wav files in hand!  How many hours of development time have been squandered because an attempt was made to code without the scripts.  When the client finally delivered the actual recordings to be used in the script, they were different than the call flow we all signed off on during the requirements meeting!  Don’t do it!  Get the recordings done first.  Then and only then code your call flow!  This thinking gave way to a concept of numbered prompts!   Again, you no sooner get the project on line and “go live” and the client is back asking if they can change a recording!  Why not create a module that would allow the client to call into an IVR script, select the prompt they want to record, play it to confirm that it is the correct one, and then let them record it themselves!   I started thinking about this after the first experiences in which the client asked for special closing recordings.    The client would say something like this: “Sometimes we have a staff meeting and we need to close the queue.  We want to play a special greeting to the caller letting them know we are in a meeting.”

CCAdmin to allow supervisors to Open and Close Queue with custom Closed prompt!

So we now have a Generic Call Flow Script that has an option for a Contact Center Administration and prompt management!   The Generic Call handler offers some run time options that can be set at run time.  They include a ROUTE TYPE  (i.e., Menu, Direct, IVR or Transfer) that dictate how to handle the incoming caller.   In fact, we can change the route type based on the DNIS or ANI, so the script actually changes its call flow to play a Menu or send the caller direct to Queue with each new call.  We then created a Contact Center Administration module that would allow an authorized user to open and close a queue on demand by dialing into an IVR script.  If you closed the Queue, you were offered the option to record a new closed greeting.  Optionally, you could record any existing prompt by  entering the prompt number.   All of this done by an authorized user with a PIN number and not requiring the System administrator.

Queue management was another area in which a modular approach to scripting could enable a range of options.  Do we play “your estimated wait time” or “your position in queue is” or just play music on hold?  If they are in Queue awaiting an agent resource, do we offer them options like, “Press 1 to leave a message, 2 to schedule a call back, or continue to hold and your call will be answered…?”   Not every client wants these options, but many want the choice. How do you make that option available without burdening  the project with more develop hours?  In fact you might want these options to change based on who called or what number the caller dialed.  We determined to add a third module to our script library. We can now offer the call back option on module basis.

Clearly every call center is different. You will always need to modify your scripts.  It is possible however, to create a flexible, reusable script that has configuration options or modules.  It is also possible to make these options available at run time based on DNIS or ANI. There is no need to launch a separate script when you can reconfigure the same script on the fly to address the various call handling options required to manage a caller through a successful contact center interaction.  Ask us about our generic scripts and save yourself a ton of money while paving the way for self-managed call center flexibility as you move through your business process! DrVoIPGeneric, DrVoIPCCAdmin and DrVoIPCallBack are all available for CISCO UCCX and come with professionally recorded generic voice prompts that can be easily branded.  We also include supporting XML documents for Scheduling, Holidays and a Queue options template for changing call flow based on DNIS!

 Killer Script Overview  – Updated for 2019 Version!

The Core Root script is a single thread that enables both application level run time variables as well as “variables on the fly” through the QueueOptions.XML file.   Typically the script will be trigger by one of the DNIS numbers attached to the script.  This DNIS become strDNIS in our application and it is used to index the XML file to pull back all the variables for that specific CSQ.  One of the variables that is returned is the strApprefix value.   For example we have  “CSQ_SandBox” for testing and it has a strApprefix of “SBOX”.  This variable is prepended to objects like Queue Message Wave Files.  In this way SBOX_QueueMessage1.wav and PTAC_QueueMessage1.wav can both be represented by strApprefix+”_QueueMessage.wav” in the same script!    This also makes it possible to create Layouts that are pushed out to the agents.

The QueueOptions file contains all of the variables that you want configured for a specific CSQ.   It sets options for offering Estimated Wait Time and Position In Queue.   We offer the option of a call back without losing your place in queue.  This has a variable that can be set to enable “record a short message to be played to the Agent before you call is returned” or to disable that option and move directly to collecting the target call back number.

Route Types  (Direct, Menu, IVR, Debug)

Some CSQ’s require that the caller be sent directly to the Call Center.   Others require the caller to navigate an IVR or MENU and the option strRouteType defines these options.   If the caller is to be offered a Menu of choices the script loads the correct menu, again using strApprefix to bring back SBOX_Menu.aef at the appropriate point in the call flow.  Likewise the caller can be directed to an IVR platform before the call moves to the call center.


The Killer Script is actually a series of scripts, documents, professionally recorded voice prompts and sample XML documents that you can copy, modify or edit to suit your call center CSQ configuration goals.  All this for $295?   What a deal, your average professional service company is billing scripting engineers out a $275-$350 and hour!   If you have any scripting experience at all, you should be able to configure this script!  Optionally, we can quote a fixed project fee to install and configure it for you!

Text Us at 929-292-8100 for details!

Open Letter to CISCO Certification Management!

Martin Sloan CCIE Voice Candidate #211151677 speaks for the entire CCIE Candidate community (DrVoIP included) when he wrote the following letter:

I’m writing you this morning to express my great disappointment in regard to Cisco’s recent announcement to retire the CCIE Voice track with no reasonable upgrade path to the CCIE Collaboration.  I know that you’re well informed as to all the arguments which are being made against this decision on Facebook, Twitter and other social media outlets, so I won’t go into any detail on why I think this is a bad decision.  At this point, the facts are well laid out for everyone to see.

I’d like to ask you to please reconsider this decision and provide a reasonable upgrade path for the certified CCIE Voice candidates.  I, myself, am not yet certified but I will make my first attempt on July 29th of this year.  I don’t need to tell you how much time, money and effort I’ve put into preparing for this exam.  It’s been a goal of mine since I first started on the CCNA.  To completely retire a certification track that is still very relevant is incomprehensible.
At the very least, I want to request that Cisco provide it’s community with an intelligent argument to support it’s recent decision to retire the CCIE Voice without a reasonable upgrade path.  We’ve heard very hallow responses citing new exam topics (that are already on v3) or that the description of the certification path wasn’t accurate with the technology.  These answers are very much an insult to those that have been so loyal and sacrificed so much to achieve CCIE certifications.  Please, ask your team to reach out to the community so we can come to an objective decision on this.

https://www.change.org/petitions/cisco-provide-a-reasonable-transition-path-from-ccie-voice-to-ccie-collaboration

Compare ShoreTel ECC and CISCO UCCX – Handling Language Options

Anyone who has been deploying telephone systems for any length of time has run into the “language” issue.   Though I am personally tired of having to “Press one” for English, the fact remains that we market on a global basis even if we are a small local business.  It is rare to encounter an Automated Attendant or Call Tree that does not offer us the option of selecting another language.  In the States, Spanish tends to dominate the motivation to change language and it is invariably offered to all callers.

Setting up a basic automated attendant to handle a language change is relatively straight forward.  You end up recording your prompts in at least two languages and then you navigate a different tree based on the selection.   Providing a language option in an IVR Script for a ShoreTel ECC or CISCO UCCX, for example, is an entirely more complex process.  Yes, you end up having to record your prompts for each language offered, but do you really want to write to sets of call flow?  Contact Center Scripts can get relatively complex very quickly.  If you apply the same solution to a Contact Center Script as you do an Automated Attendant Call Tree, you will end up having to create at least two scripts: one in English and one in the other offered language.

You will really want to focus on a single call flow and a single set of prompts.   Do you want to have the complexity of writing a script that says play “WelcomePromptEnglish.WAV” and then have to write the same call flow again, but this time the script says play “WelcomePromptSpanish.wav”.  As my Grandson says, “REALLY”?    Would it not be more economical to write and to maintain a script that simply said play “WelcomePrompt.wav”?    At some point you are going to have to ask the caller to press or say something to change their language choice.   How about we run the same script and the only thing that changes is the subdirectory that the prompts are retrieved from?   In this way we only have one call flow script to maintain and scripting writing is significantly relived of the duplication of effort that language options often require.

ShoreTel and CISCO both manipulate the language option in their respective script editors differently.  Here we take a look at how the Java based Script Library in the CISCO UCCX would implement a language option using a single call flow script.